Using the Freehand Roof Tools
Architect 3D includes freehand roof tools that provide versatility and power, when drawing complex roofing plans. Using the three-point and four-point freehand tools, roof sections are attached to walls, making it easy to draw them the necessary size the first time. After drawing roof sections, all parts of it can be customized, for example, pitch, placement, or shape. With the three- and four-point freehand tools you can specify a width for soffit.
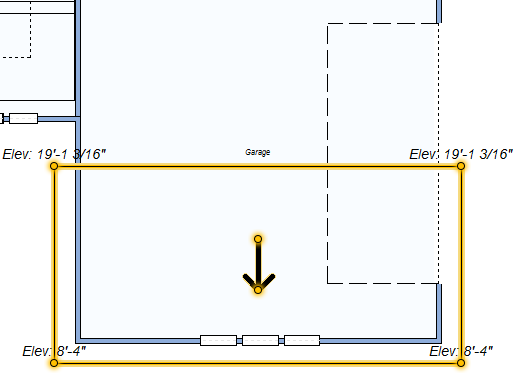
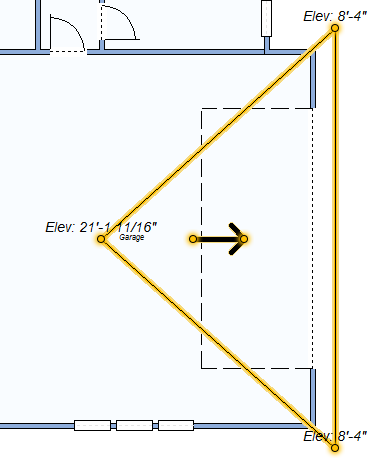
You can resize and reshape the roof by dragging end points. You can also drag the arrow in the center of the roof section to rotate it and change the direction of the roof slope, or right-click an edge and choose Set Slope to Edge to specify which edge of the roof slopes to the top of the wall.
The following freehand roofs are available:
- Freehand Roof
- Four-Point Freehand Roof
- Three-Point Freehand Roof
| Below are some references that may be useful as you design |
|---|
| Roof Properties, AutoSnap and Alignment Options, Elevating Objects, Wall Properties, Moving a Selection, Nudging a Selection, Applying Building Materials, Applying Paint Colors, Customizing Wall Framing Properties |
Freehand Roof
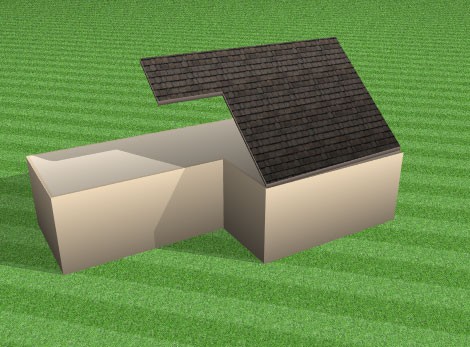
The Freehand Roof Tool allows you to create a roof section using a 2D shape draw method. You can set the pitch and the point to which the elevation is measured on the Properties pane before or after you add the roof. The elevation of each selected point of the roof section is notated; use these specs to match other roof sections.
To draw a freehand roof
1 Choose the Freehand Roof button  from the Roof Tools group.
2 On the Properties pane, choose how you want to draw the shape.
3 Use the Define 2D Shape drawing method to draw a freehand roof section.
 |
 |
|---|---|
Freehand roof drawn using the Closed Polygon draw method
Four-Point Freehand Roof
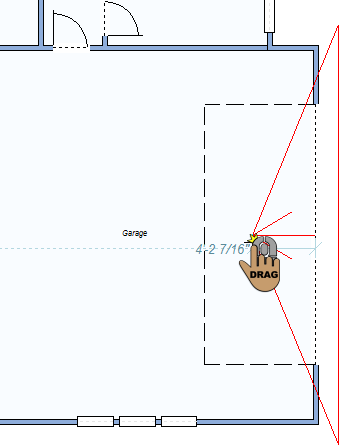
The Four-Point Freehand Roof Tool creates a rectangular roof section attached to a wall. The roof is drawn to cover the entire wall segment. You can define the pitch and the soffit settings on the Properties pane before you add the roof, and then edit the pitch and elevation after the roof has been placed.
As you draw the roof, a rubber band line is displayed and follows the pointer. This line signifies the direction the roof section will rise. Also, dimensions are displayed as you draw.
To draw a four-point freehand roof
1 Choose the 4-Point Freehand Roof button  from the Roof Tools group.
2 Position your cursor on a wall in the design window then drag away from the wall section. Release the mouse button to place.
Note : The elevation of each selected point of the roof section is notated; use these specs to match other roof sections.
 |
 |
|---|---|
Three-Point Freehand Roof
The Three-Point Freehand Roof Tool creates a triangular roof section attached to a wall. The base of the roof is drawn to cover the entire wall segment. You can define the pitch and the soffit settings on the Properties pane before you add the roof, and then, if necessary, edit the pitch and elevation after the roof has been placed.
As you draw the roof, a rubber band line is displayed and follows the pointer. This line signifies the direction the roof section will rise. Also, dimensions are displayed as you draw.

To draw a three-point freehand roof
1 Choose the 3-Point Freehand Roof button  from the Roof Tools group.
2 Position your cursor on a wall in the design window then drag away from the wall section. Release the mouse button to place.
Note : The elevation of each selected point of the roof section is notated; use these specs to match other roof sections.
 |
 |
|---|---|