Deck Properties
Decks are defined by their height, skirting, and handrails. You can edit the properties before you draw or after the component has been added to your design by selecting it and clicking the Properties tab in the right sidebar.
Note : Always press Return to accept new values in a field.
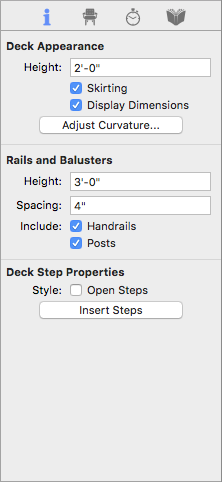
Deck Height defines the distance from the base of the deck to the top surface. Enter the Height, in inches or feet and inches. A positive number raises the deck, while a negative number lowers it. Fractions of inches are entered in decimal form. By editing the height of a deck you can create elaborate designs using multi-level decks.
Skirting checkbox controls if skirting is enabled around the sides of the deck. When selected, skirting is enabled. You can choose to include skirt trim on only certain sides, and also customize the skirting by applying colors or materials.
Display Dimension checkbox controls the display of dimensions in 2D. If automatic dimensions are not displayed for the entire drawing, the deck dimensions are not displayed. For details on controlling the automatic dimensions display “Dimensioning”
Adjust Curvature button controls curvature. For more information, see “Changing Curve Tension"
Handrails Height defines the distance from the bottom of the handrail to the top.
Spacing defines the distance between each baluster or spindle.
Handrails checkbox controls if handrails are included on the selected edge. When selected, handrails are enabled. You can include or remove handrails from one side of the deck or multiple sides.
Posts checkbox controls if posts are included at each point you clicked when drawing the rail. When selected, posts are included; when deselected they are excluded. You can add or remove individual posts using the Add Point and Remove Point Tools. For more information, see “Editing Detail Shapes”
Open Steps checkbox controls if step risers are included. When selected, risers are excluded; when deselected they are included.
Insert Steps button allows you to add steps to any side of your deck by selecting the deck edge and clicking Insert Steps. By default, steps are added to the center of the deck side, but can be moved easily into any position. To edit step properties, see “Staircase Properties”