Editing Detail Shapes
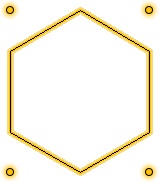
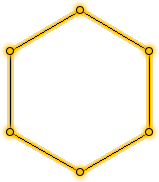
Object Level Editing is active by default. Object Level Editing, along with Point Level Editing, controls how your edits impact your object. When Object-Level is enabled, the entire object is selected; this is ideal for resizing an entire object. When Point Level is enabled, each control point on the object is selected; this is ideal for precision editing such as reshaping.
 |
 |
|---|---|
Object Points
To fine-tune your design further, use the Add Point or Remove Point tools. These tools are available anytime, but are especially useful when editing shapes.
To choose the edit level
1 Choose the Select Objects button from the Editing Tools group then click to select the shape you want to edit.
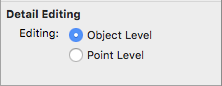
2 Click the Properties tab in the right sidebar and, under Detail Editing, choose Object Level or Point Level.
3 Drag a point to resize or reshape the selection.
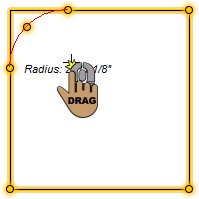
To fillet (round) a corner
Use the Fillet Corner Tool to create a round corner on an otherwise angled corner point. This allows you to manually set the curvature of a selected point.
1 Choose the Fillet Corner button  from the Editing Tools group and then click to select the cornerpoint you want to fillet.
2 Click the Properties tab in the right sidebar and choose Point Level editing.
3 Drag a corner point; hold down the mouse button and move the pointer toward the center of the element to define the curve you want.
4 Release the mouse to stop filleting the corner.
 |
 |
|---|---|
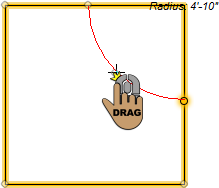
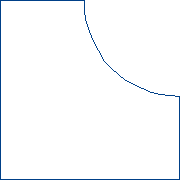
To inversely fillet a corner
You can use the Fillet Corner Tool to create an inverted round corner on an otherwise angled corner point. This allows you to manually set the curvature of a selected point.
1 Choose the Fillet Corner button from the Editing Tools group and then click to select the corner point you want to fillet.
2 Click the Properties tab in the right sidebar and choose Point Level editing.
3 Drag a corner point; hold down the mouse button and move the pointer toward the center of the element to define the curve you want.
4 Press and hold the Shift key to invert the fillet. The radius appears as you drag.
5 Release the mouse to stop filleting the corner, then release the Shift key.
 |
 |
|---|---|
To chamfer a corner
Use the Chamfer Corner Tool to create a straight edge where an angled corner point exists.
1 Choose the Chamfer Corner button  from the Editing Tools group and then click to select the corner point you want to chamfer.
2 Click the Properties tab in the right sidebar and choose Point Level editing.
3 Drag the point; hold down the mouse button and move the pointer toward the center of the object.
4 Release the mouse to stop chamfering the corner.
 |
 |
|---|---|
To add additional points
1 Choose the Add Point button  from the Editing Tools group. All of the points in your design are selected.
2 Position the crosshair where you want the point and click to add the point.
To remove a point
1 Choose the Remove Point button  from the Editing Tools group. All of the points in your design are selected.
2 Click the point you want to remove.