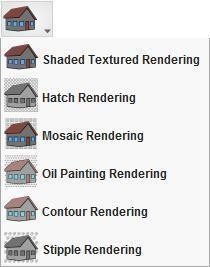
Accessing the Photo-Realistic Rendering Styles 
There are six Photo-realistic rendering styles available. To access the Photo-Realistic rendering styles, be sure Photo-Realistic Rendering mode is activated.
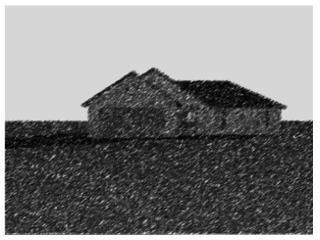
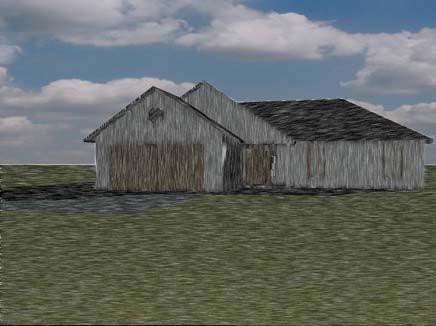
 Hatch the hatch style produces an effect similar to a shaded pencil drawing. The image is made up of a series of pencil “strokes” all in a similar orientation. All of the strokes are to provide shading - no lines are drawn.
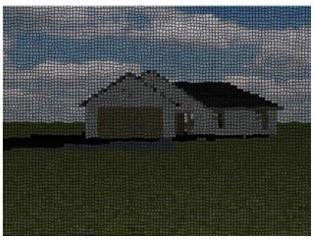
 Mosaic the mosaic style has the effect of rendering as though the design were constructed as a mosaic of small colored tiles.
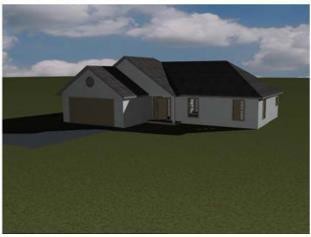
 Oil Painting the oil painting style creates an effect reminiscent of some impressionist painters, with individual blobs of paint of a single color applied across the canvas (which could be brush or palette- knife strokes). The overall image only resolves itself if you view from far enough away.
 Contour creates the effect where strokes and swirls of color reflect and represent the orientation of the underlying geometry. The effect may also resemble using colored pencils to shade the image (with the direction of the pencil strokes matching the underlying geometry at all times).
 Stipple the stipple style renders as a series of irregular dots, or stipples. The effect is similar to how photographs are reproduced in newsprint, only more pronounced.
To view a 3D photo-realistic rendering style
1. Click 3D menu > Rendering Mode > Photo-Realistic Rendering and then open a 3D View window.
2. In the 3D View window, click the Render Style button, then choose the rendering style you want.
(alternatively) Click 3D menu > Photo-Realistic Rendering > Rendering Style and choose the style you want.
Adjusting Photo-Realistic Rendering Quality
The photo-realistic styles that are available can be applied using one of the two render options: preview or final. Rendering in photo-realistic quality also applies any effects you may have selected for your design.
To render a Photo-Realistic preview 
Open a 3D View window and click the Render Preview button. This option renders a lower-quality, faster preview of the design.
(alternatively) Click 3D menu > Photo-Realistic Rendering > Render Preview.
To render in Photo-Realistic final quality
1. Open a 3D View window and then click 3D menu > Photo-Realistic Rendering > Render Final.
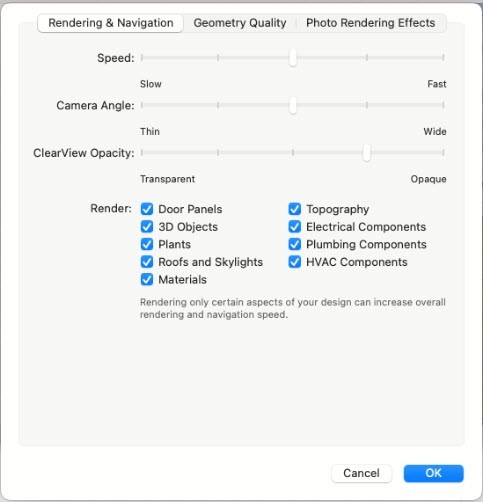
Setting Rendering Options
With Architect 3D Software you can customize the render quality of many of the customized features you use. By setting these features to lower render quality, you can speed up the rendering time.
To set the render options
- Open a 3D View window and click the Navigation and Rendering Options button on the 3D View window. The Design Options dialog box opens to the Navigation & Render Quality settings
(alternatively) Click 3D menu > 3D Rendering > Render Options.
- Drag the sliders to set the rendering quality for each feature you want to change and then click OK. Note: The lower the render quality is set, the faster the 3D View will render your design.
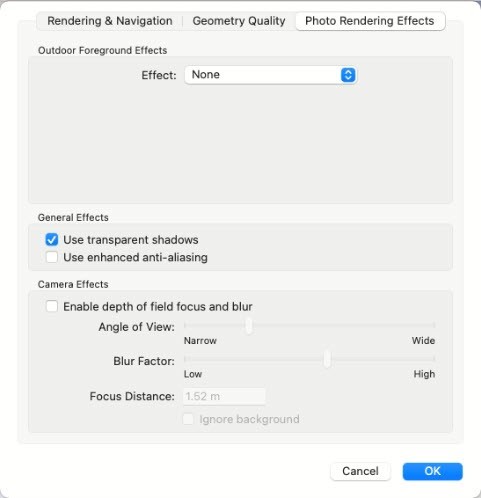
Setting Photo-Realistic Rendering Effects
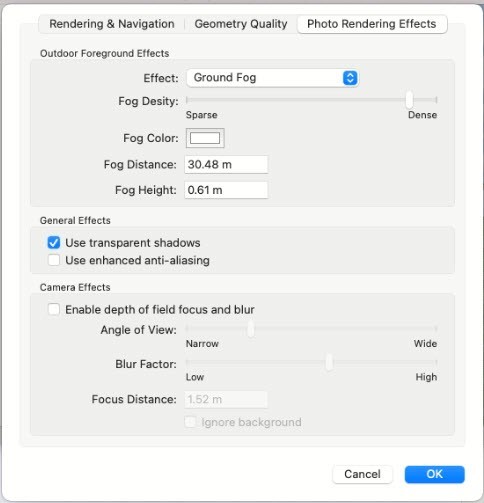
With Punch! Home Design Software you can apply outdoor effects to simulate fog and snow. These options are available from the Design Options window and are visible after rendering your 3D photo-realistic view
To add a fog effect to the exterior view
1. Open a 3D View window and click Design menu > Options. The Design Options dialog box is displayed.
2. Under 3D Preferences, click Photo Rendering Effects. The options are displayed in the right pane.
3. Click the Effect drop-down menu and choose Fog or Ground Fog. The fog effect options are displayed.

· Fog Density slider adjusts how sparse or dense the fog is displayed.
· Fog Color preview opens the Color window and allows you to select a color for the fog.
· Fog Distance controls how far the fog extends.
· Fog Height control how high from the ground the fog extends (only applies to Ground Fog).
· Select or deselect Use transparent shadows to enable or disable this option.
· Select to deselect Use enhanced anti- aliasing to enable or disable this option.
4. Click OK. To see the effect, render the drawing.
To add a snow effect to the exterior view
1. Open a 3D View window and click Design menu > Options. The Design Options dialog box is displayed.
2. Under 3D Preferences, click Photo Rendering Effects. The options are displayed in the right pane.
3. Click the Effect drop-down menu and choose Snow. The snow effect options are displayed.
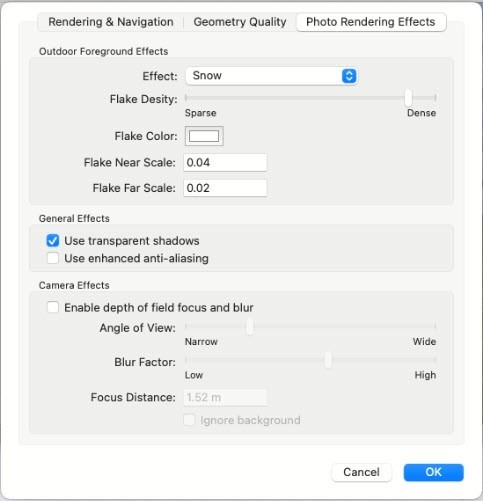
· Flake Density slider to adjust how sparse or dense the snowflakes are displayed.
· Flake Color preview opens the Color window and allows you to select a color for the flakes.
· Flake Near Scale determines the size of the closer flakes in the view.
· Flake Far Scale to determine the size of the further flakes in the view.
· Select or deselect Use transparent shadows to enable or disable this option.
· Select or deselect Use enhanced anti-aliasing to enable or disable this option.
4. Click OK. To see the effect, render the drawing.
Depth of Field Focus
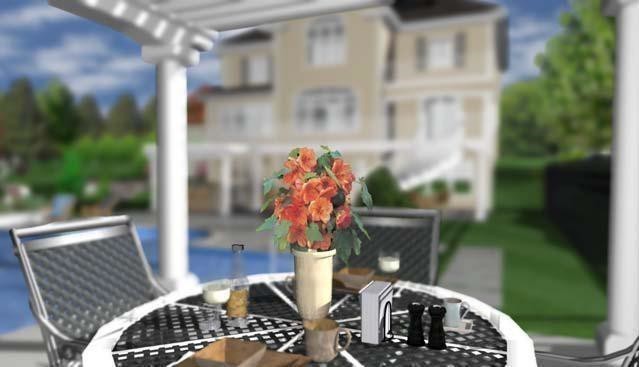
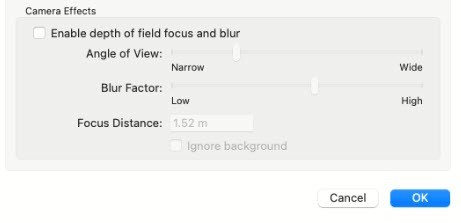
When Photo-Realistic rendering is enabled, you can adjust the depth of field focus settings to control the focus distance and how the non-focal space is displayed in your 3D view. The depth of field settings includes a focus distance, viewing angle width, and the amount of blur. The Focus Distance is the distance from the viewpoint to the point of focus in your drawing. You can measure this distance using the Virtual Ruler ) or one of the Dimensioning tools The Angle of View setting determines how narrow or wide the blur factor appears at the specified focus distance. The wider the setting, the more blur affects the scene. The Blur Factor setting controls how blurry the areas outside the focus distance appear.
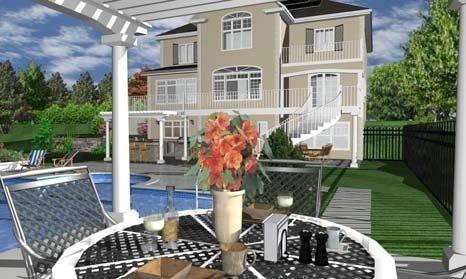
In this example, the Depth of Field is disabled. You can clearly see the foreground objects and the house in the background.
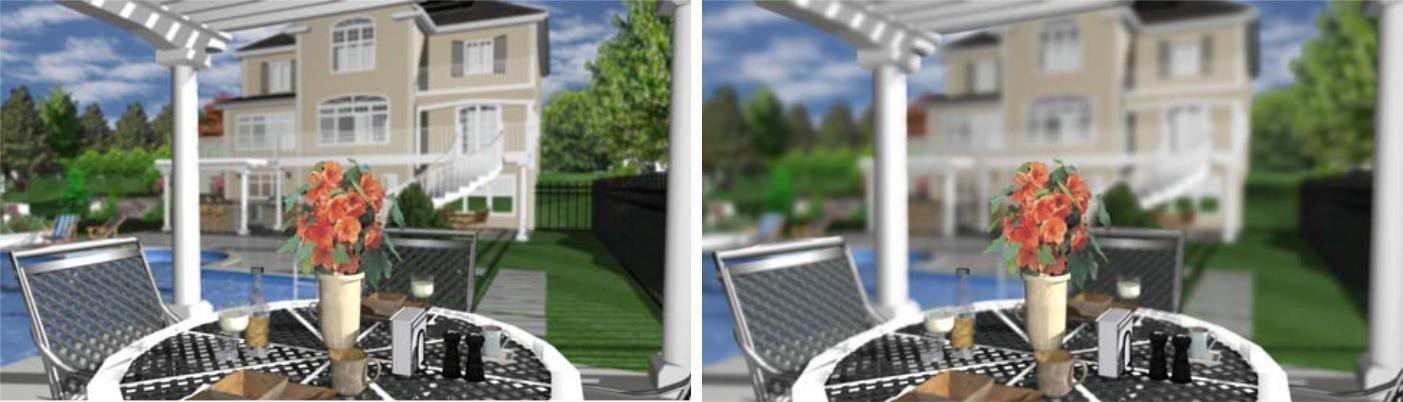
Depth of Field enabled with medium Blur Factor Depth of Field enabled with high Blur Factor
The focus is on the table in the foreground, which is very clear while the background is blurred.
To enable depth of field
1. Click 3D menu > Rendering Mode > Photo-Realistic Rendering and open a 3D View window.
2. Click Design menu > Options. The Design Options dialog box is displayed.
3. Under 3D Preferences, click Photo Rendering Effects. The options are displayed in the right pane.
4. Under the Camera Effects section, select the Enable depth of field focus and blur checkbox. The depth of field settings becomes enabled.
· Angle of View slider controls how narrow or wide the amount of space the blur occupies.
· Blur Factor slider controls the amount of blur outside of the specified focus distance area.
· Focus Distance text box defines the distance from the current viewpoint to the desired focus point.
· Ignore Background checkbox that controls whether the background image is rendered with the design. To include the background when rendering with the depth of field enabled, deselect the Ignore Background checkbox; to exclude, select the checkbox.
5. Click OK.
Rendering 3D Effects
The 3D Effects tab contains reflection and displacement effects, which can be applied to objects and surfaces in 3D.
You can see the effects using 3D Rendering when they are applied to surfaces such as floors, decks, and stairs, also flat surfaces on 3D objects. 3D Effects can also be rendered using the Photo-Realistic Rendering option.
To render 3D effects
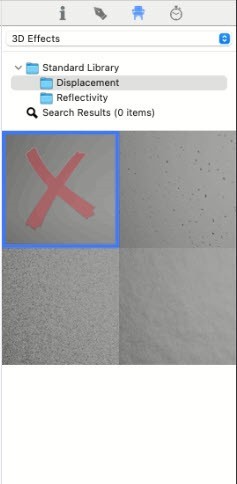
1. Click the Libraries tab and choose 3D Effects from the Libraries drop-down menu. The 3D Effects categories become available.
2. Click the Categories drop-down menu and choose Displacement or Reflectivity. Its contents are displayed in the Preview Bar.
3. Scroll through the options and drag and drop the effect you want onto the surface, in 3D.
4. Render the image to see the effect.
You can see the effects using 3D Rendering when they are applied to surfaces such as floors, decks, and stairs, also flat surfaces on 3D objects. 3D Effects can also be rendered using the Photo-Realistic Rendering option.
To render 3D effects
1. Click the Libraries tab and choose 3D Effects from the Libraries drop-down menu. The 3D Effects categories become available.
2. Click the Categories drop-down menu and choose Displacement or Reflectivity. Its contents are displayed in the Preview Bar.
3. Scroll through the options and drag and drop the effect you want onto the surface, in 3D.
4. Render the image to see the effect.
To remove a 3D effect
1. Click the Libraries tab and choose 3D Effects from the Libraries drop-down menu. The 3D Effects categories become available.
2. Click the Categories drop-down menu and choose Displacement or Reflectivity. Its contents are displayed in the Preview Bar.
3. Drag and drop the first option onto the surface in 3D.