Adding and Deleting Floors
You can add up to 20 floor levels to your design, depending on your software version. Each floor can be associated with the elevation and ceiling height of the floor below it, or independent of the floor below it. When floor levels are stacked on top of each other, making their height and elevations relative ensures that each level is positioned at the correct elevation so walls and other elements are easily placed accurately.
Adding Floors
The New Floor dialog includes options for setting the floor height, elevation, and how elevation adjustments affect existing floors on upper levels.
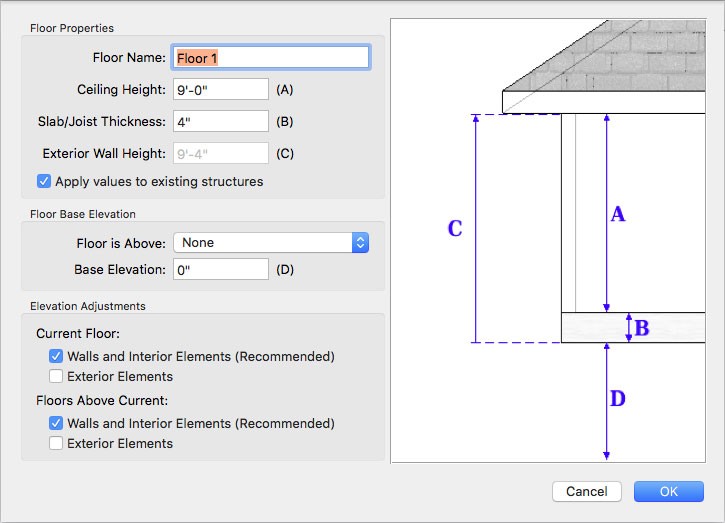
Floor Name type a unique name for the floor. This is displayed in the Floors pop-up menu.
Note : A default floor name is automatically populated in the field, but each floor name must be unique so only one floor can use the default name.
Ceiling Height type the height you want in the Ceiling Height field. Notice, the ceiling height affects the Exterior Wall Height value, which is the overall height of the wall.
Slab/Joist Thickness type the slab or joist thickness you want in the corresponding field. Notice, the value affects the Exterior Wall Height value, which is the overall height of the wall.
Floor is above pop-up menu specifies the new floor’s vertical position in relation to other floors.
- To add a new top floor choose the current top level floor.
- To insert between floors, choose the floor you want the new level to be above.
Note : When inserting a new floor, the “Controls elevations for floors above new floor” checkbox becomes active. When selected, the floors above the new floor are elevated based on the exterior wall height of the new floor. When deselected, the floors above the new floor are not repositioned.
- To add a new bottom floor choose None.
Note : When None is selected, the Base Elevation text field becomes available. Type the elevation you want for the base floor.
- Elevation Adjustments options specify whether or not you want the elevation adjustments to affect existing walls and interior elements, and exterior elements on the current floor and the floors above. When selected, the option is enabled. This option is only available when the “Controls elevations for floors above new floor” checkbox is selected.
Note : It is recommended that existing walls and interior elements are elevated automatically so
they maintain the same elevation as the floor they are on.
Copy perimeter walls to new floor from pop-up menu allows you to copy the perimeter walls from an existing floor level and draw them on your new floor level.
To add a new top floor or insert a floor
1 Choose Add/Insert Floor from the Floors pop-up menu. The Floor Properties appear.
2 Enter a descriptive name in the Floor Name field.
3 Define the floor’s ceiling height and slab/joist thickness in the corresponding fields.
4 Under Floor Base Elevation, select the Floor is Above pop-up menu and choose the position you want for the new floor.
Set the elevation options as needed, depending on the position of the new floor level.
(optional) If you want to copy the exterior walls from an existing floor to your new top floor, select the “Copy perimeter walls from” checkbox and choose the floor perimeter to copy from the pop-up menu.
5 Click OK to add the new floor.
Deleting Floors
You can delete any of your existing floors, however at least one floor must remain. When you delete a floor, all of the floor’s contents are deleted with it.
To delete a floor
1 Move the floor you want to delete and then choose Delete Current Floor from the Floors pop-up menu.
2 Click Yes to delete the floor.
The floor and all of its contents are removed from your design.