Elevating Objects
There are a number of ways to elevate objects in your drawing, from adjusting individual objects, to groups of objects, to an entire floor’s contents at once. When an entity is elevated to a nearby surface, it must be positioned on the object to which you want it elevated. For example, if you want to elevate a potted plant to a deck surface, drag the plant so it is positioned within the boundaries of the deck.
With the Object Elevation field, you can move selected items vertically by simply entering the elevation you want. This “on-the-fly” feature makes it a snap to ensure windows, doors, plants, and other elements, are in exactly the position you want.

Additionally, the Object Elevation field includes a pop-up menu of nearby objects and their detected elevation. This allows you to quickly and accurately place a selection at an existing elevation.
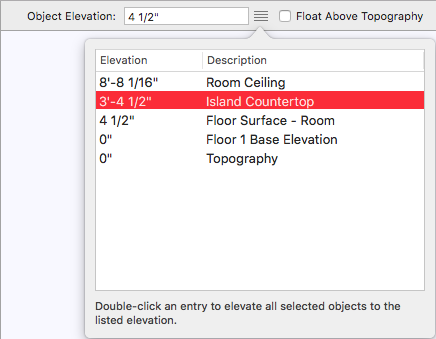
Note : To specify an amount in inches you may use either 18 or 18". To specify an amount in feet and inches they must be separated by a hyphen, for instance 18'-0", 8'-6", and so on. A single number like 20 will be understood as 20 inches.
To elevate an entity using the Object Elevation field
1 Choose the Select Objects button  from the Editing Tools group and then click to select the entity you want to elevate (hold down Shift as you click to select multiple entities). The Object Elevation field becomes active in the toolbar.
Note : If an object in the selection set is configured to float above the topography, deselect the checkbox to elevate the object(s) freely.
2 Type the elevation you want, in feet and inches, or just inches, then press the Return key. The selection is elevated based on the values you entered.
(alternatively) Click the Object Elevation pop-up menu and double-click the surface to which you want the entity elevated. The object is elevated.
To elevate an entity using the Set Elevation dialog
1 Choose the Select Objects button from the Editing Tools group and then click to select the entity you want to elevate (hold down Shift as you click to select multiple entities). T
2 Choose Edit > Elevate Object. A dialog appears.
3 Enter the elevation you want and click OK. The entities are elevated.
Note : If an object in the selection set is configured to float above the topography, deselect the checkbox to elevate the object(s) freely.
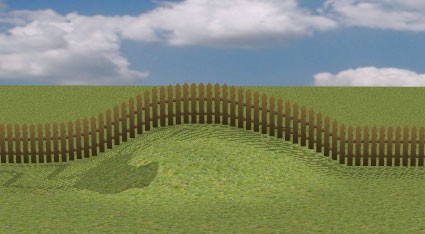
To make features follow custom topography
1 Choose the Select Objects button from the Editing Tools group and click to select the entity (or entities) you want to follow the custom topography.
2 Select the “Float Above Topography” checkbox in the toolbar.
 |
 |
|---|---|
Float Above Topography Disabled Float Above Topography Enabled