Floor Settings
When beginning a new project, you can start designing immediately using the default floor settings, or specify particular settings to be used throughout your design, such as the number of floors or ceiling heights.
By default, the Project Assistant launches automatically upon starting the application. You change the interface preferences so that the Project Assistant window does not appear. In this case, you can edit the floor properties from the Floors pop-up menu on the toolbar.
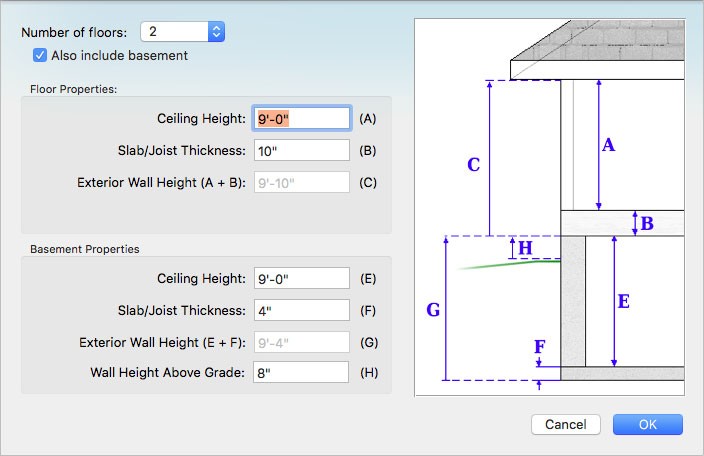
You have the option to specify the bottom floor as a basement. When this option is selected, the Basement Properties appear, and the diagram is updated to include a basement level.
To setup a project without a basement
1 From the Number of floors pop-up menu, choose the total number of floors you want in your project.
2 Under Floor Properties, enter the ceiling heights and slab/joist thickness in the corresponding fields. The exterior wall height is the sum of the ceiling heights and slab/joist thickness, so it is not editable.
3 Enter the ground floor slab/joist thickness in the corresponding field.
4 Click OK.
To setup a project with a basement
1 From the Number of floors pop-up menu, choose the total number of floors you want in your project.
2 Select the “Also include basement” checkbox. The Basement Properties appear.
3 Under Floor Properties, enter the ceiling heights and slab/joist thickness in the corresponding fields. The exterior wall height is the sum of the ceiling heights and slab/joist thickness, so it is not editable.
4 Under Basement Properties, enter the ceiling height and slab/joist thickness in the corresponding
fields.
The exterior wall height is the sum of the ceiling height and joist thickness, so it is not editable.
5 In the Wall Height Above Grade field, enter a value to specify how much of the basement you want to appear above grade.
Note : The Wall Height Above Grade value does not affect the overall wall height, it only specifies how much of the exterior wall height is above grade.
6 Click OK.
To control Project Assistant display
1 Choose Architect 3D > Preferences (or press Command-,).
2 Click the General tab and select the “Show the project assistant” checkbox to show the assistant when opening a new file or deselect the checkbox to hide the assistant when opening a new file.
3 Click Save.
4 from the When creating a new design pop-up menu, choose Start in QuickStart to open in QuickStart or choose Start with a blank design to open to the design window.
5 Click Save.