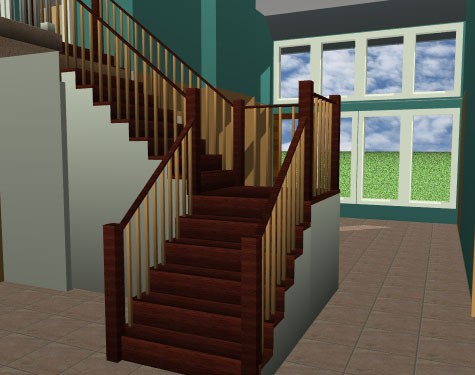
Placing a Staircase
As you create more than one floor in your design, you’ll want to draw a staircase. Straight staircases and curved staircases are drawn using the ceiling height, unless you specify a different height on the Properties pane before drawing the staircase. The center line of the staircase defines the direction and path of the staircase, while the staircase height value defines the distance to the top of the staircase.
To create an opening for the stairway in the upper floor, see “Adding and Removing Flooring”
After you’ve drawn your staircase, you can apply different colors and materials to the steps, railing spindles, posts, and handrails.
You can draw the followings types of staircases:
- Straight Stairway
- Curved Stairway
| Below are some references that may be useful as you design |
|---|
| Staircase Properties 2D Editing Methods Reshaping and Resizing 2D Objects Customizing Staircase Framing Properties Applying Paint Applying Building Materials |
Straight Stairway
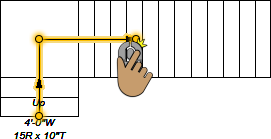
You can draw a staircase along a straight line or add multiple points to create an L-shaped or U-shaped staircase with landings. You can add as many points as you’d like to customize the shape of the staircase, however the overall height is controlled by the height property value. The number of steps in the staircase depends on the overall height of the staircase as well as the step height and depth.
Note : After a staircase if drawn you can reverse the direction by right-clicking the center line and choosing Reverse Staircase Direction.
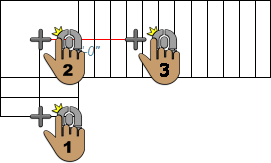
To draw a straight stairway
1 Choose the Straight Stairway button  from the Floor Tools group. Its properties appear on the Properties pane.
2 Click to set the start point and drag in the direction you want the stairs to rise, then click again to set the next point.
3 Continue to click points and drag to define the shape of the stairway and then right-click to place.
 |
 |
|---|---|
Curved Stairway
Curved staircases are a single segment that curve in the direction you draw. The number of steps depends on the overall height of the staircase as well as the step height and depth.

Note : After a staircase if drawn you can reverse the direction by right-clicking the center line and choosing Reverse Staircase Direction.
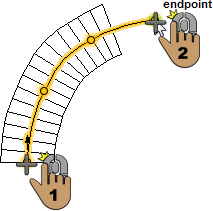
To draw a curved stairway
1 Choose the Curved Stairway button  from the Floor Tools group. Its properties appear on the Properties pane.
2 Click to set the start point and drag to set the curve in the direction you want the stairs to rise, then click and again to set the end point and place the staircase.
(optional) Hold down the Shift key while drawing to constrain stairs to a perfect arc.