(Available in Pro Platinum, Expert and Deluxe)
Default UI Menu: File/Publish To HTML
Ribbon UI Menu:
Enables you to export your drawing as an HTML file. You can export the whole drawing or any of its workspaces.
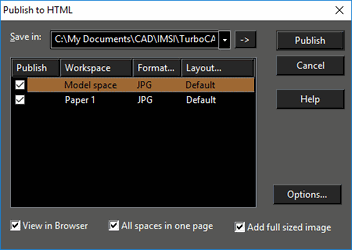 Save: Select the folder path or click the arrow button to browse. The .htm file will be created in this folder, as well as two subfolders to store the graphic images for Paper and Model Spaces.
Publish: Click to publish the selected workspaces to HTML.
Format: Sets the export format associated with each workspace. Click the column to open the format list. You can choose from .gif, .jpg, .png, .wrl, and .dwf.
Save: Select the folder path or click the arrow button to browse. The .htm file will be created in this folder, as well as two subfolders to store the graphic images for Paper and Model Spaces.
Publish: Click to publish the selected workspaces to HTML.
Format: Sets the export format associated with each workspace. Click the column to open the format list. You can choose from .gif, .jpg, .png, .wrl, and .dwf.
Note: To display .wrl and .dwf formats, you need to have an application that will transfer such drawings to your Internet browser. Otherwise you may receive a warning message.
Layout: Click the column to open the format list, and select either Default or Custom. If Custom is selected, you can define the custom layout after clicking Publish. View in Browser: Launches the default Internet browser to show the HTML you created. All spaces in one page: All selected workspaces will be placed on the same HTML page. Add full sized image: The graphic will be created with the settings defined in the Maximum size in pixels control group of the Options dialog. Options: Opens the Publish to HTML Options window.