
Default UI Menu: Draw/Block/Block Attributes
Ribbon UI Menu:
A block attribute is AutoCAD- informational text associated with a block, that you can enter whenever you insert a block. TurboCAD reads and displays block attributes from AutoCAD drawings (DWG) and DXF files.
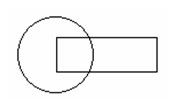
- Create the objects that comprise the blocks.
(You can also add a block attribute after a block has been created, in Edit mode. This is done the same way as adding another geometric object.
-
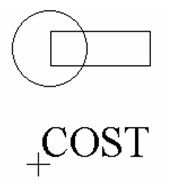
Select Block Attribute Definition. Select the start point for the text, preferably on or near the block objects.
-
Type the "tag" name for the block attribute, such as "COST." This name is used to uniquely identify the attribute within the block, since more than one attribute can be created. If the drawing will be sent to AutoCAD, do not use spaces (use underscores instead).
Note: This tool works like the text tool, in terms of alignment and local menu options.
- Enter the prompt and default value in the Inspector Bar, or you can enter these properties later. For example, the Prompt can be "How much does it cost?" and Default can be $0.00.

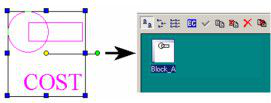
- Press Enter to finish the definition. You can create multiple attributes, such as Part Number, Owner, etc.
Once the block attribute is created, you can open its Properties to add or change the Tag, Prompt and Default values, as well as Mode.
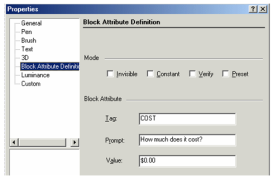
Mode: Affects how the dialog appears when the block is inserted: Invisible: The text of the block attribute is not displayed in the drawing. You can see the information in the Selection Info Palette or edit it by displaying the block's properties.
Warning: When you explode a block containing invisible block attributes, the information is lost.
Constant: The attribute value is fixed and unchangeable. It is shown to you during block insertion. Exploding the block will turn the block attribute into text that can then be edited. Verify: Prompts you to verify that the attribute value is correct when you insert the block. In AutoCAD, the attribute value is shown for your verification during block insertion if the AutoCAD variable ATTDIA is set to 0. This flag has no effect in TurboCAD as it takes place in AutoCAD when the variable ATTDIA is set to 1. Preset: Sets the attribute to its default value when you insert a block containing a preset attribute. In AutoCAD, you are not prompted for a value if the AutoCAD variable ATTDIA is set to 0. This flag has no effect in TurboCAD as it takes place in AutoCAD when the variable ATTDIA is set to 1. When the block attributes are defined, simply include them in the selection of objects that will make up the new block.
Setting Block Attributes
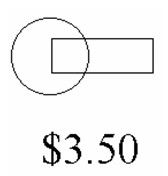
When you insert a block that has one or more attributes, a window will appear that gives the prompt and offers the default value. For example, the prompt says "What does it cost?" the default value is $0.00. The value can be changed to another value, in this case, $3.50.
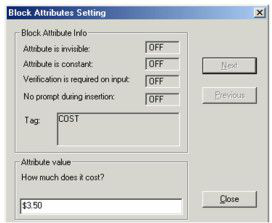
For multiple attributes, use the Next and Previous buttons to set values for all of them. When the block is inserted, the value is included with the objects.
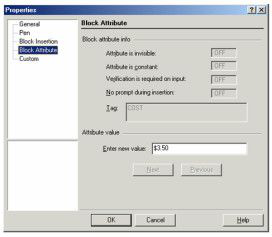
When a block has attributes defined, its Properties will contain an additional page - Block Attribute. You can edit each attribute value in this window, using the Next and Previous buttons to scroll through multiple attributes.
Sync Attributes
Sometimes it is necessary to add attributes to blocks after many instances of the blocks have already been inserted into the drawing. In this case the new attributes are not automatically added to the prior insertions. The Sync Attributes button will add the new attributes to the older blocks.
The values for these newly synced attributes within the older blocks will be the default value you assign to the attribute when you create it and it will blank if no value is assigned. For blank attributes you will have to select the existing blocks and assign values to those attributes.
Extracting Block Attributes
If you attach attributes to blocks, you can extract these attributes and display them in a table. You can also export the attributes to a report in an external file.
Note: If you want to create a schedule for architectural elements in your file (walls, slabs, windows, or doors), without defining block attributes.
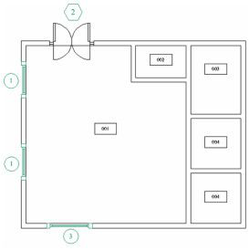
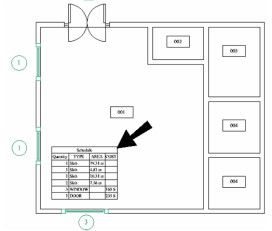
This example has three blocks used to mark windows, doors, and slabs.
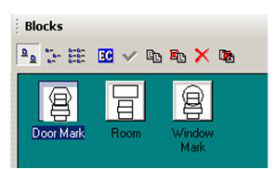
Here are the three blocks in the Blocks Palette.
- Select Extract Attributes. In this window you can select the blocks and attributes that will be included in the schedule or report.
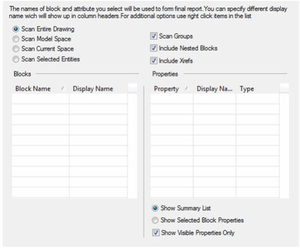
Note: You can re-order a a column by dragging its header to the new location. Scan Entire Drawing: Attributes will be extracted from all paper spaces and model space.
Scan Model Space: Attributes will only be extracted from model space.
Scan Current Space: Attributes will be extracted from the current model space or paper space.
Scan Selected Entities: Attributes will be extracted only from currently selected objects.
Scan Groups: If any groups contain blocks, these blocks will be scanned for attributes.
Scan Nested Block: If blocks contain nested blocks, these nested blocks will be scanned for attributes.
Include Xrefs: The content of Xrefs will also be scanned. The Blocks list contains all blocks that have attribute definitions. The Properties list all attributes found for the blocks checked in the Blocks list.
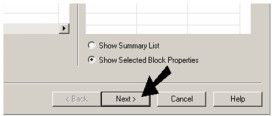
Show Summary List: The Properties list contains all attributes for all blocks checked in the Blocks list.
Show Selected Block Properties: The Properties list contains attributes only for the block that is currently checked in the Blocks list.
Show Visible Properties Only: If selected only attributes that are visible will be shown.
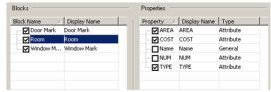
- You can select attributes for each block that will be included. For example, click Show Selected Block Properties at the bottom, and select the "Door Mark" block. Check only the "COST" and "TYPE" attributes.
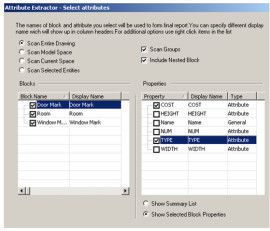
- Select the "Room" block and check "AREA," "COST," and "TYPE."
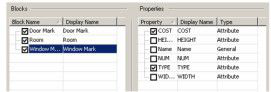
- Select the "Window Mark" block and check "COST" and "TYPE."
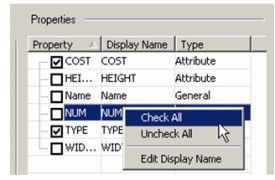
You can right-click on any field under Blocks or Properties to get a popup menu in which you can check or uncheck all, or change the display name.
- When the blocks and properties are defined, click Next.
TurboCAD scans the file, and the Preview window displays the results.
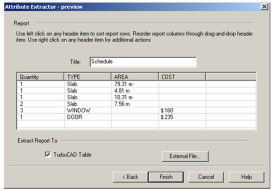
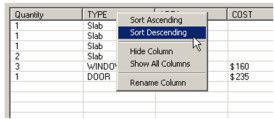
If TurboCAD Table is checked, the report will be inserted into the file. If you want to export the results, click External File. You can click on any column header to change the sorting order, or hide or rename a column.
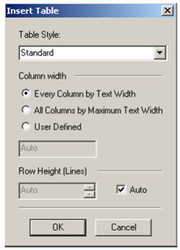
- Click Finish. If the table is to be inserted into TurboCAD, you will see the Insert Table window. Here you can define the column and row sizes.
- Click OK, and then click where you want to place the table.
You can make changes to the table formatting in the Selection Info palette.