Default UI Menu: File/Print Styles
Ribbon UI Menu:

Enable you to change color, line style, and brush of an object when you send the drawing to print. These settings do not affect the objects on the screen, only how objects are printed.
Print Style Manager
Default UI Menu: File/Print Style Manager
Ribbon UI Menu:

Print styles can be created, modified, or imported via the Print Style manager.
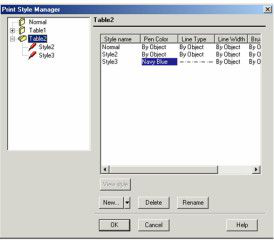 View Style: Opens the Properties window for the selected style.
New: Enables you to create a new table, or a new style within the selected table. You can also duplicate items, and import AutoCAD plot styles.
View Style: Opens the Properties window for the selected style.
New: Enables you to create a new table, or a new style within the selected table. You can also duplicate items, and import AutoCAD plot styles.
Note: These features are also available by right-clicking in the table list area.
Delete and Rename: Removes or renames the selected table or style. Deleting a style cannot be undone.
Print Style Properties
To access the properties of any print style, select the style and click View Style.
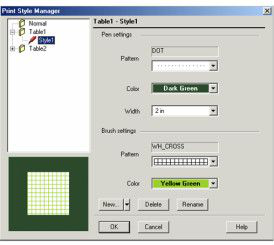 Pen Settings: Sets the pattern (line style), color, and width for the pen that will be applied to an object during printing.
Brush Settings: Sets the pattern and color for filling objects during printing. This only applies to objects to which a brush has been assigned.
Pen Settings: Sets the pattern (line style), color, and width for the pen that will be applied to an object during printing.
Brush Settings: Sets the pattern and color for filling objects during printing. This only applies to objects to which a brush has been assigned.
Applying Print Styles
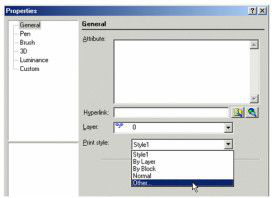
Once print styles have been created and/or modified, you can add them to your drawing via the Print Style page of the Drawing Setup (Options / Print Styles). While in Paper Space, you can also access this page through the Properties window. An object's print style is set in the General page of its Properties. Select "Other" from the drop-down menu to open the Print Style manager.
Note: Certain types of objects cannot display print styles.