Path Hatching

Default UI Menu: Draw/Hatches/Path Hatching
Ribbon UI Menu:
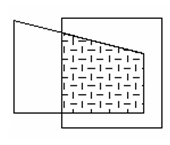
Applies a hatch pattern to a closed boundary of segments, defined manually.
-
Set the hatch pattern by opening the Properties window of the Hatch tool. On the Brush page, select the pattern and other hatch parameters.
-
Activate Path Hatching.
-
Select points to define segments of the boundary. The points do not have to lie on existing objects; they can be anywhere. A magenta line indicates the progress of the boundary.
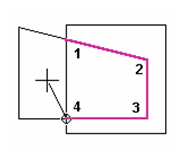
- Select the first point again to close the boundary, or select Close from the local menu or Inspector Bar.
Local menu option: By Entity: Use this option to select the entire perimeter of an object. If you have already selected boundary points, By Entity will select the perimeter up to the next point. This is especially useful when you are trying to hatch curved objects.