Point Select Mode

Shortcut Key: Ctrl+1
Toolbox Icon:
Point 1: Set a point on the entity you want to select.
With Point Select Mode active, you can select one or more objects; move individual points; select a group of points and move all of them at once (even in more than one object); add or delete points to and from a single selected object; or cut a line or curve into two pieces.
Selecting Objects
To select an individual object in Point Select Mode, simply click on the object. If another item is selected already, the first will be deselected and the second will be selected instead. You can press the Shift key and click on other items to add or remove them to or from the selection set.
NOTE: Point Select Mode will not allow you to select objects with a selection rectangle. The reason for this is that if multiple points are to be manipulated once the objects are selected, the points are specified with a selection rectangle.
Moving Individual Points in Selected Objects:
Select the object. If you are not in Point Select Mode, choose the command from the Options menu, or press Ctrl+1. The points in the selected object are highlighted with small boxes, and the cursor turns into an arrowhead with no tail.
Move the cursor over the point you wish to move. The cursor changes shape into a circle with cross hairs through its center. Click on the point, then move the cursor to the desired position and set a point there. The advantage of this method is that once you have clicked on the point, you can use Point Polar, Point Relative, or Point XY (Point XYZ in 3D Mode) to move the point to an exact location. Alternatively, you can click on the point and hold down the mouse button and drag the point, only releasing the left mouse button when the point is where you want it.
Moving a Group of Points:
Select the object(s) to be manipulated. Press and hold the left mouse button and drag a selection rectangle around the points you wish to select.
Release the mouse button. The small boxes turn.
NOTE: Point Select Mode will not allow you to select objects with a selection rectangle. The reason for this is that if multiple points are to be manipulated once the objects are selected, the points are specified with a selection rectangle.
Moving Individual Points in Selected Objects:
Select the object. If you are not in Point Select Mode, choose the command from the Options
solid for each point selected in this manner. If the points do not all lie in a rectangular region, select some with a rectangle, then press Shift and drag a selection rectangle around the other points.
NOTE: You must select even single points using the Shift key and a selection rectangle if you wish to add them to a set of selected points.
Now that your points are all selected, move the cursor over any of the selected points. The cursor turns into a circle with cross hairs. Click once and move the cursor; DesignCAD shows a rubber- band representation of the moving points. Set a second point for your desired destination. All of the selected points are moved, and the shapes of the objects containing those points are updated.
Adding a Point to a Single Selected Entity:
Select the entity and enter Point Select Mode. Move the cursor near the object you want to modify. When you are in range the cursor will turn into an arrow with a “+” sign in the arrowhead. Click at the location where you want to add a point. As you move the cursor, a rubber-band line will follow, indicating the
shape the object will have. Click again to place the new point where desired. To add the point without changing the shape of the object, set the first point, then use the Line Snap command to snap to the same location (Gravity will not work, because the point is not defined yet!).
NOTE: This function only works for lines or curves
and when there is only one item selected. Entities that cannot be modified this way will never show the arrow cursor with the “+.”
Extending the End of a Selected Line:
Select the line and switch to Point Select Mode. Move the cursor near one endpoint, and press the Shift key. If this is the first or last segment of the line, the cursor will turn into an arrow with three dots at its tip. Click the line, and release the Shift key. As you move the cursor, a rubber-band line shows the line extended to the cursor’s location.
You can shorten or lengthen the segment, or make it go backwards. When the rubber-band line is the desired length, click again. The extended line will be redrawn.
NOTE: This function only works on lines, and only on the first or last segment.
Deleting a Point from a Selected Object:
Select the object. If necessary, enter Point Select Mode. Press Ctrl+Shift. Move the cursor over the point you wish to delete. The cursor turns into a cursor with a - on it. Click on the point. The point is erased, and the object is redrawn.
Cutting a Selected Object into Two Pieces:
Select the object (this works with a line or curve, also with an arc, or circle if they are saved as a line). If necessary, enter Point Select Mode. Press Ctrl. Move the cursor to where you want to cut the object (this does not have to be a pre-defined point). The cursor becomes a tiny pair of scissors. While pressing Ctrl, click the left mouse button. The object is cut at the selected point.
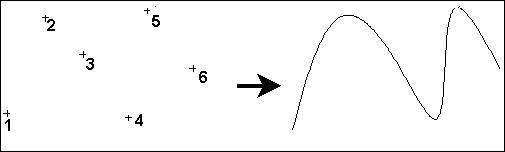
Example: Add a point to a line.
Enter Point Select Mode. Move the cursor near the line. Click the left mouse button to select the entity. Once the points are showing, move the cursor onto the line. The cursor will have a + in it when it is on the line. Click the left mouse button. Move the cursor to the desired position for the new point on the line. Click the left mouse button to set a point. A point is added to the line.