Getting Started with TurboLux
(Available in Platinum, Professional, and Deluxe)

TurboLux is a physically based rendering (PBR) solution exploiting state-of-the-art algorithms that simulate the flow of light according to physical equations. Also introduced are a new set of physically based materials with parameters based on the optical properties of metals, glass, matte, glossy, and transparent surfaces. PBR lighting and materials combine together to produce stunning images of photographic quality. Key advantages of using TurboLux include:
• Physically based rendering engines for accurate lighting (four types)
• Support for physical based materials with normal, roughness, and bump channels
• Heterogenous computing utilizing all your CPUs and supported GPUs
• Caustic support for tracing light paths and sampling methods
• Post process effects for denoising, gamma correction, and tone mapping
• New Gemstone library based on physical properties of gems
• Updated Metal library based on Fresnel properties
• Updated Luminance Editor for creating and editing lighting environments
• Additional shader options (volumes, bands, mix, cloth, car paint, glossy coatings)
System Requirements
TurboLux has specific requirements for taking advantage of your computer’s GPU (Graphics Processing Unit). When running TurboLux, the OpenCL (GPU-based) modes require an NVIDIA graphics card or GPU that supports either OpenCL 1.2 or later, or NVIDIA’s CUDA version 10.0 or later. It is recommended that you install the latest driver updates before using TurboLux rendering.
Key sections in this guide include:
-
User Interface Components
-
Luminance and Lighting
-
Creating and Editing Materials
-
Transitioning from Lightworks®
User Interface Components
Accessing the features of TurboLux is accomplished through four, key dialog/palettes. These four dialogs include:
-
TurboLux Engine: Rendering engine such as enabling of GPU rendering halt time and post processors.
-
TurboLux Scene: Default lighting setups for sun, sky, and HDR maps.
-
Camera: Assign TurboLux rendering for draft or advanced cameras
-
Luminance: Creating predefined lighting groups and environments
Further details of these four key interfaces follows:
TurboLux Engine
Located in Options/TurboLux Engine
All basic settings for TurboLux can be made with this dialog box. Settings include, Platform, Draft Render Settings, Quality Render Settings, Tone Mapping, Gamma Correction, and Logging settings.
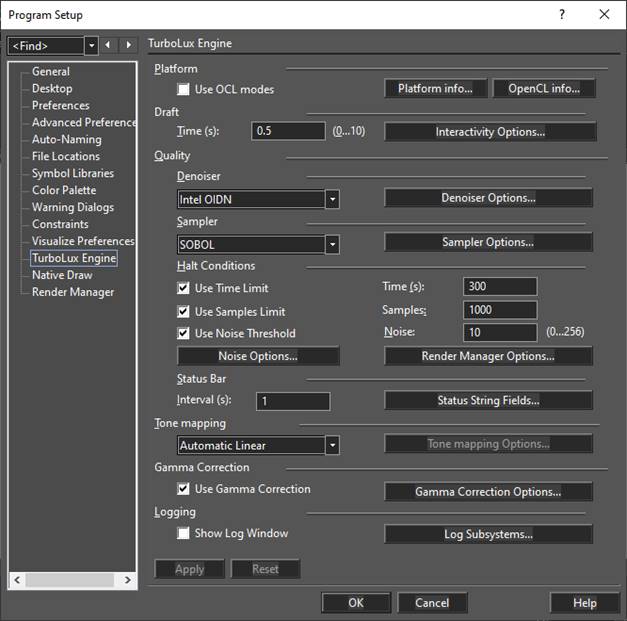
If you are going to taking advantage of your computer’s GPU, in the Platform section of this dialog, you must tick the ‘Use OCL modes’ box. You will be prompted with the following message:

If you are not going to do any GPU-based rendering or your computer does not include a supported GPU, you do not need to make any changes to the TurboLux Engine default settings.
More details on sub-settings can be found here.
TurboLux Scene
Located in Option/TurboLux Scene
All lighting settings and associated scenes can be changed via TurboLux Scene dialog box available in Drawing Setup.
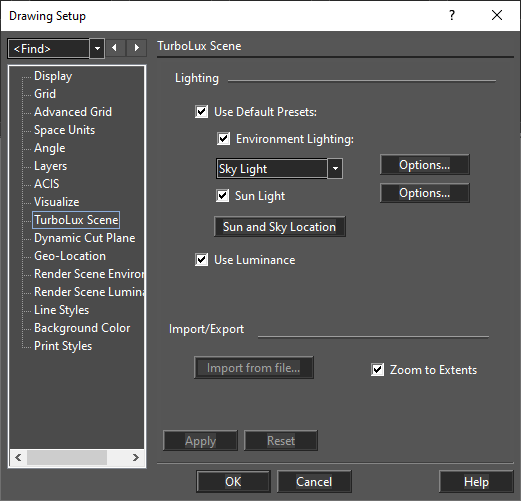
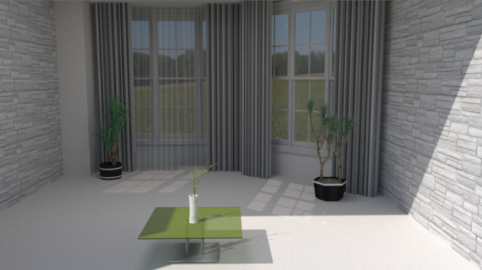
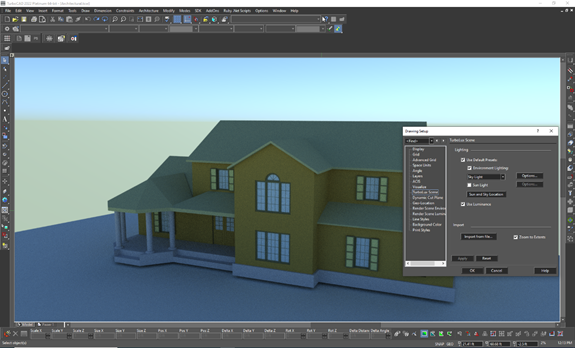
The default Lighting settings are optimized for an exterior (outdoor) scene, with the Environmental Lighting drop down menu set to Sky Light’ and the ‘Sun Light’ option enabled. For example:
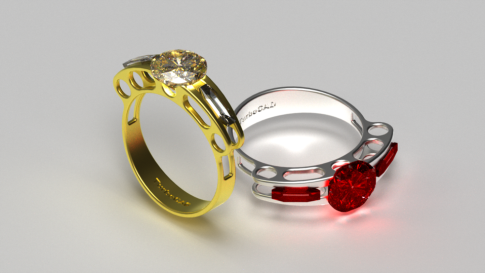
If you want to optimize your rendering for an Indoor Architectural drawing or for a Studio-type image (Jewelry, Wood working, mechanical part, hobby design, etc.), you will need to change the Environmental Lighting setting and disable the Sun Light option.
To do this, choose the Environment Map option from the Environment Lighting drop down menu:
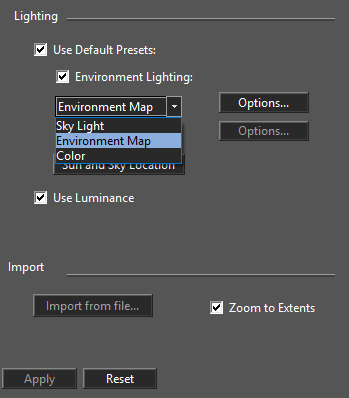
Next, click on the Options button to the right of Environment Lighting, to insure that there is a TurboLux Scene file associated with this chosen Lighting. If there is no file loaded, click on the ‘three dots’ icon. This will take you to folder where these files are located. Choose the file named studio_001.hdr
More details on sub-settings can be found in TurboLux Scene section.
Camera
Located in View/Camera/Properties
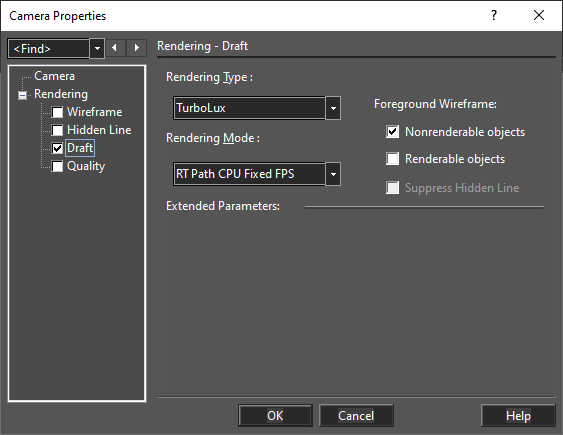
The TurboLux Render Type has been added to the Draft Render and Quality Render options in the Camera Properties menu.
TurboLux in Draft Render:
Several Rendering Mode options are available when the TurboLux Render Type is chosen If OCL has not been enabled in the TurboLux Engine dialog (see above) then one, CPU-based rendering option will be available: RT Path CPU Fixed FPS.
If OCL has been enabled, you will see two OCL, or GPU-based Rendering Mode options:
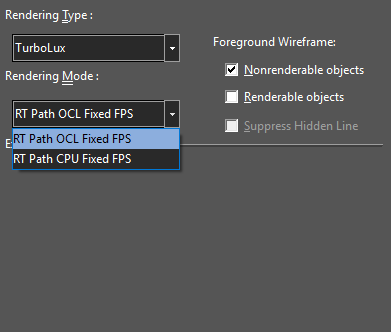
with RT Path OCL Fixed FPS as the default
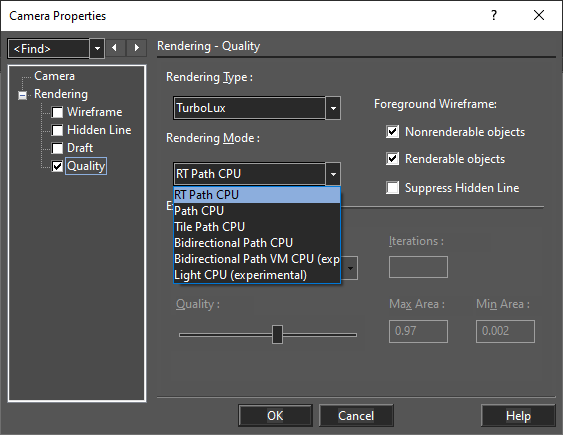
TurboLux in Quality Render:
Similarly, if the Quality Render Mode is ticked and TurboLux is selected, then multiple Rendering Mode options are available for both CPU and GPU-based rendering For CPU: RT Path CPU, Path CPU, Tile Path CPU, Bidirectional Path CPU, Bidirectional Path VM CPU, Light CPU. For GPU: RT Path OCL, Path OCL and Tile Path OCL.
Luminance and Lighting
Advanced/custom lighting accessed via Luminance
In addition to the Lighting controls discussed in the above TurboLux Scene section, the lighting of the render scene environment is controlled via Luminance. These settings can be accessed in one of three ways: through the Luminance Palette (Tools/Luminance Palette), via the Render Manger (Tools/Render Manager or through Properties, in the right-click Local menu)
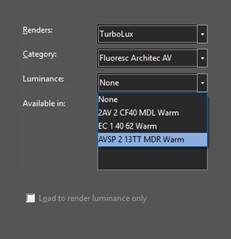
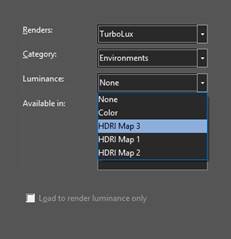
Renders: Select which render engine you wish to select a material from: All and TurboLux.
Category: Contains light types (Floresc Architec AV, Single and Sky) or a Render scene Environment Groups of Luminances such as Environment, Floresc Architec AV, Single, Sky, or the name of an open drawing.
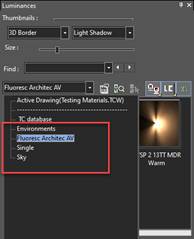
Luminance: If a light is chosen from the Category drop down, then a list of lighting effects or sub-options will be displayed for that Light type. If ‘Environments’ is chosen from the Category drop down, then a list of different Render Scene HDR options will be displayed
Light type selected Environments selected
 |
 |
Available In: Shows which of the render engines have definitions for the selected luminance.
Load to render luminance only: If on, the geometry of the luminance object is hidden and only the illumination effects are shown.
Edit... Opens the Render Manager which allows you to edit either the selected Light or Luminance Environment.
Editing Luminance
Luminance can be edited via Luminance Palette or directly through the Render Manager.
If using the Luminance Palette, select a Luminance Environment or Light in the Luminances Palette, right-click and select Edit TurboLux Luminances from the local menu.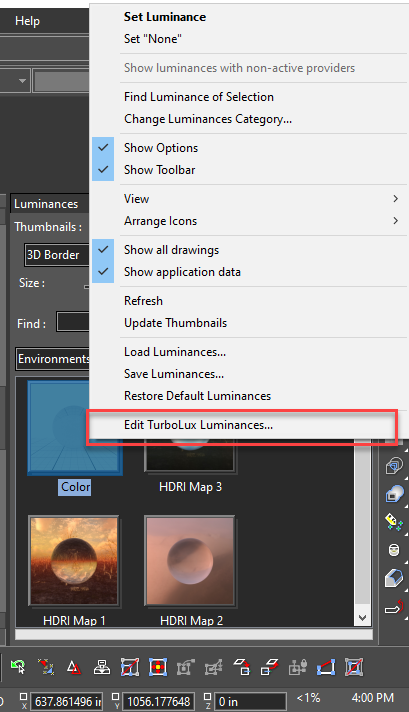
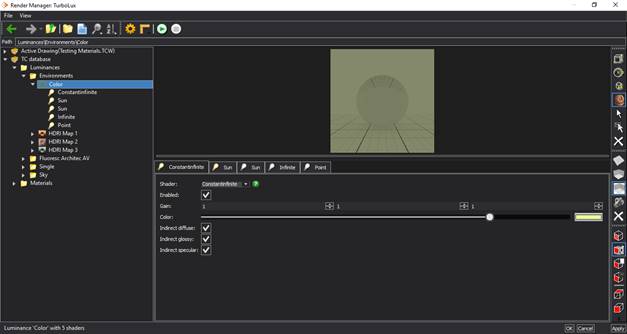
Render Manager opens, letting the user edit Luminance.
Right clicking on tree elements provides a variety of functions. Right clicking on Luminances allows you to:
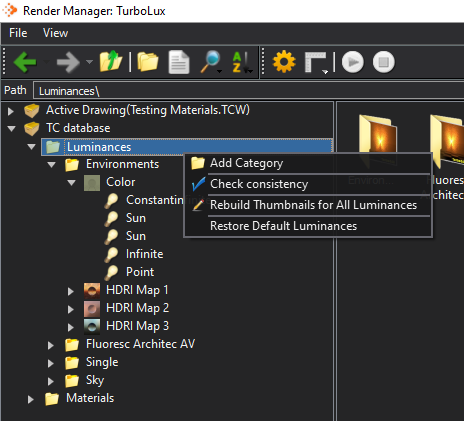
· Add Category
· Rebuild Thumbnails for all Luminances
· Restore Default Luminances
Right clicking on a Category allows you to:
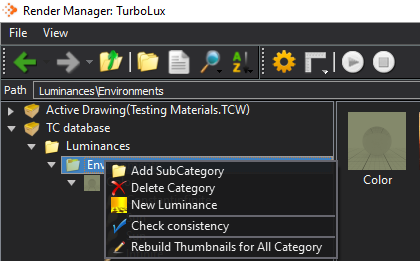
· Add SubCategory
· Delete Category
· New Luminance
· Rebuild Thumbnails for all Category
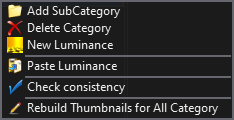
If a luminance has been copied you will also be allowed to:
· Paste Luminance
Right clicking on a Luminance allows you to:
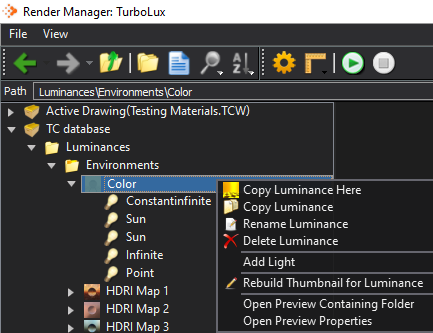
· Copy Luminance Here – adds a copy of the selected luminance to the bottom of the current category.
· Delete Luminance
· Rename Luminance
· Copy Luminance – Copies the luminance so it can be pasted elsewhere.
· Add Light – Adds a light to the selected luminance.
· Rebuild Thumbnail for Luminance
Complex luminances can contain up to five light types; each type is represented by a page on the Luminance Editor. For each page, select the desired light type, and edit its parameters as needed.
The available parameters depend on the selected light type. In the Preview section, you can change the shape and orientation of the preview object and desk (the surface beneath the object). Under Options, you can toggle the display of the preview object or desk. If Auto Update is checked, the preview will update each time a change is made (otherwise you must click the Preview button).
You can navigate within the preview window using the center mouse button.
Light Types
Following are the TurboLux Light Types that can be edited via Render Manager.
o Sun
o Sky2
o Infinite
o Point
o Mappoint
o Sphere
o Mapsphere
o Spot
o Projection
o Constant Infinite
o Sharp Distant
o Distant
o Laser
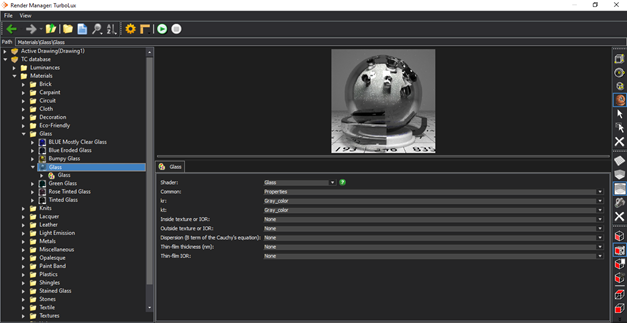
Creating and Editing Materials
Drag and Drop Materials
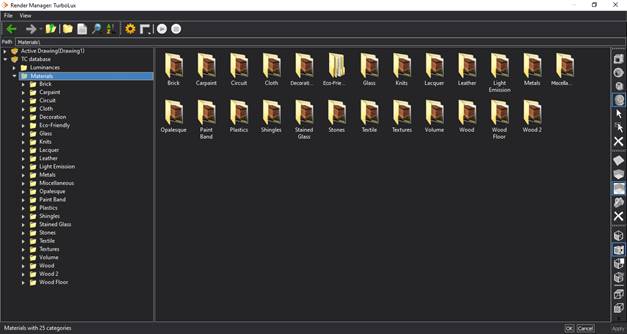
Several material categories with procedural shaders are a part of TurboLux materials libraries.
Materials can be accessed through Render Manger or Materials Palette.
More details on the material types can be found here.
Creating & Editing Materials
Materials can be created or edited via Materials Palette or Render Manager.

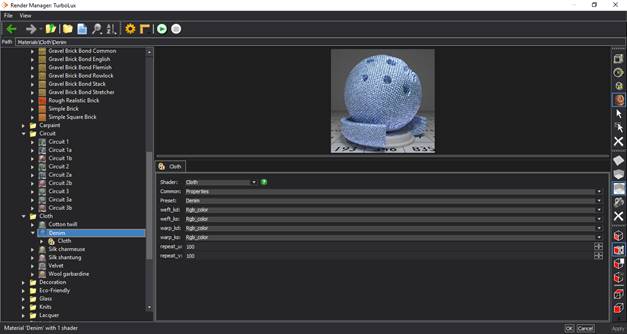
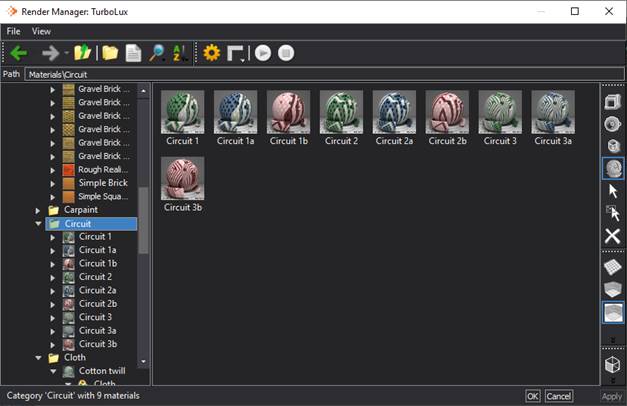
Expanding a folder will show sub-folders and/or names for Materials or Luminance, etc. The list on the left will show tiny thumbnails next to the name (if available) and larger thumbnails in the right-hand pane. If no thumbnails are available, a simple box with a warning sign is used to represent the item.
Clicking on a Material name (or Luminance, etc.) will expand and show the list of shaders used. The right-hand window will split showing the thumbnail in the top pane and the shaders in the lower window. You can double-click the shader to open its properties or click on the shader name in the left-hand list. With the ability to resize the window, scrolling within some property lists can become a thing of the past. The Status Bar at the bottom will display information about the selected item. OK will save your changes and Cancel will exit the editor without saving. As of this writing, the Apply button will only update the thumbnail in the palette, but not the drawing or items in the drawing as before.
Tree Context Menus
By right-clicking on a Material folder, you will expose additional Folder and Material options:
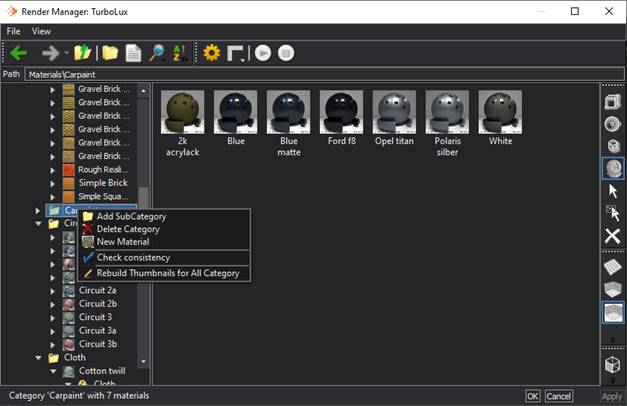
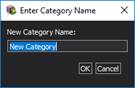
Add Sub Category: Name and add a sub-category to the selected category. It will create a Carpaint "Default" material (this can be renamed). A category has to have a least one material in it.
Delete Category: This deletes the selected category and its objects, plus any sub-categories. There is no Undo.
New Material: Name and create a new material. Initially, this will be a matte white material.
Rebuild Thumbnails for All Category: This rebuilds thumbnails only for materials in the category, not materials in sub-categories (if present), using the last used Preview settings.
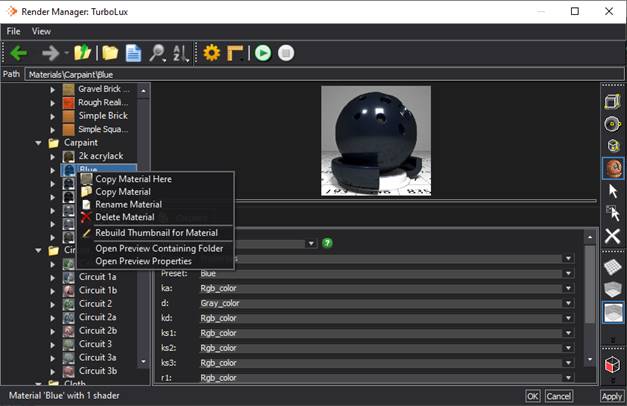
Copy Material Here: Place a copy of the selected material in the current category. You will be prompted to create a new name.
Delete Material: This deletes the selected material.
Rename Material: Give the selected material a new name.
Copy Materials: Places a copy of the material on the clipboard.
Use the Paste Material command to place it into any other Materials category, except the one it was copied from.
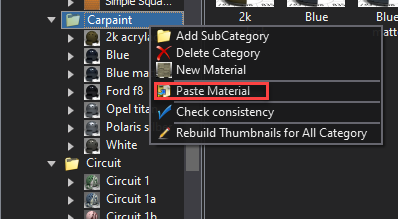
Rebuild Thumbnails for Material: This rebuilds the thumbnail for the selected material using the last used Preview settings.
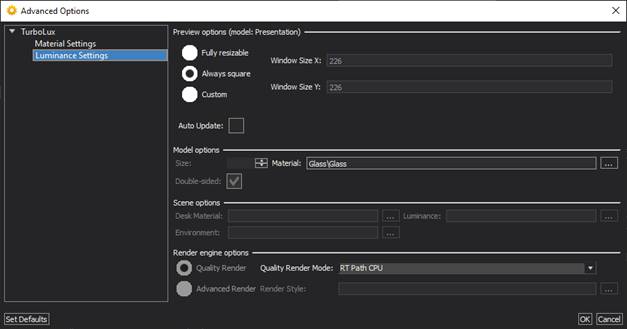
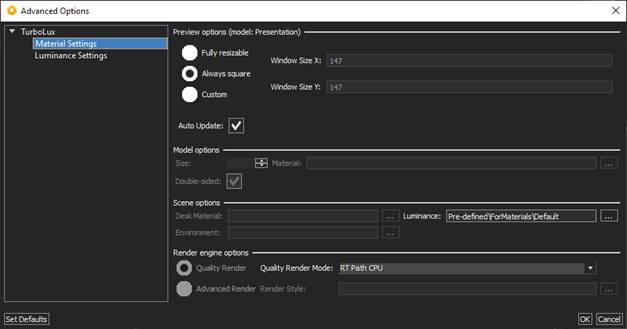
Advanced Options:
Available by clicking on the Gear icon at the top of the Render Manager.
Displays the settings used when creating a thumbnail preview. Each "settings" window has various options available depending on the setting chosen. Model, scene, and render engine option settings are also available here.
Transitioning from LightWorks®
Lights & Lighting
As a physically based rendering engine, there is no such concept of ambient light as in Lightworks or OpenGL. Instead, you must always provide a light source. The most common light source to add is a high-definition range image (HDRI). HDR images are often identified into Exterior, Interior, and Studio categories. There are HDR files included with TurboLux that are accessed via the TurboLux Scene menu under the Environment setting. You can also find collections of free HDR images available on the internet.
In addition to using HDR images to replace ambient light, other light sources include material emission (area lights), sun & sky environments, or create custom Luminances. By default, Lights do not activate for TurboLux. Lights, light types, light settings, and light groupings can be added or edited via Luminance settings, through the Luminance Palette or Render Manager (see discussions above).
Materials
The material parameters are quite different between Lightworks and TurboLux. TurboLux material parameters are based on physical properties. For example, the metal shader is driven by Fresnel based values and the glass shader is driven by index of refraction and dispersion values. Additionally, many of these parameters have multiple formats. For example, roughness can be defined by a single floating point or a 2D image texture map. Each shader allows you to specify the formats of the parameters.
Post Process Effects: TurboLux has several important options available for post processing an image. These include:
Denoiser: Reduces firefly effect of progress-based sampling.
Tone Mapping: Balances the overall lighting of a scene
Gamma Correction: Increase/decrease scene contrast
Modifications to these effects can impact the final quality and light intensity of your rendered image.
Caustics
Caustics is a term describes the patterns of light and color that occur when light rays are reflected from or refracted through a material’s surface. To maximize the effects of caustics, enable the Bidirectional Path Render Mode in the Camera Properties dialog box. This will trace light not only from the camera but light sources as well. Additionally, enable the Metropolis sampler from the TurboLux Engine settings dialog.