Snaps
(Available in all TurboCAD Variants)
Default UI Menu: Modes/Snaps
Ribbon UI Menu:

Snaps ensure precise placement of points when you use the cursor. For example, rather than enter coordinates or length to define the endpoint of a line, you can snap to the endpoint or midpoint of an existing line. This Snap toolbar displays and controls running snaps. Local snaps can be used regardless of what running snaps are active.
Magnetic Point

Default UI Menu: Modes/Snaps/Show Magnetic Point
Ribbon UI Menu:

The magnetic point is the indicator of the snap location. The disadvantage to showing the magnetic point is that for very large files or very slow computers, the magnetic points might take time to display.
Running and Local Snaps
Snaps can be permanent (until turned off) or can be temporary (used just once). Running snaps are permanent, and those invoked by the local menu and SEKE's are temporary.
Running Snaps
Running snaps are snaps that are constantly active, as opposed to one-time snaps invoked by SEKEs and the local menu. You can turn on running snaps by: Selecting items from the Snaps menu. Clicking the icon or combination of icons on the Snap Modes toolbar.

Right click on the snap button next to the Coordinate Fields, and check the desired snaps.  Use hotkeys. You can view these in the Snaps menu. For example, Shift+V turns on Vertex snap.
Note: Be careful with the snap modes you leave running. For example, if only Vertex is in use, you will not be able to select any point besides a vertex.
You can temporarily turn off all running snaps by clicking the SNAP button next to the Coordinate Fields. While the button is grayed out, the running snaps are disabled. Click again to activate the snaps. The GEO button performs the same function for geometric aids (Extended Ortho, Apparent Intersection, and Show Magnetic Point). It is usually best to turn off both SNAP and GEO at the same time.
Local Snaps
If you want to use a certain snap once, but do not want to have the particular snap mode constantly in use, you can use local snaps. These are one-time snaps that you can select from the Local Snap item of the local menu. You can also use SEKE's (hotkeys) to invoke one-time snaps.
SEKE's
Single Equivalent Keyboard Entries are keyboard shortcuts, or hotkeys, for quickly performing a function or snapping. SEKE's are affected by the snap aperture settings. If the sought snap point or type is not available within the aperture and Show snap aperture is turned on the SEKE will not snap. To use a SEKE for snapping, place the cursor on the desired object and press the key. For example, place the cursor anywhere on a line and press M to snap to its midpoint. The following is the list of SEKE snaps: C - Center (snaps to the center of an arc, circle, or ellipse) G - Grid (snaps to the nearest grid point). H - Perpendicular Opposite (snaps to an endpoint so that the new line is bisected by an existing line) I - Intersection (snaps to the intersection of two objects) J - Perpendicular (snaps to the perpendicular projection to an object) M - Midpoint N - Nearest on Graphic (snaps to the nearest place touched by the cursor) Q - Quadrant Point (snaps to 0, 90, 180, 270 degree point of a circle, arc, ellipse) S - No Snap V - Vertex (snaps to endpoints of lines and arcs) In the LTE Workspace you must use the ALT key simultaneously wijth SEKE. I.e ALT+N
Snap Modes
Default UI Menu: Modes/Snaps
Ribbon UI Menu:

This section lists all available snaps and geometric aids. When accessed from the Snap Modes toolbar or from the menu, these are running snaps (permanent until turned off). When accessed by a SEKE or from the local menu, they are one-time snaps.
LTE Snaps
In the LTE Workspace SEKEs behave with slight differences to standard TurboCAD methods. To use a SEKE you must hold down the ALT key. E.g. the Center SEKE becomes ALT+C while in the LTE Workspace.
Apparent Intersection Snap

Default UI Menu: Modes/Snaps/Apparent Intersection
Ribbon UI Menu:

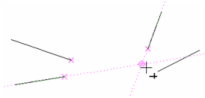
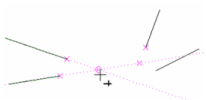
Snaps to points where two lines would meet. An auxiliary line is displayed from both lines, extending to this point. Show Magnetic Point must be turned on.
- Start with lines whose extensions will meet (non-parallel). When you pass the cursor over each line, the line's endpoint is marked.
- When the cursor passes over any apparent intersection point, auxiliary lines will be displayed from the actual lines, and their intersection point is marked.
Note: If Always show auxiliary lines is checked in the Drawing Aids window, the auxiliary lines will be displayed, even when you move the cursor away from them.
Apparent Intersection works here on drafting palette objects.
Center of Extents Snap
SEKE: E 
Default UI Menu: Modes/Snaps/Centre of Extents
Ribbon UI Menu:

Snaps to the center of extents of a 2D or 3D object. This is the center of the bounding rectangle (2D) or box (3D) that encloses the selected object. 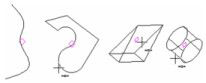
Center Snap
SEKE: C

Default UI Menu: Modes/Snaps/Centre
Ribbon UI Menu:

Snaps to the center of an arc, circle, or ellipse.

Divide Point Snap

Default UI Menu: Modes/Snaps/Divide Point
Ribbon UI Menu:

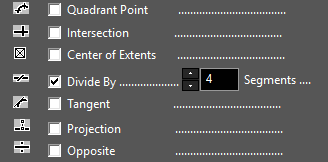
Snaps to one of the division points of an arc or line segment.
The default number of segments is 3, but you can change this in the Segments field of the Drawing Aids window. Open this window by right-clicking on the SNAP or GEO button next to the Coordinate Fields.

Tip: You can also divide arcs and line segments while using the Edit Tool, by selecting Divide Segment or Arc Divide *from the local menu.
Extended Ortho Snap

Default UI Menu: Modes/Snaps/Extended Ortho
Ribbon UI Menu:

Snap to points located orthogonal from existing points. Show Magnetic Point must be turned on.
- Start a polyline with two linear segments, then start the third segment like this:
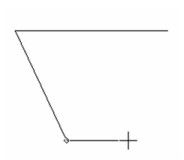
- To end the third segment, first hover over the start point. This displays an auxiliary line extending vertically from that point. You can snap to points along this line.
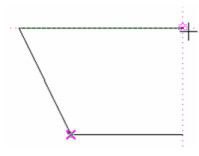
- Horizontal auxiliary lines can also extend from this point, when the cursor is to the right or left.

Note: If Always show auxiliary lines is checked in the Drawing Aids window, the auxiliary lines will be displayed, even when you move the cursor away from them.
Grid Snap
SEKE: G

Default UI Menu: Modes/Snaps/Grid
Ribbon UI Menu:

Snaps to the nearest grid point. If the Advanced Grid option of Frequency is set to a figure greater than one, invisible grid lines will also be detected by this snap mode.
Intersection Snap
SEKE: I

Default UI Menu: Modes/Snaps/Intersection
Ribbon UI Menu:

Snaps to the intersection of two objects. 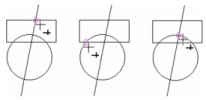
Middle Point Snap
SEKE: M

Default UI Menu: Modes/Snaps/Middle Point
Ribbon UI Menu:

Snaps to the midpoint of a line or line segment. 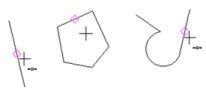
Nearest on Facet Snap

Default UI Menu: Modes/Snaps/Nearest On Facet
Ribbon UI Menu:

Snaps to the nearest point on a facet, or to the projection of this point onto the current workplane.
Nearest on Graphic Snap
SEKE: N

Default UI Menu: Modes/Snaps/Nearest On Graphic
Ribbon UI Menu: 
Snaps to the point on an object closest to the cursor, within the snap aperture.
No Snap
SEKE: S

Default UI Menu: Modes/Snaps/No Snap
Ribbon UI Menu:

When on, turns off all snap modes. With snap modes off, you define points by simply clicking, or by using the Inspector Bar and Coordinate Fields.
Opposite (Mirror Point) Snap

Default UI Menu: Modes/Snaps/Opposite
Ribbon UI Menu:

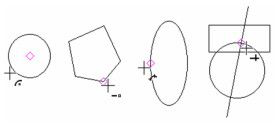
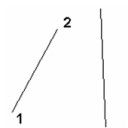
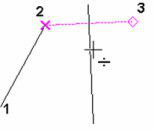
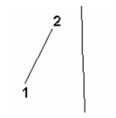
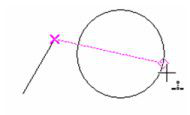
Snaps to a point that is the mirror image of the last point drawn, in reference to a selected object.In this example, the line on the right is the mirror line. The last point drawn is Point 2, when creating Line 1-2.
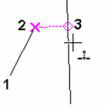
Activate the Opposite snap and hover over the mirror line. Point 3 is the snap point.
In some cases it is important where you select the mirror object. If the circle is selected on the left side, the mirror point will be opposite that side.
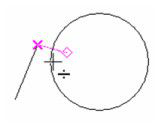
If you select the circle on its right side, the mirror point will be opposite that side.
Ortho Snap
Hotkey: Shift + O

Default UI Menu: Modes/Snaps/Ortho
Ribbon UI Menu:

When in use, the cursor can only move horizontally or vertically.
Projection Snap

Default UI Menu: Modes/Snaps/Projection
Ribbon UI Menu:

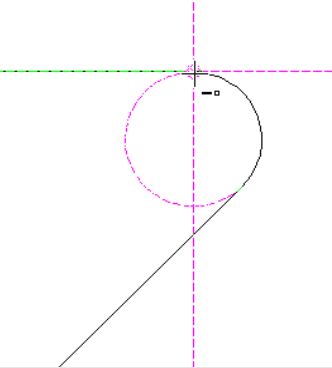
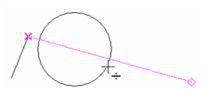
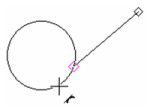
Snaps to a point that is the perpendicular projection image of the last point drawn onto a selected object.In this example, the line on the right is the projection line. The last point drawn is Point 2, when creating Line 1-2.
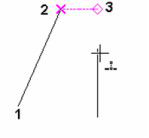
Activate the Projection snap and hover over the projection line. Point 3 is the snap point, which is the perpendicular projection of Point 2.
The snap point does not have to lie on the projection line; it can be placed on the extension of the projection line.
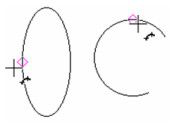
In the case of a circle, the projection point is along the radial from the circle center. If the circle is selected on the left side, the snap point will be on that side.
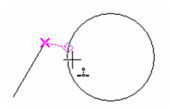
If you select the circle on its right side, the snap point will be on that side.
Quadrant Point Snap
SEKE: Q

Default UI Menu: Modes/Snaps/Quadrant Point
Ribbon UI Menu:

Snaps to the nearest quadrant point (0, 90, 180, and 270 degrees) on a circle, arc, or ellipse.
Show Magnetic Point

Default UI Menu: Modes/Snaps/Show Magnetic Point
Ribbon UI Menu:

When in use, a diamond-shaped point will be displayed for the locations of all running snaps.
Tangent Snap
SEKE: T

Default UI Menu: Modes/Snaps/Tangent
Ribbon UI Menu:

Snaps to a tangent point on an arc, circle, or ellipse, relative to the previous point.
Vertex Snap
SEKE: V

Default UI Menu: Modes/Snaps/Vertex
Ribbon UI Menu:

Snaps to the nearest vertex. A vertex can be an endpoint of a line or line segment, corner of a polygon, or endpoint of an arc or curve. 
LTE Snaps
In the LTE Workspace Snaps and SEKEs behave with slight differences to standard TurboCAD methods. In the LTE Workspace the Vertex snap is called Endpoint. To use a SEKE you must hold down the ALT key. E.g. the Vertex snap becomes ALT+V while in the LTE Workspace.
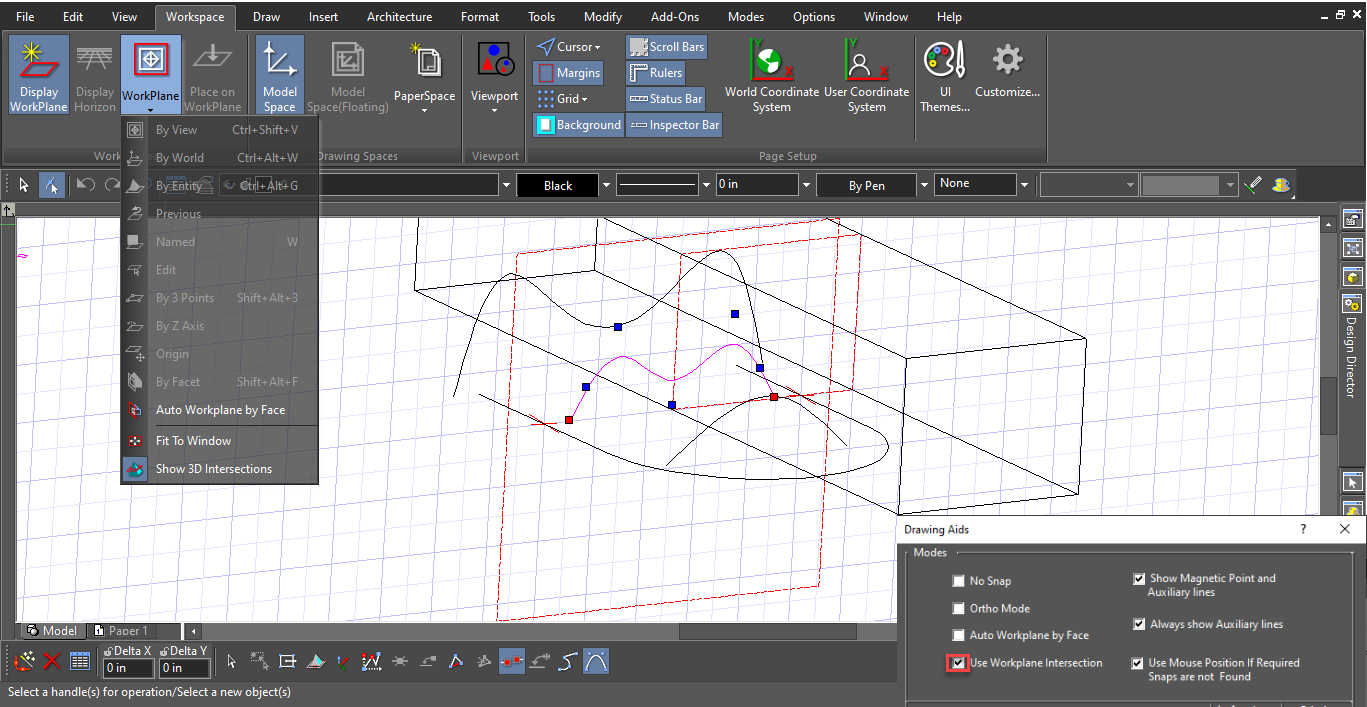
Workplane Intersections Snap

Default UI Menu: Modes/Snaps/Use Workplane Intersections
Ribbon UI Menu:

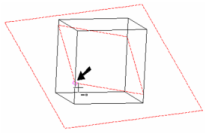
Snaps to intersection curves between 3D objects and the current workplane.
- The workplane must be displayed and intersection lines must be displayed as well.
- Activate the Workplane Intersections snap along with the snaps you want to use on the intersection lines and curves. In this case Vertex snap is active, and you can snap to an endpoint of the intersection line.
3D Snap – Snap to Workplane:
Snap to WorkPlane Intersections also works with 2D objects (arcs, curves, polylines) that do not lie both lie on the XY plane of the current workplane/UCS.
Mid 2 Points Snap

Default UI Menu: Modes/Mid 2 Points Snap
Ribbon UI Menu:

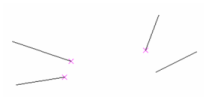
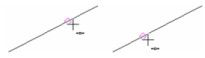
Snap mid two points that once chosen allows you to have two subsequent points and will then snap to the middle of them.
- Enable Mid two point snap and select two points

- Mid two point will snap to middle of two selected points.

Snap Settings
The Drawing Aids window contains options for setting snaps and their priority levels. Open this window by right-clicking on the SNAP or GEO button next to the Coordinate Fields.

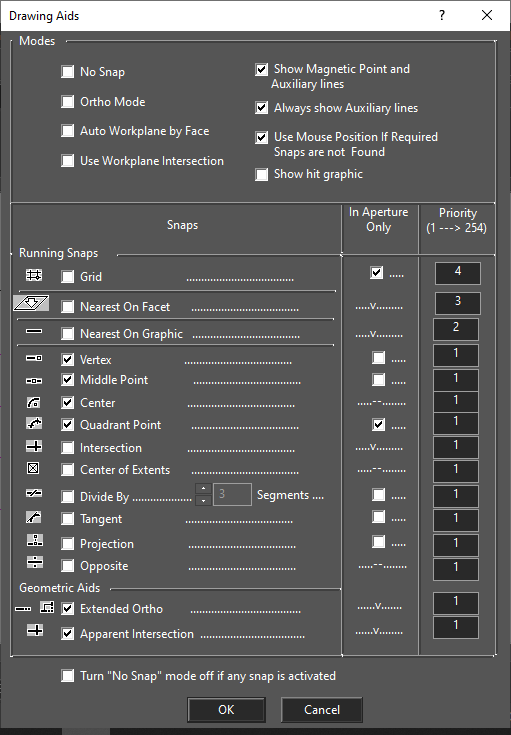
Modes
No Snap: No snaps will be permanently active (running). Ortho Mode: The mouse will move only horizontally and vertically. Workplane by Face mode: The workplane will be set by the facet of the solid where your cursor is. Use Workplane Intersection: Enables you to snap to intersection lines and curves between a 3D object and the current workplane. . Show Magnetic Point and auxiliary lines will also appear. Always show auxiliary lines: Once displayed, auxiliary lines will remain onscreen, even when the cursor moves outside the snap aperture. Use Mouse Position if Required Snaps are not Found: If you click on a point at which there is no snap, the point will be used anyway. Running Snaps: These are snaps that are permanently active, as opposed to snaps that are used only once. In Aperture Only: The associated snap will function only when the snap point is within the snap aperture. If more than one object is located within the snap aperture, the point will be defined at the closest qualifying snap point, unless Priority is set. If not checked, the snap point itself does not need to be located within the snap aperture. You can set the radius of the snap aperture in the General page of the Program Setup (Options / General).
Show Hit Graphic: This will highlight edges for snaps when you move a 3D object or connect two, 3D objects together. Settings can be changed from Program Setup/Preferences window.
Tip: To see the snap aperture while you are working, set it in the Preference page of Options.
Priority: Establishes which snap take precedence if more than one snap is available. A value of 1 has the highest priority.