Multi-Text
(Available in all TurboCAD Variants)
Default UI Menu: Draw/Text/Multi Text
Ribbon UI Menu:

Creates multi-line paragraphs that fit within a paragraph width boundary. Each multiline text object is a single object, regardless of the number of lines it contains.
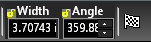
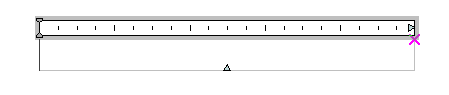
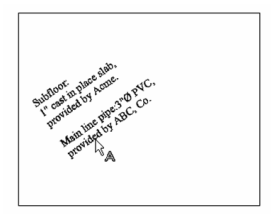
- Select the first point of the text, then a second point to define the paragraph width and angle. You can also use the Inspector Bar to enter the width and angle.

- The Character palette opens, in which you can define the text properties that will be active for multi text created from now on. (You can change these properties mid-text.) These properties are explained below.

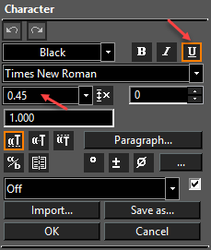
Font: Sets the color and font type. The "B" icon creates boldtext, the "I" icon creates italics, and the "U" icon underlines the text.

Text Height: Sets the height of the tallest letter. The "X" icon enables you to set the height as a factor of the current height.
Width Factor: is the width multiplier of each character. 
-
Oblique angle: Sets the italicization angle

-
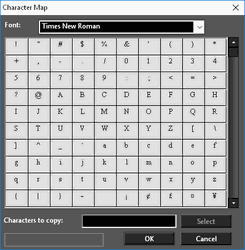
Symbols: While entering the text, you can insert a degree, plus/minus, or "phi" (angle) symbol.


The ellipses button open the Character map.
- The a/b is used to insert a fraction. You can chose to divide the fraction by a line or a slash. Usability has been improved by the addition of OK and Cancel button in the dialog box of the Insert Fraction in the Text Editor palette.

- These three icons are used for top, center, or bottom Justification.

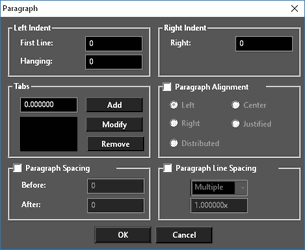
- Paragraph: This button opens the Paragraph properties for the selected section of text:
-
Import / Save: Once text is created, you can Save it as a .txt file. This text can later be inserted elsewhere by clicking Import.

-
Insert Column Break: Generates a new column.


To delete a column break move the insertion cursor to the top of the column in front of the first character, and them press the Backspace key. The distance between the columns is set by the Column Gutter Property
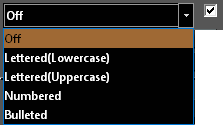
- List: Allows insertion standard Bulleted and Numbered lists.
- To create the text, simply start typing. The text will start where you defined the first text point. You can enter line breaks manually, and breaks will be created by word-wrapping, according to the paragraph width you set.
If you want to change text properties (font, height, etc.) while typing, make the change in the Character window and continue entering text. You can also enter symbols by clicking the relevant icon in the Character window. While entering text, you can use the Backspace key or the Undo and Redo icons. 
-
In the Inspector Bar or local menu, select Finish when the text is complete. You can also choose Cancel which will terminate the text editor without any changes being made.

The text is complete, and the preview box disappears.
Editing Multi Text
You can edit text before or after it is created by editing it on-screen:
- You can also edit the content of the multi-text by clicking on the multi-text with the Multi Text tool, or, if in the Selector General properties the Double Click Action is set to Edit Content, you can edit the multi text content by double clicking on the multi text with the Selector tool.
- You can also use the old mode of editing Multi line text. Make sure you are in MultilineText mode (Draw / Text / Multi Text) and select Edit Text from the local menu, command line, or Inspector Bar.

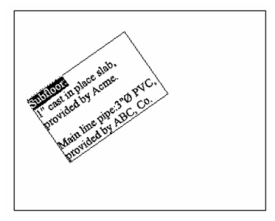
- The cursor appears as the letter "A"; select the text you want to edit.
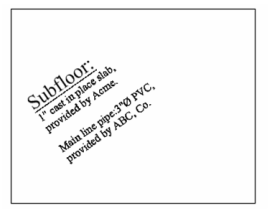
- Edit the text as you would in any text editor. To make a change to a specific string, such as the first word in this example, highlight that string.
- Set the properties for that string in the Character window. In this example, the text was underlined and its height was increased.
- Select Finish to implement the change.
Multi Text Properties
If you open a multiline text object's Properties there are certain parameters of the text you can edit. 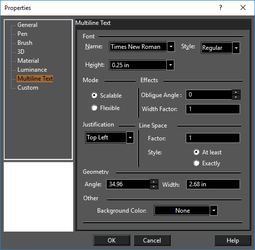
The properties also appear in the Selection Info palette, when the multiline text is selected. All parameters can be edited, except for the text string itself. ![../Storage/7-2-multi-text-img0030.png) Font: Sets the font name, style, and height. Mode: Select Scalable for text that can be re-sized non-proportionally or Flexible if you want pen, brush and slant options available. Oblique Angle: Available for Flexible mode only, sets the slant of the text (slant of each character). Width Factor: Sets the width of each character. Justification: Adjusts the text relative to its paragraph box. Factor: Sets the distance between lines. Style: Select At Least to automatically set the line size relative to the largest character of a line. Select Exactly to keep all lines the same size. Angle: Sets the angle of the paragraph. Width: Sets the width of the paragraph.