TurboLux Wiki
TurboLux is a physically based and unbiased rendering engine. Based on state of the art algorithms, TurboLux simulates the flow of light according to physical equations, thus producing realistic images of photographic quality.
Render Configuration
Engines
The choice of engine decides how lights are traced in the scene. TurboLux offers the following engines (integrators):
- Path (CPU/OpenCL): Unidirectional pathtracer that casts rays from the camera. Samples the whole film progressively. Supports all AOVs.
- Tiled Path (CPU/OpenCL): Unidirectional pathtracer that is almost the same as Path, but uses a special sampler which iterates over the image in tiles (this leads to a slightly lower RAM usage). The OpenCL version adapts the number of tiles that are rendered at once to the performance of the compute devices (GPUs/CPUs), so the tile size does not matter a lot (if rendering performance is bad due to small tiles, the number of rendered tiles is increased automatically). When the last tile of a pass is reached, it is split among the compute devices. Supports all AOVs.
- Bidir (CPU only): Bidirectional pathtracer that casts rays from both camera and light sources. Samples the whole film progressively. Supports only a subset of AOVs: RGB, RGBA, ALPHA, DEPTH and SAMPLECOUNT. It is recommended to combine this engine with the Metropolis sampler.
Light Strategy
The light strategy controls how much processing power is spent on each light in the scene. All lights in the scene can be sampled with the same probability (uniform light strategy), but if some light sources are much brighter than others, the image will be more noisy because a lot of processing power is spent on weak lights that are not contributing much to the lighting. The solution to this problem are the power and log power light strategies. They dedicate more processing power to lights that are brighter.
The following light strategies are available:
- Uniform
- Power
- Log Power (default)
The sampling probability of a light can also be influenced with the importance setting of the light source:
Importance: How much processing power to spend on this light source compared to other light sources. Used to scale the light importance computed by the light strategy. For instance, if you set a uniform light strategy, a light with a user importance of 2.0 will be sampled 2 times more often than one with 1.0. If you use a power light strategy, the user importance will be multiplied by the light power.
Materials
Basic
Matte
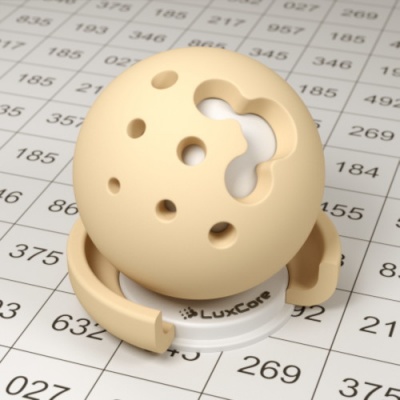
Matte represents a dull, diffuse surface and is very quick and efficient to render. Matte does not have any specular highlights so it works well for small background objects and test renders. It can represent dull surfaces such as matte plastic, clay, concrete, unpolished stone, and drywall.
Matte Translucent
![]()
Matte Translucent allows for transmission of light through the material. It is well suited to plastic lamp covers, where glossy translucent would simply add calculation time, as well as dull polymers, some dull organic materials (such as cheese or banana peels) and some kinds of textiles.
Glossy
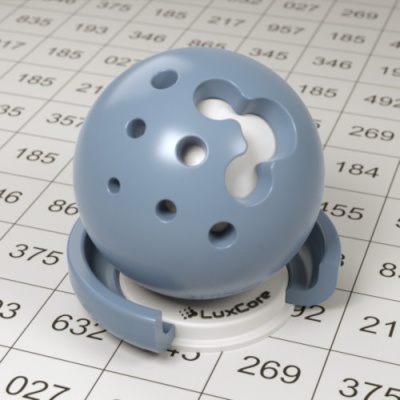
The Glossy material represents a diffuse surface with a varnish coat. It is well suited to most plastics, lacquered wood, glazed ceramics (porcelain/tile), and wet surfaces. With the "multibounce" option enabled, the material will have a soft appearance, mimicking the scattering by fuzz or hair, making it well suited to rendering many types of cloth.
Glossy Translucent
![]()
Glossy Translucent represents a diffuse surface with both a transmission component and a varnish coat. This material is well suited to most organic materials, including skin, internal organs, leaves, eyes, milk, ketchup, alien slime, etc. It can also work well for soap, and certain plastics.
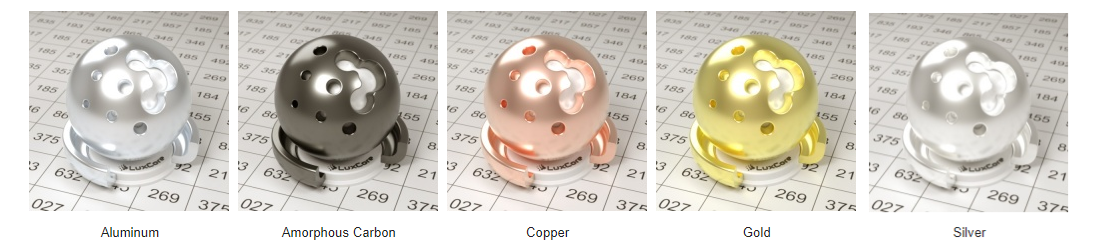
Metals
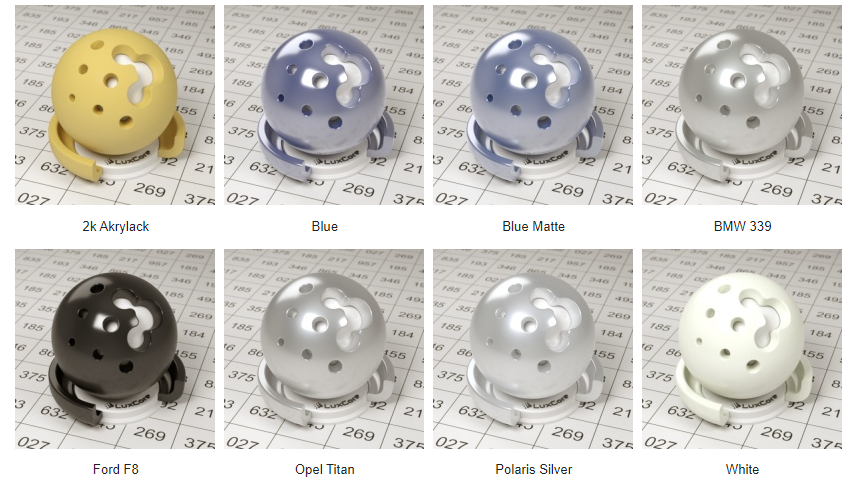
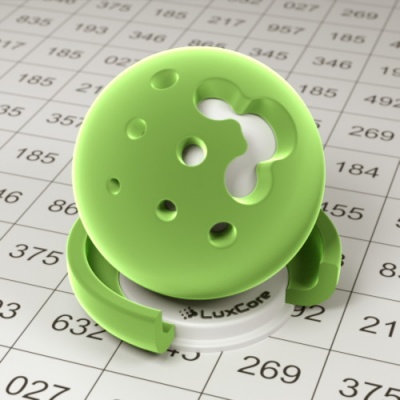
Metal
The metal material represents a generic metal surface. It supports any color as base as well as loading of presets such as aluminum and gold.
Color/Fresnel Texture
This defines the base color of the metal. Metal presets can also be loaded by using the fresnel texture. Fresnel NK files with measured data can be used as well in either the Sopra or Luxpop formats.
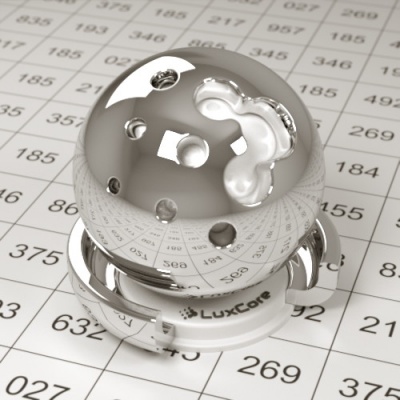
Mirror
Glass
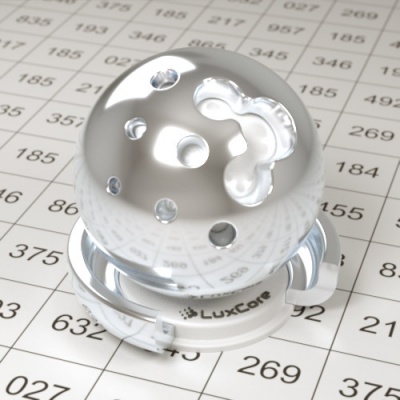
Glass
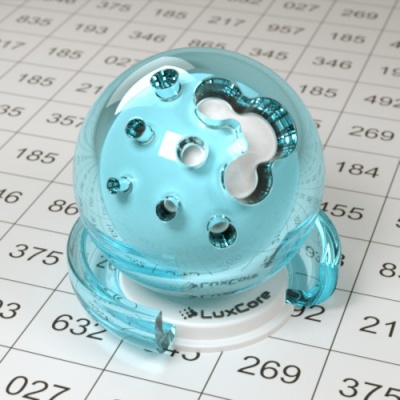
The glass material represents a smooth dielectric substance. It works well for materials such glass, crystals, clear liquid, transparent plastic, and gemstones.
Rough Glass
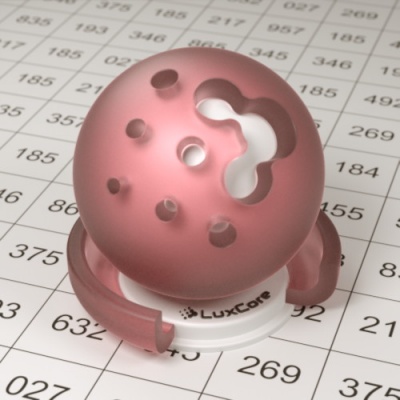
The Rough Glass material represents a rough dielectric surface. It works well for frosted glass and some kinds of ice.
Others
Car Paint

Car Paint is an advanced glossy material, simulating a diffuse surface with multiple reflective coatings. It works well for car paint, obviously, but is also well suited to any sort of "high-tech"-looking painted surface, such as painted aircraft skin, starships, futuristic weapons, etc.
Presets
Presets are available for some quick paint jobs. These are derived from the paper that the car paint material itself was based on.
Velvet
The Velvet material represents a fuzzy, velvety surface. It works well for velvet and other types of cloth. Its appearance can vary wildly with lighting conditions, so you may find it easier to use in a mix with another material such as glossy or cloth.
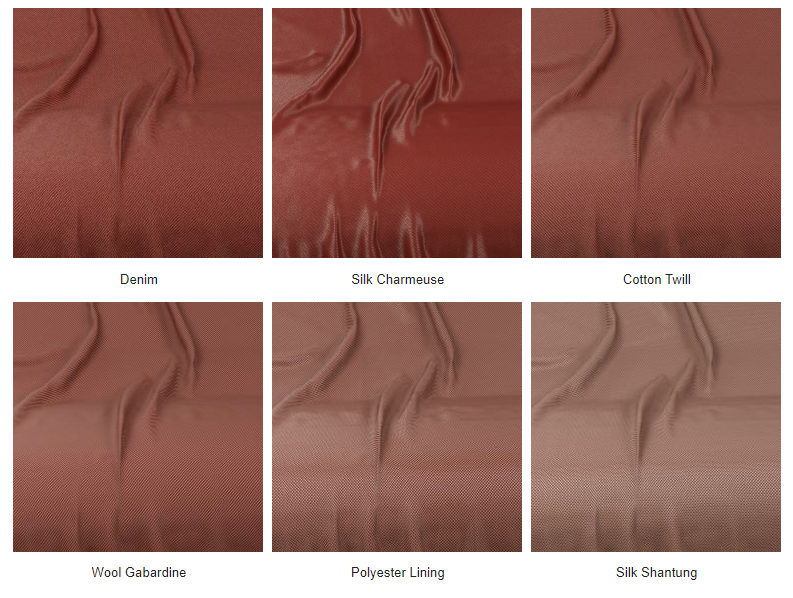
Cloth

The Cloth material simulates a woven fabric. The model's parameters are too many to expose individually, but presets are available for typical fabrics such as denim, polyester cloth, wool and silk. The material is based on the PhD thesis "The Appearance of Woven Cloth" by Piti Irawan. LuxCoreRender's implementation is an adaptation of the code in Wenzel Jakob's Mitsuba renderer, which was again based on code by Irawan.
Important note: the object you are assigning this material to will have to be UV unwrapped for this material to work properly.
Preset Name
Six presets with different stitch patterns are available. The ones below are rendered with the same diffuse and specular colors, but due to the different stitch patterns and specularity of the preset the look of the cloth varies. More advanced cloth materials can be created by using textures instead of solid colors on the diffuse and specular channels, and by mixing with other materials such as velvet or glossy translucent.Preset Name
Six presets with different stitch patterns are available. The ones below are rendered with the same diffuse and specular colors, but due to the different stitch patterns and specularity of the preset the look of the cloth varies. More advanced cloth materials can be created by using textures instead of solid colors on the diffuse and specular channels, and by mixing with other materials such as velvet or glossy translucent.
Mix

The Mix material is a special material that is used to combine two other materials. Note that it is possible to use one mix material as a component of another mix material. This allows for complex shader combinations.
Null(transparent)
Glossy Coating
Textures
Image Textures
Image textures are two dimensional images that are projected on 3D objects. These textures can be used in a variety of material channels, for example color and bump. Typically, the UV mapping of images on 3D objects is handled by the 3D application.
File Formats
The following formats can be used as textures:
- BMP (uncompressed)
- EXR
- JPG
- PNG
- HDR (Analyze 7.5)
- RAW (consisting of a very simple header (in ascii), then the image data)
- ASC (Ascii)
- INR (Inrimage)
- PPM/PGM (Portable Pixmap)
- PAN (Pandore-5)
- DLM (Matlab ASCII)
In most cases, PNG files work best for texturing in LuxCoreRender. TIF and PSD (Photoshop) images may work on some platforms.
Image Texture Parameters
When using an image as a texture in any material channel, a couple of parameters are available:
- Gamma - The gamma correction value for the texture. 1.0 will not affect the texture, which is what you want when you need to use the actual RGB values encoded into the texture, such as for a bump map or specular map. If you want a color image texture to appear as the image did on screen, you will want to set this to the screen gamma it was built using, which is probably 2.2.
- Gain - A scaling factor that will be applied to the image.
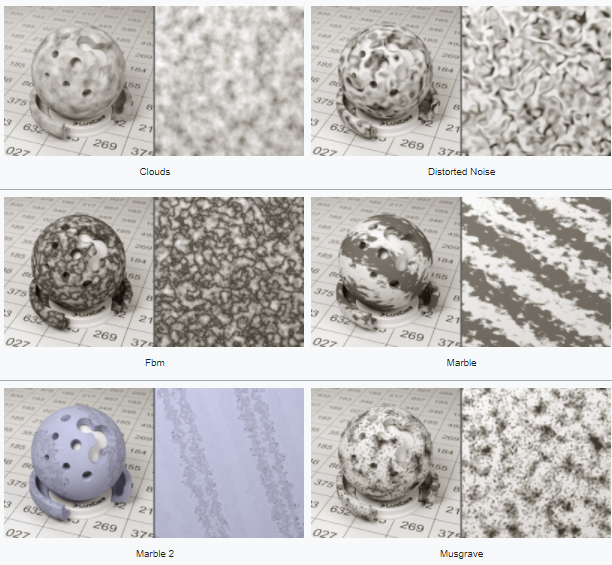
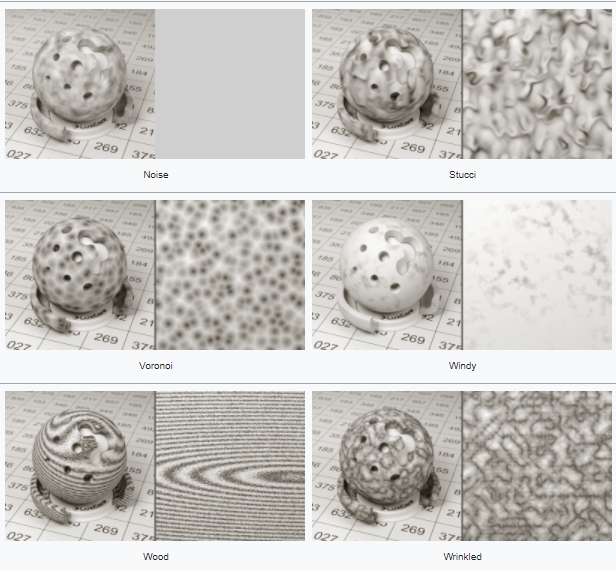
Procedural Textures
Procedural textures are defined mathematically, which means that the texture value (or color) at any given point is calculated by the program instead of being defined by an existing bitmap image. By combining various textures, very complex materials can be created. At the same time, using procedural textures can be very time effective since UV mapping is not required. Many of the procedural textures are fully three dimensional, which means that regardless of the shape of an object, they will always fit perfectly at edges.
The downside of having LuxCoreRender calculate the texture's values is that your 3D application may not be able to show previews for all textures. More complex procedural textures can also add to the render time.
uxCoreRender's procedural textures are very flexible and covers a wide range of different looks. Not only that, but they can also be combined by using the mix/add/subtract/multiply helper textures for mathematic operations. Most textures generate a noise based on noise size and noise depth. Noise size adjusts the scale of the texture and noise depth adjusts the amount of details. Increasing depth will give finer details but are also slower to render.
Spectrum Textures
The spectrum textures are a set of color textures that define an actual light spectrum rather than an RGB color. They are mainly used for absorption and emission, but can be used on any color field if desired.
Volumes
LuxCoreRender includes a flexible and powerful volume system that controls how light behaves when it moves through objects or the space in-between objects. With it you can create visible sun rays in a dusty room or orange juice or anything in between. Three types of volumes are available to simulate a wide range of volumetric effects.
Volume Types
1. Clear Volume
![]()
Clear is a simple volume that features refraction and absorption. It is primarily meant to be used with clear materials, such as colored glass. It can also be used to add some extra realism to translucent materials with little performance cost. It has two properties, an index of refraction(IOR) and an absorption color.
Absorption Color
This is the main color of the volume. It determines how light is lost(absorbed) as it passes through the volume, making the color darker and more saturated the farther it travels through the volume. Your exporter will have a Color at Depth setting which will make the volume match the absorption color at the depth you specify.
Index of Refraction
The refractive properties are defined by the IOR value. Your exporter will have some preset ready for the most common volumes. It's important to note that the only material that will use this IOR setting is glass. The other transmissive materials(null, matte translucent and glossy translucent) do not support refraction.
2. Homogeneous Volume
The homogeneous volume represents a volume with an even distribution of microscopic particles. It can be used for subsurface scattering (SSS) such as milk or orange juice. It can also be used for atmospheric scattering such as a dusty room with visible sun rays.
Please note that atmospheric scattering is very light. Set Scattering Color to full white and try setting Scattering Scale to 0.001. To simulate it efficiently, you should keep multiscattering disabled in your exporter. This will greatly reduce the noise in the scene. Multiscattering should be used with heavy scattering volumes, such as milk or orange juice. Homogeneous uses the same index of refraction and absorption parameters as the clear volume. In addition to those, it has two extra parameters, scattering color and scattering asymmetry.
Scattering Color
The scattering color determines the color and density of the particles. Higher values are denser. This control can also affect the color of your volume, but that will be determined primarily by the absorption color.
While the scattering color has red, green, and blue values, it is not limited to this range. You can specify values higher than 1 (pure white). In fact, for heavy interior volumes you will often need to use values in the 30-1000 range. To help deal with this wide range of values, your exporter will present you with a set of RGB values and a "scale factor" that the RGB values will be multiplied by.
Scattering asymmetry
The asymmetry value determines the scattering direction. A positive value is primarily forward scattering (light is scattered in the same direction as the ray was traveling) and a negative value is backwards (back towards where the ray came from). Clear particles have a more forward scattering and opaque particles a more backwards scattering. The default value 0 scatters light evenly in all directions.
3. Heterogeneous Volume
The heterogeneous volume is the most powerful (and also the slowest) of the three volume types. It has the same functionality as the homogeneous volume, but it also includes ray-marching support. This means it can deal with volumes with varying internal properties, such as clouds, smoke, and ground-hugging fog. It has the same properties as the homogeneous volume, with one extra setting, step size.
The heterogeneous volume can be used as the exterior volume as well, although this comes at a substantial performance cost (even when not using multiscatter) and is not recommended in most cases.
The clear and homogeneous volumes evaluate volume properties only once as it enters the volume. They assume these properties hold constant all the way to other side of the volume. For volumes that are continuous, this is a helpful optimization. However, if the volume is not continuous (such as a cloud), this causes blurred details and the edges of the volume container to become visible. In order to handle changing details, heterogeneous subdivides the volume transit path into several sub-paths (a process known as ray-marching) and evaluates the properties again at each sub-point.
Step Size
Step size defines the spacing between the ray-marching sub paths, in meters. Smaller steps will show greater volume detail, but are slower to render. Setting too large of steps may result in a blocky or noisy appearance of the volume.
Volume Priority
Volumes have a priority setting, which is an integer number. In regions where volumes overlap, the volume with highest priority is chosen and replaces all other volumes.
Lighting
1. Area Lights and Mesh Lights
The most common way of lighting in LuxCoreRender is by using area lights. With this light you are able to simulate a wide range of lighting. It supports common settings such as power and color but also allows to control the spread angle, as well as the shape of the emitted light using IES files.
Another common way is by using mesh lights. This type of light supports the same features as area lights but also features textured lighting. As mesh lights are objects, you can assign an entire object to emit light, such as the tungsten filament in a light bulb or halogen bulb. In general, it's advised to use mesh lights with as few faces as possible to keep render times down.
Objects only emit light in the direction that the normals of the object's faces are pointing.
2. Environment Lighting
Environment lighting encloses the scene entirely, lighting it from all angles. It is normally used for environment mapping, although it can also be used to add a solid color environment. The hemi lamp is used for this type of lighting and it accepts latlong environment maps.
Environment lighting is usually done with HDR(high dynamic range) images but it is possible to use low dynamic range images (like JPG or PNG) as well, but in this case you may want to add some additional lighting to your scene to avoid getting a poorly contrast render. This is not necessary with HDR environment maps, which can be used as the only source of light to create a realistic lighting. Note that the hemi lamp's location in the scene does not matter, only its rotation.
The External Resources page has some links to sites that offer free and quality HDR's. Also a simple web search for "hdri maps" or "hdr maps" will give a lot of results. You can also create your own hdri maps with LuxCoreRender by using the environment/panorama camera.
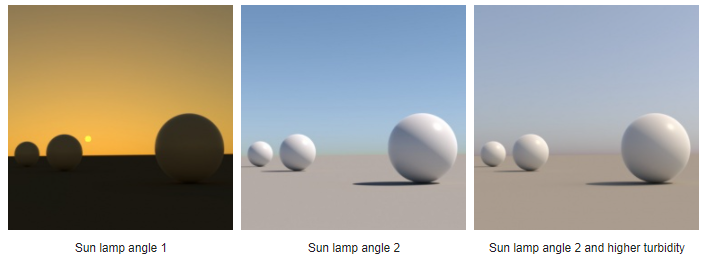
3. Sun and Sky
The sun and sky light creates a lighting setup that simulates the light of the sun and atmosphere, based on the direction of a sun light in the scene and a parameter named turbidity which defines the clearness of the sky. Both the sun angle and the sky clearness influence the color of the light.
Note that the sun lamp is very bright (as it is in real life) so you may have to turn the Gain way down if you have other lights in the scene. The other lights may look like they are not even emitting, but they are actually overpowered by the sun. It is possible to use this light with sun only, sky only, or the default sun+sky. If you want softer shadows try adjusting the relative sun size parameter. Note that the sun lamp's location in the scene does not matter, only its rotation.
4. Point Lights
Point lights are infinitely small light sources that emit light in all directions. In most cases, it's recommended to use only mesh/area lights and environmental lighting for your scene, rather than point or spot lights. This is because the point and spot lights have no real world equivalent as the light source is an infinitely small point. As a result, they tend to produce unnaturally hard lighting and sharp shadows.
5. Spot Lights
Spot lights are infinitely small lights that emit light in a cone shape. Apart from color and location, the width of the cone can be set (as the number of degrees of the center line it will extend), and there is a setting to feather the intensity towards the edge.
As with the point lights, it's recommended to use only mesh/area lights and environmental lighting. This is because the point and spot lights have no real world equivalent as the light source is an infinitely small point.
Projector
Both point lights and spot lights can distribute their light and color according to an image. With spot lights, this results in an effect like something being projected from a diapositive projector or beamer.
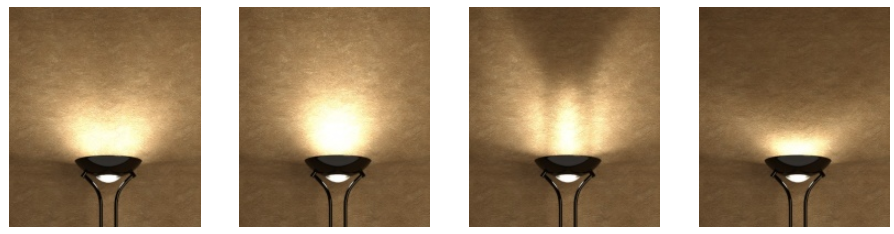
6. IES data
With the help of IES files you can get the light distribution pattern of a real light fixture. This will keep render times down as you don't need a reflector or glass material to replicate the pattern. The renders below were lit with the same area light, only with different IES files. Area lights, spot and point lights supports IES files.