Hatch Pattern Creator

(Available in Platinum and Professional)
Default UI Menu: Tools/Create Hatch Patterns
Ribbon UI Menu:

TurboCAD's Hatch Pattern Creator (HPC) opens the door to a whole new world of customized hatch patterns. Use existing patterns, create your own patterns from scratch, or combine existing patterns with your new ideas and maximize the potential of both. Creating and editing hatch patterns has never been easier or faster. The HPC a tool icon  will appear below TurboCAD's main toolbar and a menu item will appear in the Tools menu.
 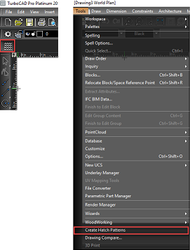 When you select either the button or the menu item the HPC will appear in the Inspector bar.
Clearing Patterns
It is possible to clear all of the item accumulated in the pattern on which you are working. To clear accumulated patterns: In the local menu or Inspector bar choose "Clear." All of the accumulated items will be to removed.
Note: The tool has limitation on the number of created patterns (1000). You can change this value using corresponding field in the Inspector bar.
Creating Hatch Patterns
There are two primary ways of using the HPC: By Symbol, and By Sample
Creating Patterns - By Symbol
In the "By Symbol" mode you can select any drawing entities (flexible texts, polylines, arcs, curves, etc.) or their parts, using a fence, to create patterns. To create pattern by symbol:
- Select the HPC.
- Click once the set the first corner of the selection fence (rectangle).
- Move the cursor to a new position, and click again to set the final point of the selection fence.
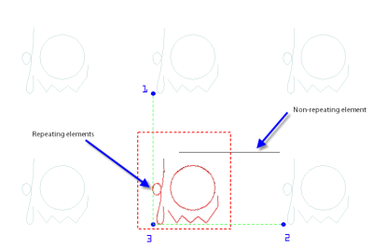
The selection fence will appear as a red dashed line. The selected elements will appear highlighted in red, and the repeating pattern of those elements will be shown in light blue-grey.
- Click Finish
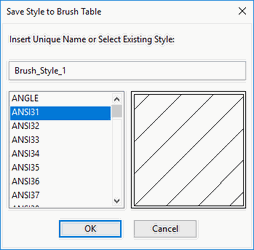
- Click Yes when prompted to add the pattern to the Brush Style Table
- Type in a name for the pattern, and then click OK.
Adjusting the Pattern
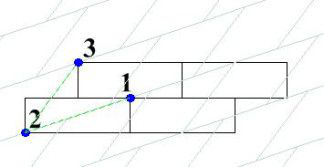
Before clicking Finish you can alter the appearance of the pattern while you are creating it. By moving the blue control points (labeled 1& 2 above) you can change the frequency of reoccurrence and the direction of the pattern in those directions. Moving the other control point (labeled 3 above) allows you to change the origin of the pattern relative to the origin of the drawing.
Note: Notice that the horizontal line segment (above) was not selected as a part of the pattern. Line segments will be only be included in the pattern only if both ends of the segment are inside the selection fence.
Creating Patterns - By Sample
In the "By Sample" mode you use the selection fence to select a sample, prepared in advance, and designed to create a pattern. The Hatch Pattern Creator will automatically detect a valid repeating pattern. To be valid the pattern must repeat both vertically and horizontally within the rectangle of the selection fence. 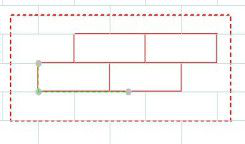
NOTE: This mode does not provide the option to adjust the pattern with control points. To adjust the pattern you must switch to Transform mode.
To create pattern by sample:
- Draw the pattern.
- Select the HPC.
- Click once the set the first corner of the selection fence (rectangle).
- Move the cursor to a new position, and click again to set the final point of the selection fence.
The selection fence will appear as a red dashed line. The selected elements will appear highlighted in red, and the repeating pattern of those elements will be shown in light blue-grey.
- Click Finish
- Click Yes when prompted to add the pattern to the Brush Style Table
- Type in a name for the pattern, and then click OK.
Editing Hatch Patterns
Using Existing Brush Styles
You can use existing hatch pattern type brush styles as the basis for your new pattern. To select an existing pattern:
- Select the HPC.
- In the local menu or Inspector bar choose "Copy from…" to select existing brush style.
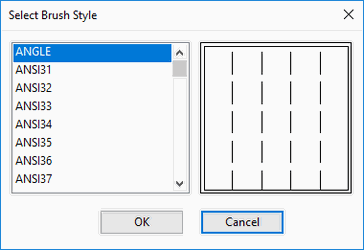
- Select the Brush Style in the Select Brush Style dialog, and then click OK.
NOTE: In the "By symbol" mode the selected style will be copied as a new style. After that you can transform it. In the "By sample" mode a sample of the selected style will be used as a base for the new pattern. Later it can be used by user any number of times.
Accumulating Patterns
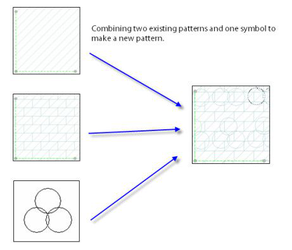
When this mode is active, each newly selected symbol or sample, and each selected existing pattern will be added to the pattern you are creating. To accumulate patterns:
- Select the HBC.
- In the local menu or Inspector bar choose "Accumulate patterns" to toggle on pattern accumulation.
- Select a pattern, by sample, by symbol, or an existing pattern.
- Select another pattern, by sample, by symbol, or an existing pattern. Continue selecting patterns until you are done.
- Click Finish
- Click Yes when prompted to add the pattern to the Brush Style Table
- Type in a name for the pattern, and then click OK.
To turn off pattern accumulation:
- In the local menu or Inspector bar choose "Accumulate patterns" to toggle off pattern accumulation.
Transforming Patterns
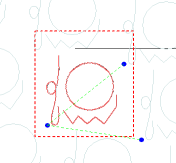
In transform mode you can transform the current pattern. Use the blue control points or the fields in the Inspector bar to transform the pattern. 
 The control point labeled "1" (above) is used to set the rotation angle and/or overall scale. The control point labeled "2" (above) is used to set the offset of the pattern's origin point from the drawing's origin. The control point labeled "3" (above) is used to specify the scale for the pattern's height and (or) obliquity (angle) taking into account the rotation angle. At any time you can lock any of the fields in the edit bar.
NOTE: Transformations will be applied only to the last (current) accumulated item in the pattern.
Storing Created Patterns
At any time you can save created patterns as a new or existing style in the TurboCAD brush style table. To save a pattern:
- In the local menu or the Inspector bar choose"Save style…".
- Type in a new name or select an existing name.
- Click OK