Inserting Objects from other Files
(Available in all TurboCAD Variants)
Default UI Menu: Insert/Picture, Insert/File, Insert/Object
Ribbon UI Menu:

You can insert data from external files into your TurboCAD drawing. For example, you can insert a Word document or a .gif picture file, or even data from another TurboCAD (or other CAD format) file. You can insert files, pictures, and OLE objects. These tools can be accessed from the Insert menu, or from the Insert toolbar, displayed by right-clicking in any toolbar area and selecting Insert*.

Inserting a File

Default UI Menu: Insert/File
Ribbon UI Menu:

Inserts a TurboCAD (or other CAD format) file into the current drawing. 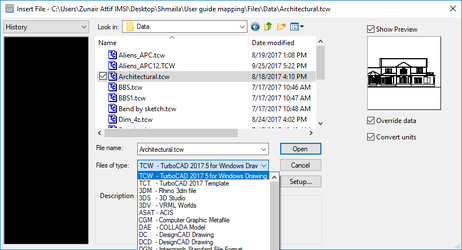
Note: The contents of the inserted file are embedded, not linked. See Inserting an OLE Object
Inserting Partial Data from a File
The right side of the Open window contains a box in which you can select what you want to add from the selected file. 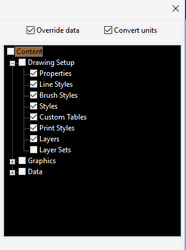
For example, you can insert all objects ("graphics") but omit their properties or line style. Or you could insert a file's layers without the objects that they contain. You can use File / Extract To to save only selected components in your drawing to a .tcw file. This is useful for creating file templates. Override data: If any items with the same name are found in the target file, they will be replaced by the items in the source file. Convert units:* It converts the units of the file according to current units.
Inserting an OLE Object
Default UI Menu: Insert/Object
Ribbon UI Menu:

Warning OLE is limited in functionality and no longer fully supported by Microsoft. As a result OLE objects are not recommended, results will vary. While this feature is provided for legacy reasons it is not supported and will see no future development. Enables you to insert OLE objects from other Windows applications. You can edit an OLE object from within TurboCAD using the features and commands of the Windows application in which the object was created (the source application). For example, you can insert a Microsoft Word application into your drawing and edit the text or graphics using Microsoft Word tools.  Select Insert / Object, and the Insert Object window appears.
 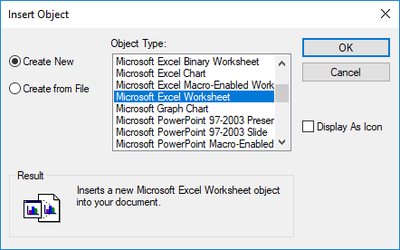 Create New: Inserts an OLE object from another application. Select the application from the list of all applications found on your system. The object will appear in the drawing. The object is editable in its source application Create from File: Inserts an object from another application that has already been created in its source application. Enter the path and name of the file, or click Browse to find it. Display as Icon: Places an icon representing the object into the drawing.
Tip: You can also drag the file into the drawing via Windows Explorer.
Embedded and Linked OLE Objects
OLE objects that you insert can be either linked or embedded. Embedded objects become an integral part of your file, and take up more space in the file than a linked object. Embedded objects will move with the file if you transfer it. If you make changes to the OLE object's source file, these changes will not affect the embedded object. Linked objects are references to the file on which they were based, and they retain their connection to that file. If you make changes to the OLE object's source file, the changes will affect the linked object. If you plan to use multiple copies of an OLE object, using links will reduce your file size. Linked objects are referenced by their path. If you move the TurboCAD file, you will need to move all linked objects as well. If you move the source file of a linked object to another folder, Windows will not be able to locate the file, and you will need to edit the link.
Warning: Norton AntiVirus Script Blocking can cause problems with OLE. For example, Microsoft Word documents are inserted as a picture, not a Word document.
Paste Special
Enables you to choose how to insert (paste) into your drawing an object that was previously cut (Ctrl+X) or copied (Ctrl+C) to the clipboard. The object on the clipboard can be from TurboCAD, or it can come from another application. The options available in the Paste Special window depend on the type of object in the clipboard, and the object's source application. For example, if there is a Microsoft Word document on the clipboard, you can paste it as: Word Document: Inserts as an OLE object which you can edit within TurboCAD using the Microsoft Word application. Picture: Inserts as an image Text: Inserts as a TurboCAD text object. When inserting an object as OLE, select Paste Link to link the object to its source file or Paste to embed the object (break the link with the source file). Check Display As Icon to insert the OLE object as an icon. You can then click Change Icon to select another icon.
Note: Only two types of data can be inserted into TurboCAD as an editable TurboCAD drawing object: text (inserted as a TurboCAD text object), and TurboCAD drawing objects that have been copied to the clipboard from TurboCAD. All other clipboard objects will be pasted either as OLE objects or as pictures (either bitmaps or metafiles).
Editing Inserted OLE Objects
Edits an OLE object in its source application.
- Select an OLE object in your drawing. This object may appear as a document or a bitmap, or it may appear as an icon, depending on the options you chose when you inserted the OLE object.
- Double-click on the object to open it for editing.
Editing Links to OLE Objects
You can set each linked object so that the update happens automatically, or so that the update must be done manually. Links box: contains all the links in the active drawing. You can highlight multiple links by pressing Shift or Ctrl. Update Option: Sets whether the selected links are updated automatically or manually. Update Now: Updates the current link. This is how to update sink that are set to update manually. Open Source: Opens the file in its source application. This also enables you to compare the linked object to the source file. Change Source: Enables you to choose a new source for the object. Once the object is linked to the new file, its contents will change to match the new file.
Inserting a Picture

You can insert a picture from a file, from a list of images, or as an OLE object. Inserting pictures is useful, for example, if you have a picture of a site plan and want to create buildings directly on it.
As with inserting any object, the picture will be inserted "on top" of existing objects. To adjust the object stack, you can use the Bring to Front and Send to Back tools. See Stacking Objects. The Image toolbar can be opened by right-clicking on any toolbar area and selecting Image.
Note: Nearly all graphic formats are raster images, meaning they are composed of dots. Even when reading vector formats, such as *.wmf, the image is converted into a raster format for TurboCAD purposes.
Image Manager
Default UI Menu: Insert/Picture/From Image List
Ribbon UI Menu:

Enables you to manipulate all the raster images in the current drawing. You can insert files directly from this window using From Image List. 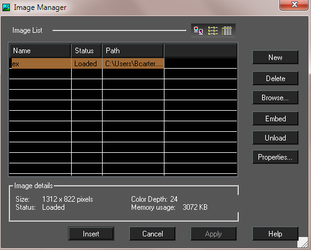 The toolbar at the top of the window can be used to change the image list as thumbnails, list, or detailed list. Image List: Lists all images inserted into the drawing. The list can be sorted by name, status, or path. To edit a name, select it and then click it again. You can then enter the new name. New: Adds a new image file to the list. Delete: Deletes an image file from the list. Embed: Saves the image file in the drawing as an embedded object, and not as a reference to an external file. Unload: Unloads image data from work memory. Reload: Reloads image into work memory. Properties: Opens the Image Visualization Properties window, which is useful for setting the image quality for large images.
 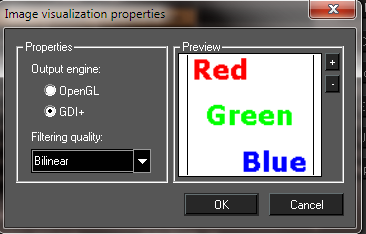 OpenGL: Limits image output to the maximum OpenGL texture size (1024x1024 is supported by most hardware), and resizes image to a square view. For example, a 400 x 300 image will be resized to 512 x 512, thereby losing accuracy. As you increase the zoom, the image may become blurry. GDI+: Supports large images without resizing, maintaining high accuracy. Not all hardware can render this way efficiently, so this method may be slower than OpenGL. Filtering quality: Controls scaled or rotated images. Nearest point: The pixel with coordinates nearest to the desired pixel value is used, resulting in a set of large squares when viewed closely. Bilinear: A weighted average of a 2 × 2 area of pixels surrounding the desired pixel is used. This is the most common filtering algorithm, adding smoothness in large scales. Trilinear: A more exact extension of Bilinear* and is practically indiscernible. But it is unsupported with OpenGL.
Note: These parameters are not file-specific; they affect visualization of all images in all TurboCAD files.
Inserting a Picture from a File

Default UI Menu: Insert/Picture/From File
Ribbon UI Menu:
Using this tool you can insert any type of graphic - .gif, *.jpg, etc. The file is embedded and the picture itself cannot be edited. You can, however, select it and perform any of the *Select Edit commands (see Select Edit). All inserted files are listed in the Image Manager.
- Change the workplane, if necessary. The picture will be inserted onto the current workplane (though it can be moved later).
- Select Insert / Picture / From File and browse to select the desired picture.
- Select two points to determine the size of the inserted picture. Use the local menu option Keep Aspect Ratio if you want to maintain the picture's proportional size.

Note: The first point you select corresponds to the upper-left corner of the picture. You can move, rotate, or scale the picture using any of the Select Edit tools.
Inserting a Picture from a List of Images

Default UI Menu: Insert/Picture/As Object
Ribbon UI Menu:

Invokes the Image Manager, from which you can select a picture to insert. Inserting a Picture as an OLE Object Inserts a picture as a linked OLE object. This means that the picture can be edited in its source application and all changes will be reflected in the TurboCAD drawing as well. File types that are allowed for OLE insertion are .wmf (Windows metafile) and .dib (device-independent bitmap).
- Select Insert / Picture / as Object and browse to select the desired picture.
Tip: You can also drag the file into the drawing from Windows explorer.
- The picture is inserted in its original size. You can resize, move, or rotate it by using the Select Edit tools.
- To edit the picture, you can double-click on it to open it in its source application.
To select a previously inserted picture, click along an edge instead of inside the picture.
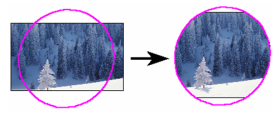
Clipping Images
 Enables you to use a border to clip a raster image. Borders must be either a closed polyline, or a closed circle or ellipse.
- Select the image you want to clip.
- Select the new image outline. The image will be clipped to the outline.
- The image still retains its original size, even if it is not fully displayed. Therefore, you can clip it again using larger borders.
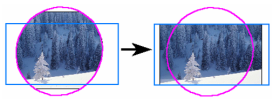
Image Properties
You can view certain properties of all currently inserted picture by selecting an image and opening its Properties (see Object Properties) to the Image page. 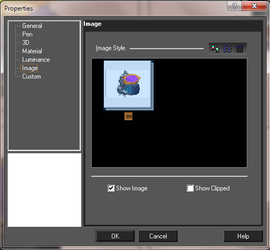 The toolbar at the top of the window can be used to change the image list as thumbnails, list, or detailed list. Show Image: Shows or hides the images. Show Clipped: Uncheck to hide the clipping contour and show the original image. Check the box to show a clipped image. From the Selection Info Palette you can access the additional properties of:
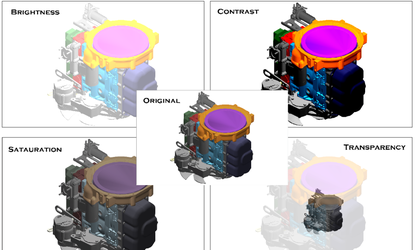
- Brightness
- Contrast
- Saturation
- Transparency
 These can change the appearance of the image. Here are some examples.