LTE Command Line

(Available in Platinum and Professional)
The Command Line enables you to activate a command by typing its alias, and/or to input geometric data or command information by typing. The Command Line can help you avoid using the mouse or menus. To enable LTE workspace
- Select Tools → Workspace → Customize…
- Select LTE workspace from the drop-down list for Default style.
- Press Close.
Note: LTE Workspace is not a feature of TurboCAD Deluxe
LTE Command Line Options
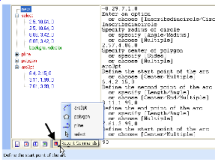
(Available in the LTE Workspace only) The Command Line console is divided into three sections:
- The Command Line itself, which is located to the right of the word Command. This is where you enter command names (aliases).
- The Command History, above the Command Line. This is where you see prompts and options for the current tool, as well as a history of previous tools.
- The Actions List, to the left of the Command History. This is where you can see a list of tools used, points or other geometry defined for the tool, and other actions such as zooming.
The Actions List shows three different types of information. Tools (Line, Circle, etc.) are shown in red. Points are shown in blue inside each tool. These are the geometric data used for each tool. Commands are shown in green; these include non-geometric actions like zoom or redraw.
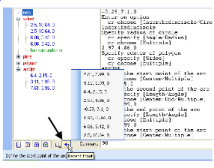
 You can double-click on any object in the Actions List to repeat the command or input.The icons below the Actions List control what is displayed there. The first icon can be used to show or hide the Actions List.
 The other icons can be used to hide the tools, points, and commands.
 The Recent Commands icon displays the tools last used, in reverse order. You can select one of these to activate it.
 The Recent Input icon displays a list of points entered. You can select one of these to use it for the current tool.
Using the LTE Command Line
(Available in the LTE workspace only) This example shows how to use the Command Line to create a polyline.
- You could activate Polyline by clicking its icon or selecting it from the main menu, and still use the Command Line for entering data. But this example will use the Command Line for everything. In the Command Line, a tool is referenced by its "alias."
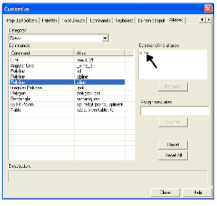
- To see the list of aliases, right-click in the command history area (above the Command field) and select Edit Command Aliases.
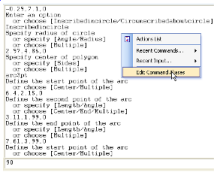
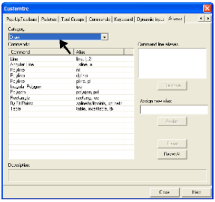
- This opens the Aliases page of the Customize window. The commands are listed according to their appearance in the menu bar. Polyline is in the Draw menu, so choose the Draw category.
Note: You can also open this window by selecting Tools / Workspace / Customize.
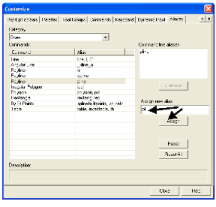
- Highlight Polyline, and its default alias, "pline",. appears on the right side.
- To make it easier to type, you can name the alias to something easy like "pl." Then click Assign, then close the window.
- To access the Command Line, you can place your cursor there, or press Tab to enter the Command field. Enter "pl" and press Enter.
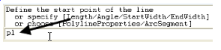
Note: If dynamic fields are displayed, pressing Tab will place the cursor in the first dynamic field. You can type an alias in any of these fields, or press Tab until the cursor moves to the Command Line.
- The default action is to "Define the start point of the line."

- You can click a point on-screen or use the dynamic input fields (see "Using Dynamic Input" on page 87). To define the start point in the Command Line, type the coordinates using the format "0,0" then press Enter.
- For the end point of the first segment, type "20,0."
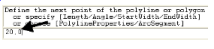
This creates a horizontal segment 20 units long. 
- To use the local options, you can open the local menu by right-clicking. To activate a local option in the Command Line, type the first letter of the option name. So to define the next segment by "Length" type "L" and press Enter.
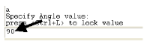
- Then type "15" and press Enter to set the length.
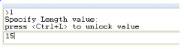
- The prompt now mentions that you can lock this value by pressing Ctrl+L, so press Ctrl+L.
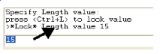
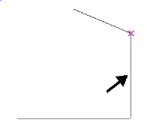
- To complete the line segment, enter "A" then type "90." Press Enter twice.
This completes the second line segment. If you move the mouse around, the preview line for the third segment is locked at 15 units.
- For the next segment, enter "A" again, then type 180 and press Enter twice.
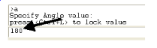
- This finishes the third segment, which is also 15 units long.
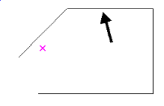
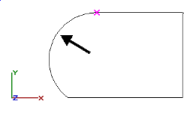
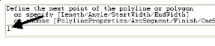
- To make the next segment an arc segment, look in the Command History for option names. When an option has two words, such as "Arc Segment," you enter the first letter of each word. So type "AS" and press Enter.
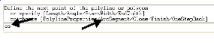
- The last step is to complete the polyline by closing it. But if you enter "C," that will invoke the Circumference option which is listed first. To invoke Close, type the entire word: "close."

- The polyline is now closed with an arc segment.