Materials
Default UI Menu: Options/Materials
Ribbon UI Menu:

By applying materials to a 3D object, you can obtain a more realistic view of the model during a render.An object's materials can be seen in Quality render mode, and in certain types of Draft rendering.Several materials and categories are provided by default. You can create a new material via the Render Manager .
Differences between Lightworks and RedSDK materials
Representation, storage structures and all other elements are completely identical for Lightworks and RedSDK Luminances, Environments and Render Styles. At the same time the two sets of materials have a number of differences, which are described in more detail below:
- All information about Lightworks materials is stored in a special text file. Before the rendering process initiate a special code appends the Lightworks material definition into this text file. All information about the RedSDK materials is stored in .RED files, and only a few special master properties are available for user to change. Therefore, RedSDK material stored in TurboCAD, are held as small text file, which contains the file path to the corresponding RED file. Without .RED file materials will not work in RedSDK.
- In the case of Lightworks if a shader has a texture, the text representation of this shader contains only the file path to the image file. Only immediately before the rendering process is the image file loaded. In the case of RedSDK the RED file contains not only path to the texture, but the embedded image file itself. the path to the image file may not be valid, but the loaded texture inside RED file is always valid.
- RED files can be stored by the following paths:
- Path to propin.dat (Luminance.dat, sceneenv.dat or RenderStyles.dat) / RedSDK
- Path to Default.dat / RedSDK (for materials, luminances, environments or render styles)
- Near active drawing file
In all these cases a relative path to the RED file will be used. A user can use any other custom RED file, however, In this case, an absolute path will be used.
- When a user deletes a material, the text representation of the material also is deleted. In the case of the RedSDK material the .RED file also is deleted except in cases when the RED file was custom or default (I.e. installed together with TurboCAD). In the case of a custom file you cannot delete the .RED file because you did not create it.
- A user can create a new RedSDK material in two main ways.
1. Create from a custom RED file.
2. Create it from a special copy of the default RED file. Therefore, when the first new material is created in the Render Manager a new *.RED file is created as a copy of the default RED file.
- In the case of Lightworks, a text representation of the material is included in the .tcw file. That is why it is possible to send just a .tcw file to another user and that user will be able to reproduce a render.
- As mentioned, in the case of RedSDK for the *.RED file in needed for rendering. That is why it is necessary to use the e-pack functionality in the case of exchanging files that depend upon RedSDK.
There is a RedSDK material specific UI control which displays the path to the .RED.
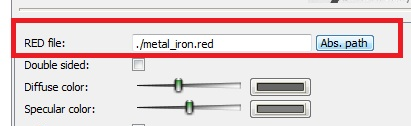 This control is used for these cases:
When the RedSDK material contains relative path to the .RED file. Pressing the Abs. path button user can see the absolute path which is used for loading of the RED file.
By pressing the Rel. path button the user can return to the state where the relative path is displayed.
This control is used for these cases:
When the RedSDK material contains relative path to the .RED file. Pressing the Abs. path button user can see the absolute path which is used for loading of the RED file.
By pressing the Rel. path button the user can return to the state where the relative path is displayed.

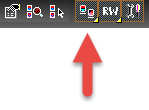
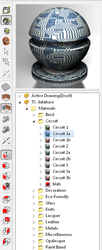
Using the Materials Palette
Default UI Menu: Tools/Palettes/Materials
Ribbon UI Menu:

Provides easy and fast access to object materials.
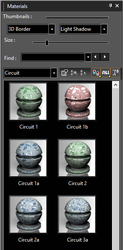
Categories

All materials that have been defined are displayed here, and can be assigned to objects and edited.
Find Material of Selection.

To edit a material, select the item in the palette, then right-click and select Edit Material. Or double-right-click on the item, or click Edit Material.
You can use Select by material to select the object by applied material. Select the material in the materials palette and click Select by material the object having the material applied will be selected. Make sure that Active Drawing is selected in the categories.
To switch the luminance display from thumbnails to list format, click View Thumbnails and select a different view.
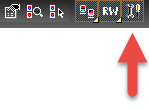
 TurboCAD has Lightworks rendering engine available. The Render Engine Filter allows you to specify which components will be displayed in the palette. ALL sets the palette to show all elements from all installed rendering engines. LW will show only LightWorks elements.
 You can hide or show the palette fields and toolbars by clicking Show / Hide Options.
 Right-click on the Material palette will open a local menu that provides a wide array of options.
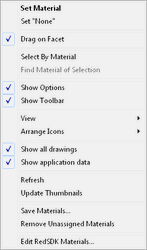
Set Material: Sets the currently selected material to the currently selected objects. Set "None": Sets the material of the currently slected object to none. Select by Material: Select all objects that have the material currently selected in the palette. Find material of Selection: In the Palette locate the material of the currently selected object. Show Options: Toggle the display of the options on/off. Show Toolbar: Toggle the display of the toolbar on/off. View: Allows you to toggle on/off Thumbnails, List, Details Arrange Icons: Allows you to spcify how the icons will be arranged: No arrange, By Name, By Name Inversely, By Category, By Category Inversely Refresh: Refreshs the thumnails to reflect changes. Update Thumnails: regenerates all of the thumbnails in the palette. Save Materials: Saves the current materials. Remove Unassigned materials: (This option only appears if the category is set to a Drawing Shader Manager) unused materials will be removed from the palette. Edit LightWorks Materials...: Opens the Render manager. The Render manager is opened to the current material if one is selected. If no material is selected the Render manager opens to the current category.
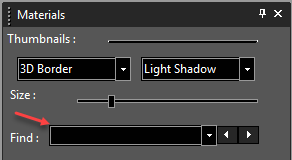
Search Option:
You can also search a material in the palette. Type a word in "find" option to search, the first suitable item is highlighted. To browse through the materials, buttons next to the input field highlight and can be used to show the previous or next suitable item. Successful search options are added to the list and saved between sessions.
Dragging and Dropping Materials
Another way to apply materials to object is to select a material in the Material palette, then drag-and-drop it onto the desired object.
Drag on Facet
Selecting the Drag on facet setting in the local menu of the Material palette will allow you to drag a material to a single facet of an object.
Lightworks Material Properties
 You can access material properties via the Material page of an object's Properties window), or by using the Materials Palette.
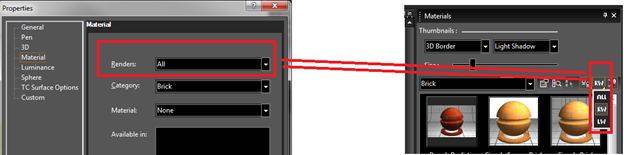
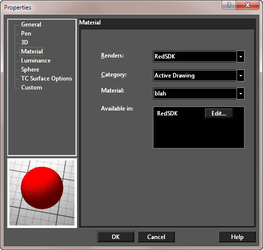 Renders: Select which render engine you wish to select a material from: RedSDK, Lightworks, or both.
Category: Groups of materials such as glass, metals, stone, and wood, or the name of an open drawing.
Renders: Select which render engine you wish to select a material from: RedSDK, Lightworks, or both.
Category: Groups of materials such as glass, metals, stone, and wood, or the name of an open drawing.
Material: This field depends on the category. For example, if the Category is Metals, the materials include brass, iron, aluminum, etc.
Material: The list of the materials available in the selected category.
Available In: Shows which of the render engines have definitions for the selected material.
Edit... Opens the Render Manager.
Loading and Saving Materials
Default UI Menu: Options/Materials/Load Materials, Options/Materials/Save Materials
Ribbon UI Menu:

Use the categories on the right side of the Save window to specify which materials you want to save. Material data will be written to a .mat file, located in the Materials folder.Any new material you define will be automatically saved in the TurboCAD file as well.To load a materials .mat file, select Load Materials from the Options / Materials menu, or from the local menu of the palette.
Managing Materials in the Render Manager
 Or you can select a luminance on the Luminances Palette, right-click and select Edit Material.
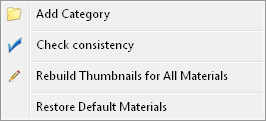
 Right clicking on tree elements provides a variety of functions. Right clicking on Materials allows you to:
- Add Category
- Rebuild Thumbnails for all Materials
- Restore Default Materials
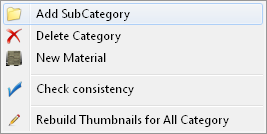
 Right clicking on a Category allows you to:
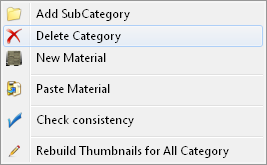
- Add SubCategory
- Delete Category
- New Materials
- Rebuild Thumbnails for all Category
 If an luminance has been copied you will also be allowed to:
- Paste Materials
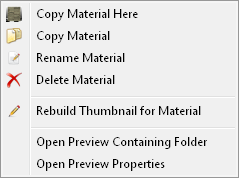
 Right clicking on a Luminance allows you to:
- Copy Materials Here – adds a copy of the selected luminance to the bottom of the current category.
- Delete Materials
- Rename Materials
- Copy Materials – Copies the luminance so it can be pasted elsewhere.
- Add Light – Adds a light to the selected Materials.
- Rebuild Thumbnail for Materials
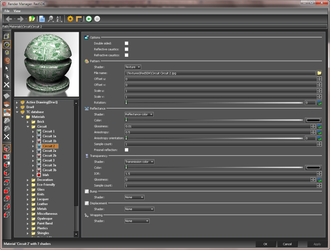
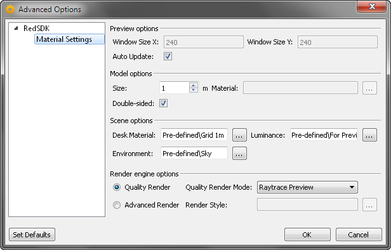 The toolbar on the Left side of the editor allows you to specify the elements of the preview.
 You can navigate within the preview window using the center mouse button.