Luminance
Default UI Menu: Options/Luminance
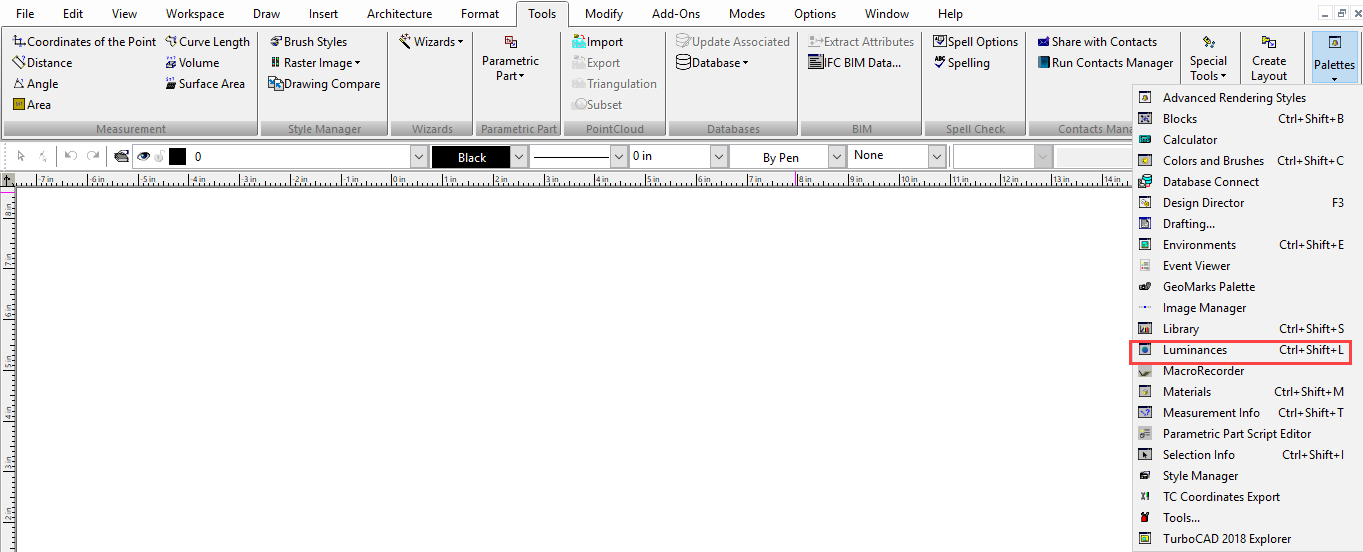
Ribbon UI Menu:

Another way to add lights to your drawing is to assign luminance properties to the entire mode, or to individual 3D objects. Luminance is one or more lights attached directly to objects, or to the overall WCS or UCS. Luminance differs from lights in that the range of luminance effects is much larger than those available for drawing lights An object's luminance can be seen either in Draft or Quality rendering, as long as an appropriate Lightworks rendering mode is used.Several luminances and categories are provided by default. You can create a new luminance via the Luminances Editor .
Loading and Saving Luminances
Default UI Menu: Options/Luminance
Ribbon UI Menu:

Use the categories on the right side of the Save window to specify which luminances you want to save. Luminance data will be written to a .dat file, located in the Luminance folder. Any new luminance you define will be automatically saved in the TurboCAD file as well.To load a luminance .dat file, select Load Luminances from the Options / Luminance menu, or from the local menu of the palette.
Luminance Properties

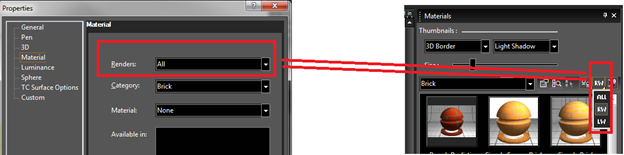
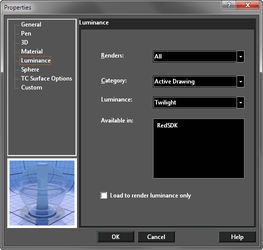 Renders: Select which render engine you wish to select a material from: RedSDK, LightWorks, or both.
Category: Groups of Luminances such as complex, single, sky, or the name of an open drawing.
Edit Lumninance: The list of the Luminances available in the selected category.
Available In: Shows which of the render engines have definitions for the selected luminance.
Load to render luminance only: If on, the geometry of the luminance object is hidden and only the illumination effects are shown.
Edit... Opens the Render Manager.
Renders: Select which render engine you wish to select a material from: RedSDK, LightWorks, or both.
Category: Groups of Luminances such as complex, single, sky, or the name of an open drawing.
Edit Lumninance: The list of the Luminances available in the selected category.
Available In: Shows which of the render engines have definitions for the selected luminance.
Load to render luminance only: If on, the geometry of the luminance object is hidden and only the illumination effects are shown.
Edit... Opens the Render Manager.
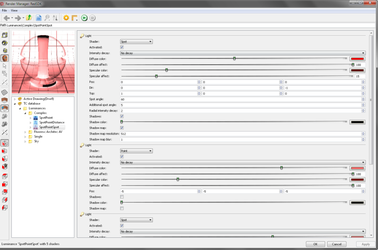
Managing Luminances in the Render Manager
 Or you can select a luminance on the Luminances Palette, right-click and select Edit Luminance.
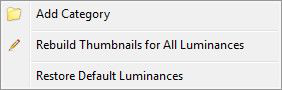
 Right clicking on tree elements provides a variety of functions. Right clicking on Luminances allows you to:
- Add Category
- Rebuild Thumbnails for all Luminances
- Restore Default Luminances
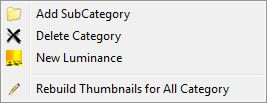
 Right clicking on a Category allows you to:
- Add SubCategory
- Delete Category
- New Luminance
- Rebuild Thumbnails for all Category
 If an luminance has been copied you will also be allowed to:
- Paste Luminance
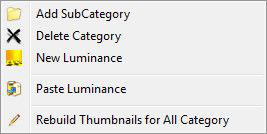 Right clicking on a Luminance allows you to:
- Copy Luminance Here – adds a copy of the selected luminance to the bottom of the current category.
- Delete Luminance
- Rename Luminance
- Copy Luminance – Copies the luminance so it can be pasted elsewhere.
- Add Light – Adds a light to the selected luminance.
- Rebuild Thumbnail for Luminance
 Complex luminances can contain up to five light types; each type is represented by a page on the Luminance Editor. For each page, select the desired light type, and edit its parameters as needed. The available parameters depend on the selected light type. In the Preview section, you can change the shape and orientation of the preview object and desk (the surface beneath the object). Under Options, you can toggle the display of the preview object or desk. If Auto Update is checked, the preview will update each time a change is made (otherwise you must click the Preview button).
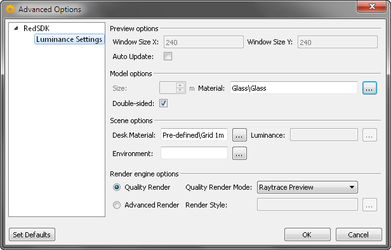 The toolbar on the right side of the editor allows you to specify the elements of the preview.
 You can navigate within the preview window using the center mouse button.
Now you can set "Direction by Geo-Location" in sky and sun shaders
Using the Luminances Palette
Default UI Menu: Tools/Palettes/Luminances
Ribbon UI Menu:
Provides easy and fast access to object luminances.
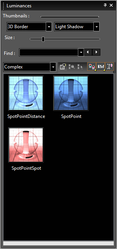
Categories

Specify the luminance cetegory.
Find Luminance.
To edit a luminance, select the item in the palette, then right-click and select Edit Luminance. Or double-right-click on the item, or click Edit Luminance.
To switch the luminance display from thumbnails to list format, click View Thumbnails and select a different view.
 TurboCAD has LightWorks rendering engine available. The Render Engine Filter allows you to specify which components will be displayed in the palette. ALL sets the palette to show all elements from all installed rendering engines. LW will show only LightWorks elements.
 You can hide or show the palette fields and toolbars by clicking Show / Hide Options.
 Right-click on the Luminance palette will open a local menu that provides a wide array of options.
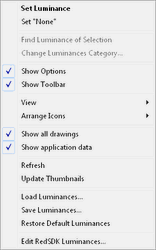
Set Luminance : Sets the currently selected Luminance to the currently selected objects. Set "None": Sets the Luminance of the currently slected object to none. Show Options: Toggle the display of the options on/off. Show Toolbar: Toggle the display of the toolbar on/off. View: Allows you to toggle on/off Thumbnails, List, Details Arrange Icons: Allows you to spcify how the icons will be arranged: No arrange, By Name, By Name Inversely, By Category, By Category Inversely Refresh: Refreshs the thumnails to reflect changes. Update Thumnails: regenerates all of the thumbnails in the palette. Load Luminances... : Load Luminances from file. Save Luminances... : Saves the current Luminances Remove Unassigned Luminances: (This option only appears if the category is set to a Drawing Shader Manager) unused luminances will be removed from the palette. Edit LightWorks Luminances...: Opens the Render manager. The Render manager is opened to the current Luminance if one is selected. If no Luminance is selected the Render manager opens to the current category.
Search Option:
You can also search a luminance in the palette. Type a word in "find" option to search, the first suitable item is highlighted. To browse through the luminances, buttons next to the input field highlight and can be used to show the previous or next suitable item. Successful search options are added to the list and saved between sessions.
