Render Manager
Default UI Menu: Tools/Render Manager
Ribbon UI Menu:

The Render Manager is opened whenever you click an option to Edit: Materials, Environments, Render Styles, or Luminances.
Preview options:
- Window Size: options display the current size of the preview pane. These sizes will be used when creating a saved thumbnail. Currently, the numbers can't be edited in the dialog. Resizing the upper right pane will change the numbers.
- Auto Update: is on by default. As changes are made to settings, the thumbnail will update; just changing a number will trigger an update. When this is turned off, use the Refresh button on the Render toolbar to update the thumbnail. Model options:
- Size: Defines the size basic models (Box, Sphere, etc.) used in thumbnails. The default size is 39.370079 inches or 1 meter.
- Material: Specify the material settings for the basic models. Not available in "Material Settings".
- Double-sided: Controls the visibility for the front and back sides. Scene options:
- Desk Material: A pre-defined Grid is the default for the desk or floor material or choose a different material from the list. Available in all settings.
- Luminance: A pre-defined setting for Materials and Render Styles and a different pre-defined setting for Environments. Not available in "Luminance Settings".
- Environment: A pre-defined "Ray Cube Gradient" setting is used or choose from the list. Not available in "Environment Settings".
- Units: "By Drawing" is the default or choose from the list. Render engine options: Choose a style from the list. Not available in "Render Style Settings".
- Advanced Render — Render Style: On by Default
- Quality Render — Quality Render Mode: If activated, use "Raytrace Full" or select from the list.
Editor Window
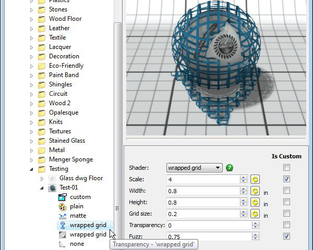
Displays the various options for the selected shader. Clicking on the green question mark icon will open this Help file. Some fields will have an cycle icon
This allows you to choose the type of field you want to use; spinner (absolute values) or slider (percentage values). 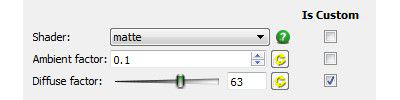 The Is Custom column allows you to checkmark only those fields you may want to make frequent changes to.
 When you go to edit the material, it will open at the "Custom" shader setting and only the checked fields in the various categories will be displayed together on one page. No need to jump back-n-forth between shader pages.