Printing
(Available in all TurboCAD variants)
Default UI Menu: File
Ribbon UI Menu:

TurboCAD has a wide range of printing features, enabling you to scale and center your drawing on the page or to tile your drawing across multiple pages. TurboCAD also provides a full range of advanced printing options for experienced users. Paper Space is the work mode used for layout your drawing for printing.
Note: Under Windows, plotters are treated as printers.
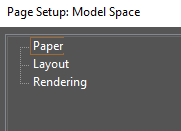
Page Setup
Default UI Menu: File / Page Setup
Ribbon UI Menu:

Controls exactly how drawings will be printed. The three pages of this window are Paper, Layout, and Rendering.
Note: Page Setup is different than the Page Setup Wizard , but any relevant parameters set in the Wizard will appear in Page Setup as well.
After setting the parameters in this window, you can either print directly from the Page Setup (click Print), or click OK to accept the changes and return to the drawing. You can then print using File / Print, and the Page Setup settings will be used.
Tip: You can also access the Page Setup via the Print window.
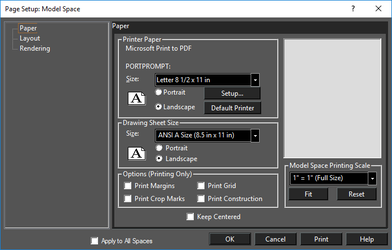
Page Setup - Paper
Sets the size, orientation, and other parameters of the printer paper and the drawing sheet. The printer paper is the physical paper that goes through the printer; the drawing sheet is the area on which your drawing will be printed, which can span multiple sheets of printer paper.
Note: These settings are not retained with the drawing file.
Printer Paper: Sets the size and orientation of the printer paper. These options can also be set via the Print window. Setup: Enables you to choose another printer or access functions that directly control your printer. This window is specific to your printer driver, so check your printer or printer driver documentation for details. Default Printer: Sets the printer paper parameters to those of the default printer. Drawing Sheet Size: Controls the size and orientation of the area on which your drawing will be printed. This area can be imposed on a single sheet of printer paper, or it can span multiple sheets of printer paper. Its orientation can also be set separately from the orientation of the printer paper. The page display on the right will reflect the relationship between printer paper and drawing sheet. The drawing sheet size will be shown in white (or a custom color if one has been set), and the dashed lines show individual pages of paper. Changing the drawing sheet size may change the number of columns and rows. Options: Enables you to set what elements are printed. These options affect only the printing of the drawing and are not reflected in the appearance of the drawing on screen. Print Margins: Prints a border along the margin of the printer sheets. This is useful for framing a drawing that is printed on a single sheet. Print Crop Marks: Prints crop marks on the printer sheets. This is useful if you want to print across multiple printer sheets and crop the sheets so they can be pasted together. You may need to increase your margins to make room for the crop marks. Print Grid: Prints the grid, as long as it currently displayed. Print Construction: Prints construction geometry. Printing Scale: Scales the drawing so that it fits within the drawing sheet (click Fit), or you can choose a custom scale. If the desired scale does not appear in the list, you can type directly using the format 1 in = 1 ft. Keep Centered: Keeps the drawing centered on the drawing sheet. It may be necessary to turn this option off, then on again, for the desired effect.
Page Setup - Layout
Controls the number of rows and columns (sheets of printer paper arranged vertically and horizontally), as well as other paper parameters.
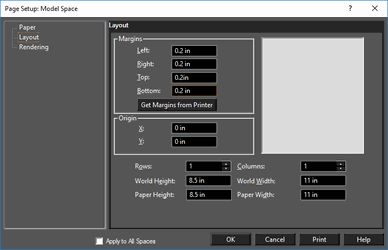
Margins: Margins are the dotted rectangle lines inside the edges of the paper, that let you know whether you are drawing inside or outside the printable area of your drawing. You can specify the top, bottom, left, and right margins of the printer paper in Paper units. You can also enter units other than the default units. Get Margins from Printer: Sets the minimum margins for your printer and page size. Rows / Columns: Sets the number of rows and columns of printer sheet paper for tiled printing. As you increase the number of rows and columns, the Drawing Sheet Size (the area on which your drawing will be printed) increases accordingly. World Height / Width, Paper Height / Width: Sets the dimensions of the drawing sheet in world or paper units. As you change these values, the number of rows and columns will automatically update. Origin: Enables you to move the paper to a different location in the drawing. Specify the location of the lower-left corner of the paper in absolute coordinates. This feature is useful if you want to print a particular area of a large drawing by relocating the paper to the area that you want to print.
Page Setup - Rendering
Sets the resolution at which a rendered drawing will be printed.
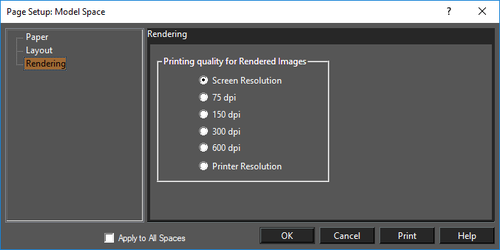
Printing quality for Rendered Images: Select the resolution for printing rendered drawings.
Note: When the resolution is set to a value that is higher than the maximum resolution supported by the printer, the image will be printed at the printer's maximum resolution.
Apply to All Spaces: It applies settings to all paper spaces in the drawing when checked.
Printer Paper and the Drawing Sheet
One potentially confusing concept is that of the printer paper versus the drawing sheet. Printer paper means the physical sheets of paper that go through the printer. The drawing sheet is the total surface area on which your drawing will be printed. The drawing sheet can correspond to a single sheet of printer paper, or it can span multiple sheets of printer paper. Both the printer paper and the drawing sheet have adjustable sizes and orientations. This provides a great deal of flexibility when you want to print a large drawing on multiple sheets. You could, for example, print a poster in landscape orientation three feet wide and two feet tall. You could print this virtual sheet out on 32 sheets of 8.5" x 11" paper oriented in portrait, or on 30 sheets of the same size paper oriented in landscape.
Printing from Model Space
Default UI Menu: File/Print
Ribbon UI Menu:

To get a printed copy of the objects appearing in the current window view, you can use File / Print and choose to print the current view.
Print Options
Default UI Menu: File/Print
Ribbon UI Menu:

Hotkey: Ctrl+P
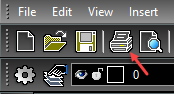
Icon on Standard Toolbar:
 Provides a set of tools for printing a single view of a drawing, or printing specific sheets drawing spanning multiple sheets of paper.
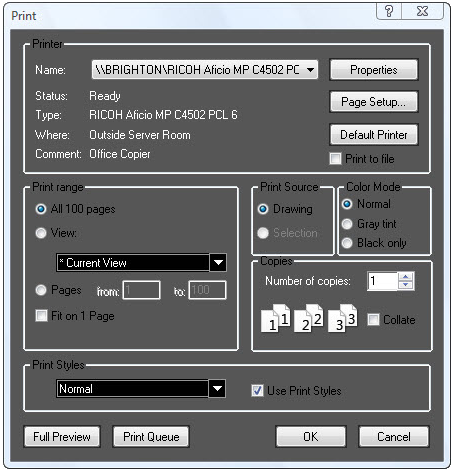 Printer: Select a printer and manipulate its properties.
Name: Select the desired printer from the drop-down list. All printers set up on your system should appear on this list.
Properties: Opens the Properties window for the selected printer.
Page Setup: Controls exactly how drawings will be printed.
Default Printer: Selects the Windows default printer.
Print to File: Prints the document as a file instead of routing it directly to a printer. You will be prompted to specify the filename and location.
Print Range: Options for setting a specific view of the drawing to print, and for selecting a range of pages when printing a drawing that spans multiple printed sheets.
Printer: Select a printer and manipulate its properties.
Name: Select the desired printer from the drop-down list. All printers set up on your system should appear on this list.
Properties: Opens the Properties window for the selected printer.
Page Setup: Controls exactly how drawings will be printed.
Default Printer: Selects the Windows default printer.
Print to File: Prints the document as a file instead of routing it directly to a printer. You will be prompted to specify the filename and location.
Print Range: Options for setting a specific view of the drawing to print, and for selecting a range of pages when printing a drawing that spans multiple printed sheets.
Tip: This is useful for printing tiled drawings if you only want to print specific pages.
All: Prints the entire current drawing. If you choose Selection under Print Source, only objects that are selected will be printed. If your drawing spans multiple printer sheets, the total number of sheets will be shown in this option title. View: Prints a single view of the drawing. You can print the current view by default, or click in the list box and choose any named view. Pages: Prints a range of pages if the Page Layout is set to print multiple pages. The printer sheets are counted starting in the lower-left corner from left to right, and from bottom to top. Fit on 1 Page: Prints everything on a single page. This option can be used either for printing a view or printing the entire drawing. Print Source: Select what you want to print. Drawing: Prints the current drawing. Selection: Prints only selected objects. Color Mode: Normal: Uses the predefined printer settings. Gray tint: Used for color printers. Disables color mode and prints in black and white, using grey tints for other colors. Black only: Disables color mode and prints in black only; no grey tints are used. Copies: Sets the number of copies and whether you want multiple copies to be collated. Print Styles: Sets the print style to be used while printing.
Print Window
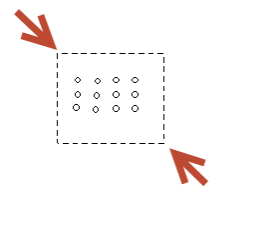
You can create printouts by arbitrarily specifying a window of the desired area of a drawing.
- Go to the Print dialog.
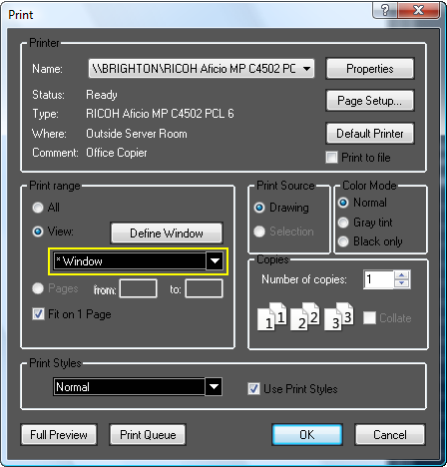
- Change the Print Range to View
- In the View drop-down select Window.
- Press the Define Window button\5. Click two points to define the print window.
- When the Print dialog reappears click the Ok button. If you wish to review the print area prior to printing click the Preview button.
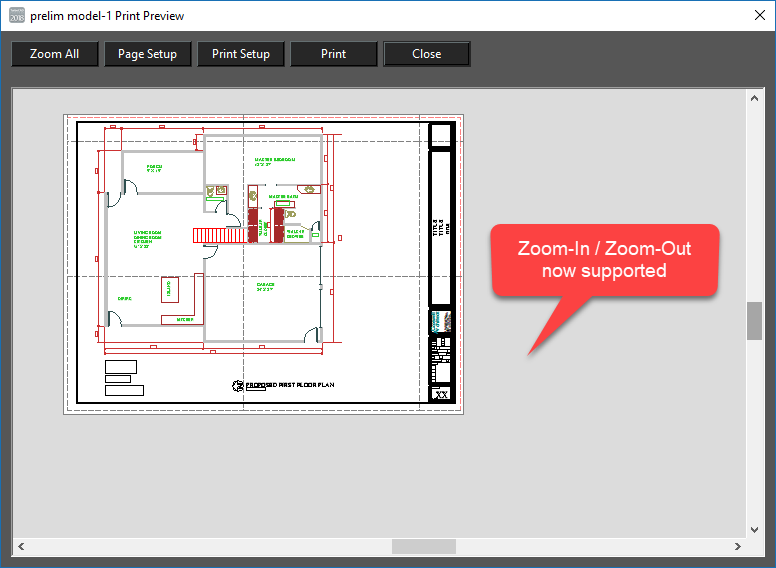
Previously, it was not possible to zoom in and out using the wheel mouse on the print preview. Now you can zoom in Print Preview windows, prior to printing to be sure things are looking correct Such as line thickness etc.
Print Style Options
Default UI Menu: File/Print Styles
Ribbon UI Menu:

The Print Styles Option dialog allows you to View and Specify the current print style. To set the Current Print Style
- Open the Print Styles Dialog.
- Select the Style from the Print Style Table Name drop-down.
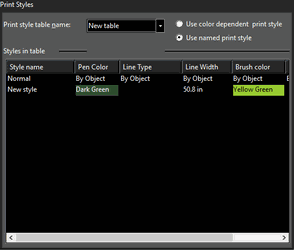
Print Styles
Default UI Menu: File/Print Styles
Ribbon UI Menu:

Enable you to change color, line style, and brush of an object when you send the drawing to print. These settings do not affect the objects on the screen, only how objects are printed.
Print Style Manager
Default UI Menu: File/Print Style Manager
Ribbon UI Menu:

Print styles can be created, modified, or imported via the Print Style manager.
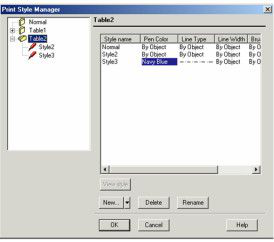 View Style: Opens the Properties window for the selected style.
New: Enables you to create a new table, or a new style within the selected table. You can also duplicate items, and import AutoCAD plot styles.
View Style: Opens the Properties window for the selected style.
New: Enables you to create a new table, or a new style within the selected table. You can also duplicate items, and import AutoCAD plot styles.
Note: These features are also available by right-clicking in the table list area.
Delete and Rename: Removes or renames the selected table or style. Deleting a style cannot be undone.
Print Style Properties
To access the properties of any print style, select the style and click View Style.
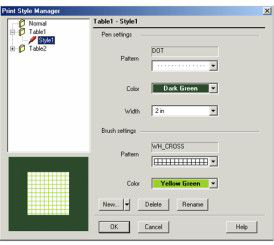 Pen Settings: Sets the pattern (line style), color, and width for the pen that will be applied to an object during printing.
Brush Settings: Sets the pattern and color for filling objects during printing. This only applies to objects to which a brush has been assigned.
Pen Settings: Sets the pattern (line style), color, and width for the pen that will be applied to an object during printing.
Brush Settings: Sets the pattern and color for filling objects during printing. This only applies to objects to which a brush has been assigned.
Applying Print Styles
Once print styles have been created and/or modified, you can add them to your drawing via the Print Style page of the Drawing Setup (Options / Print Styles). While in Paper Space, you can also access this page through the Properties window. An object's print style is set in the General page of its Properties. Select "Other" from the drop-down menu to open the Print Style manager.

Note: Certain types of objects cannot display print styles.
Selecting Print Style Type
You can use two different Print Style type: Named Based and Color Based. Only one type of styles can be used in a drawing at the same time.
STB - Name Based Print Styles
Name based print styles correspond to AutoCAD STB files. They map a named style to a specific print presentation and group of settings.
CTB - Color Based Print Styles
Color based print styles correspond to AutoCAD CTB files. They map each indexed colors to a specific print presentation and group settings. To Specify the Type of Styles Used
- Open the Print Styles Dialog.
- Use the option button to specify whether you want named or color based print styles.
Simple Printing and Tiled Printing
To make a simple print of a drawing that fits on one sheet:
- Select File / Print to open the Print window.
- For Print Range, click All to print your entire drawing.
- Check Fit on 1 Page.
- Select the printer, and click Properties to set the paper size and orientation.
- Return to the Print window, and click OK to print your drawing. Your drawing will be centered and printed on a single sheet of paper.
If your drawing is larger than the printer sheet, as it is in most cases, you need to use tiled printing. This method prints sections of your drawing on separate pages, which can then be pieced together. The Page Setup is used to set parameters for tiled printing .
Tip: When tile printing, it is usually best to turn the Print Crop Marks option on, unless your printer is capable of printing with zero margins. Crop marks enable you to easily trim the edges of the paper so that the sheets can be pasted onto a backing for display.
An example of tiled printing is as follows:
- Select File / Page Setup.
- On the Paper page, use the Printer Paper field to specify the paper and orientation.
- In the Drawing Sheet Size fields, specify the size and orientation of the area on which you want to print the drawing. For example, if you want a printout 2 feet tall and 3 feet wide, you would type 2 ft x 3 ft in the list box, and choose the Landscape option. Or you can select a standard size.
- Click Fit to place your drawing on the tiled sheets.
- Click Print to print your drawing immediately, or click OK and print later using File / Print.
Another way to tile print is to specify the number of rows (the number of pages from top to bottom) and columns (the number of pages from left to right). This is done on the Layout page of the Page Setup. You can then return to the Paper page to fit your drawing onto the tiled printer paper. TurboCAD will automatically adjust the dimensions of the drawing sheet to accommodate changes in the number of rows and columns.