3D Boolean Operations
Default UI Menu: Modify/Modify 3D Objects/3D Boolean Operations
Ribbon UI Menu:

Boolean operations use two existing 3D objects to create a new object. Objects can be combined, subtracted, intersected, or sliced. The objects must both be of the same type - surfaces or solids.
You can display the Boolean & Facet toolbar by right-clicking in any toolbar area and selecting Boolean & Facet.
 These tools are also available on the fly-out toolbar from the Drawing Tools.
 When Boolean operations are completed, you can edit the shape and location of the objects used to create them . If you plan to assign materials to your 3D objects, it is recommended to do this after the Boolean operations are performed.
Note: The Imprint tool also uses Boolean operations, combining a solid with the extrusion of a 2D closed profile.
Boolean operations can use multi-select modes to select objects as components for operations.
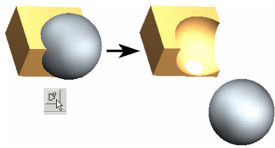
3D Add
(Available in Platinum, Professional and Deluxe)
Default UI Menu: Modify/Modify 3D Objects/3D Boolean Operations/3D Add
Ribbon UI Menu:

Combines two or more 3D objects into one object. Any overlapping volume is removed. Select two objects to combine, and the second object is joined to the first object. Selection order is important, because the new object will have all the properties of the first object selected, such as layer and material.
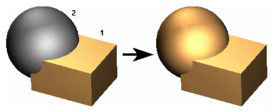
The resulting object is one object. You can verify this by selecting the object.
The selected objects do not have to overlap. If you combine non-overlapping objects, they will still be combined into one object.

To select multiple objects hold down the shift key while selecting, then select Finish Selection from the local menu.
Note: Boolean operations can use multi-select modes to select objects as components for operations.
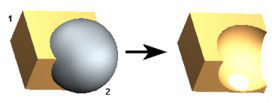
3D Intersect

(Available in Platinum, Professional and Deluxe)
Default UI Menu: Modify/Modify 3D Objects/3D Boolean Operations/3D Intersect
Ribbon UI Menu:

Creates one 3D object that is the overlap (intersection) between two objects. Select two objects that overlap. Selection order is important, because the new object will have all the properties of the first object selected, including layer, and material.
 Local menu option:
Keep Original: When this option is selected the original objects used in the intersection will be retained.
Local menu option:
Keep Original: When this option is selected the original objects used in the intersection will be retained.
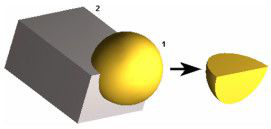
3D Subtract

(Available in Platinum, Professional and Deluxe)
Default UI Menu: Modify/Modify 3D Objects/3D Boolean Operations/3D Subtract
Ribbon UI Menu:

Subtracts one or many 3D objects from one 3D object. First select the object to subtract from, then select the object to subtract. By default, the second object is deleted.
Local menu option:
Don't remove the subtrahend: Keeps the second (subtracted) object. The resultant objects appear the same, but if you move the second object you can see that it was subtracted from the first.
To select multiple objects hold down the shift key while selecting, then select Finish Selection from the local menu. The first object will act as the minuend, and all of the subsequent objects will be subtrahends.
Note: Boolean operations can use multi-select modes to select objects as components for operations.
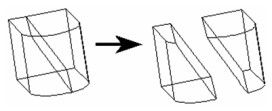
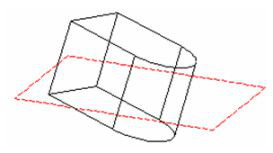
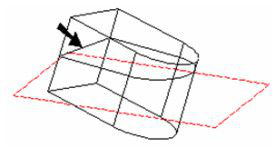
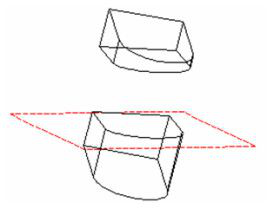
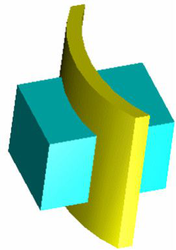
3D Slice
(Available only in Platinum)
Default UI Menu: Modify/Modify 3D Objects/3D Boolean Operations/3D Slice
Ribbon UI Menu:

Slices, or divides, one or more objects into new objects, by specifying the slicing plane.
Note: The Section tool is similar, but it creates a section of the object on the specified plane, while leaving the original object intact.
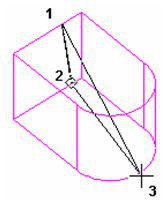
Slice by Line
Slices objects by a plane perpendicular to the current view, defined by two points. This is the default option.
- Select Slice by Line (2 Points) from the local menu or Inspector Bar.

- Select the objects to slice. You can use Shift to select more than one object.
- Select two points The slicing plane will pass through the line defined by these points, in the direction normal to the current view (into the screen).
The slice is created, though in the current view the dividing plane appears as a line.
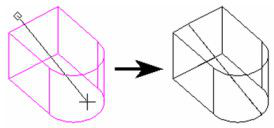
You can rotate the view and move one of the new objects to see how the original object was sliced.
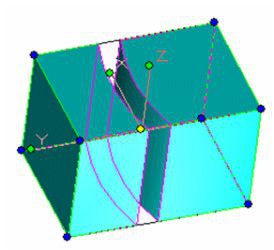
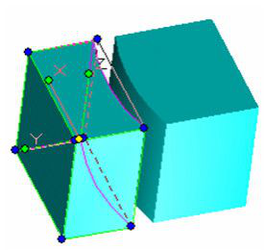
Slice by Plane
Slices objects by defining the slicing plane. The plane is defined by three points.
- Select Slice by Plane (3 Points) from the local menu or Inspector Bar.

- Select the object to section. You can use Shift to select more than one object.
- Select three points to define the slicing plane.
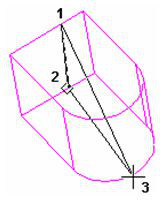
The slice is created. You can move one of the new objects to see how the original object was sliced.
Slice by Workplane
Slices objects by using the current workplane as the slicing plane. For details on workplanes,
- Select Slice by Workplane from the local menu or Inspector Bar.

- Select the object to slice.
Note: To slice multiple objects, start out using a different option - Slice by Line or Slice by Plane. Use Shift to select the objects to slice, then click the Slice by Workplane icon. The object is sliced.
You can move one of the new objects to see how the original object was sliced.
Slice by Surface
Slices the object by using a surface. The surface must be a ACIS solid surface.
- Select Slice by Surface from the local menu or Inspector Bar.

- Select the object to be sliced.
Note: To slice multiple objects, start out using a different option - Slice by Line or Slice by Plane. Use Shift to select the objects to slice, then click the Slice by Workplane icon. The object is sliced.
- Select the the object to do the slicing.
You can move one of the new objects to see how the original object was sliced.
Slice by Facet
Slices objects by a plane perpendicular to the current view, defined by two points. This is the default option.
- Select Slice by Facet from the local menu or Inspector Bar.

- Select the objects to slice. You can use Shift to select more than one object.
- Select the facet that will be used to slice the object.
You can rotate the view and move one of the new objects to see how the original object was sliced.
Delete a Sliced Part
Removes one of the new objects created by slicing objects. This option is used in tandem with one of the other options.
- Select the desired slicing option (in this case, Slice by Plane) and Delete a Sliced Part from the local menu or Inspector Bar.
- Select the object to section. You can use Shift to select more than one object. Slice the object by the selected method, in this case, defining a plane by three points.
3. The slice is created. Select the object you want to delete.
Tip: Objects created as a result of slicing can also be deleted by selecting them and pressing the Delete key.
Note: Boolean operations can use multi-select modes to select objects as components for operations.
Leave Graphic Associations

If this option is on graphic association to the sliced part will be retained. It is on by default.
Delete Graphic Associations

If this option is on graphic association to the sliced part will be deleted.
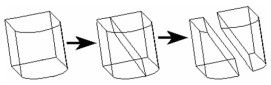
Exploding Solids
(Available in Platinum, Professional and Deluxe)
Default UI Menu: Modify/Explode
Ribbon UI Menu:

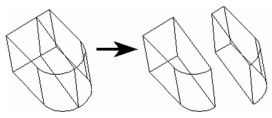
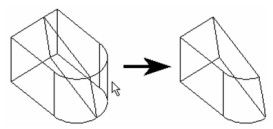
If you use Boolean functions such as 3D Add or 3D Subtract, it is possible to get a solid comprised of two or more separate objects that are still considered to be one object. It can be difficult to split this solid using 3D editing tools, but the Explode tool can be easily used for this.
- Start with two solids that overlap.
- Use Boolean Subtract to remove one solid from the other. In Select mode the two parts are considered to be one object.
- With the object still selected, activate Explode (Format / Explode).
Note: For more information on exploding, The two parts are now considered to be separate objects.
MultiAdd_VB6
(Available in Pro Platinum, Expert and Deluxe)
Default UI Menu: SDK/Boolean/MultiAdd_VB6
Ribbon UI Menu:

Combines two or more 3D objects into one object. Any overlapping volume is removed. Select two or more objects to combine, then click the MultiAdd_VB6 tool. All of the selected objects will be combined into one object. The resulting object is one object. You can verify this by selecting the object.
Note: Not Currently Available in 64-bit editions