Animation Mode
Animation Mode 
Menu: Animation / Animation Mode
Used to animate or add motion to objects in a DesignCAD drawing.
NOTE: To exit Animation Mode, select it again from the Animation menu.
This command is also used to produce animated AVI video files that can be played by Windows Media Player and other video player applications.Animation Command will also produce VRML files, which can be used to animate a drawing for display on the Internet.
DesignCAD animation works on the same principle used by motion pictures and animated cartoons. A series of drawing images are recorded one frame at a time, with the position of the animated object changed slightly from frame to frame. When all the frames are displayed in rapid succession, the animated drawing creates the illusion of motion and continuity for the viewer.
DesignCAD animation is performed by establishing keyframes of a drawing at the start, middle and end of an animated sequence. These keyframes serve as guide posts for the sequence. You must select how much time (how may frames) will pass between keyframes. You must also manipulate and move the drawing object between keyframes. This tells DesignCAD what and how much “movement” to display in relation to various times in the animation sequence.
NOTE: Pay attention to where the selection handles on the animated object are located. The selection handle serves as a reference point for all the movement, rota- tion, or scale changes that will occur in your animation.
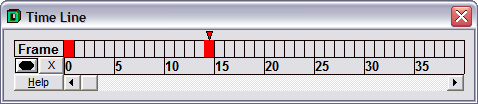
When you activate Animation Mode, the Control Panel and Time Line appear.

Select the object or objects for which you want to record animation. If you want multiple objects to have different animations, animations must be recorded for each object separately.
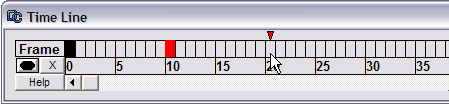
To set the first keyframe, make sure the box in the Time Line above the zero is highlighted in the Time Line (there will be an arrowhead above it) and click the Set Keyframe button.
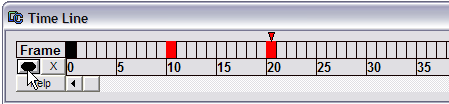
Begin to set the next keyframe by clicking in the box above the number for the next frame that will be a keyframe. Notice that the arrowhead moves above the box you clicked. The boxes that correspond to the keyframes you set (except for the 0 frame) are filled with red, indicating that they are keyframes.
The number of frames left between keyframes determines the size of the animation increments in the final animation. In other words, if you are rotating an object 90 degrees between two keyframes that are ten frames apart (frames 0 and 9), there will be 9 movements. In the final animation, the object will rotate 10 degrees per frame (90 divided by 9 is 10).
TIP: Animation runs at about 15 frames per second, so 30 frames would equal approximately two seconds.
Now implement the transformation, using the Move, Rotate, or Scale commands. You can combine these commands as well.
Once you have moved the object in the desired manner, verify that you have highlighted the box above the number you want to set as the second keyframe and click the Set Keyframe button to lock in the keyframe.
Repeat this series of actions as many times as necessary to complete your animation. If you want to delete a keyframe, highlight the box above the keyframe you want to delete in the Time Line and click on the Delete Keyframe button .
NOTE: Don’t forget to record a keyframe any time you change the direction of movement, the direction of a rotation, etc. For example, if you are going to move an object to the left and then up in your animation, make sure you record a keyframe before you move the object up. If you don’t record a keyframe after you move the object to the left but wait until after you have moved the object to the left and then up, DesignCAD doesn’t know that you wanted to show movement to the left and then upward movement. The object will move diagonally when the animation is played.
Example:
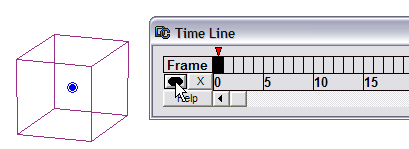
Start with a box, and start Animation Mode. Select the box, and make sure Key Frame 0 is highlighted. To start the animation at this point, click the Record Key Frame icon.
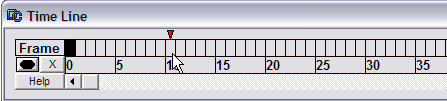
Highlight the key frame where you want the first transformation to end
Click the box to get its select handle and move the box. You can enter “Delta” coordinates, or move it by eye.

When the box is in the position you want, click Record Key Frame again. When recorded, the key frame is red.

When played, the box movement will proceed evenly from Key Frame 0 to Key Frame 10.
If you want the object to by stationary for a few frames, you must record this as well. First, highlight the key frame where you want the movement to end (which in this case is actually NO movement).
To keep the box in place, first click it as if to move it, then use the Gravity snap to click it bank into the same location. Then record this key frame. In this example, between Key Frame 10 and Key Frame 20, the box will not move.
Highlight the next Key Frame, and implement the next transformation. For example, move the box and rotate it as well. Then record the key frame.

If you want to see where the object is at any time during the animation, simply click a key frame.
To see the animation in action, click Play. If Loop is enabled, the animation will play over and over.

In this example, you should see the box move, then stay still, then move and rotate at the same time.
Click Stop to end the animation.

If you want to remove a key frame, highlight it and click the “X” icon.
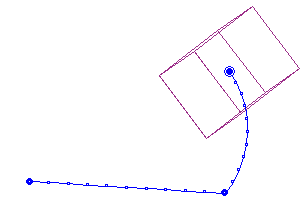
If you want to see the animation path, click Show Path.

This shows the movements, as well as the number of key frames per movement.