Preferences
Menu: Options / Preferences
Provides the advanced user some control over some of the more complex areas of DesignCAD.
HPGL Export Settings:
- Fill Area Spacing (10 to 100 dots): Specifies the distance between adjacent fill lines in plotter increments (usually around 1/1000 of an inch).
- Optimize plot line direction: Specifies whether DesignCAD will attempt to rear- range the point order in adjacent plotted lines to minimize pen movement.
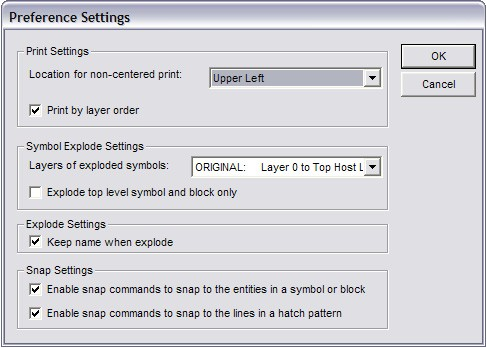
Print Settings:
- Location for non-centered print: Choose which corner of the page a non-centered print will shift towards.
- Print by Layer Order: Specifies whether entities are printed in the order in which they were drawn or in the order of the layers.
Symbol Explode Settings: (see example at the end of this section)
- Layers of exploded symbols: Provides fine-level control over the layer behavior for exploded symbols and blocks (whether they were loaded with the Load and Explode op- tion checked, or were exploded after being loaded into the drawing).
Original: Default behavior. A symbol’s entities get exploded onto their original layers. Entities that were defined on layer 0 of the symbol (or on layer 0 of any nested symbols within the exploded symbol) move to the layer on which the outermost symbol was placed in the current drawing.
Flatten: All of the symbol’s entities, including those in nested symbols, get exploded to the layer on which the symbol was placed in the current drawing.
Original 2: Like Original behavior, except for entities that were on layer 0. Any entities that were on layer 0 of a nested symbol move to the layer on which the included symbol was loaded in it’s host symbol or drawing.
Flatten 2: All of the symbol’s entities get exploded to the layer on which the symbol was placed, except for entities that were on layer 0. Any entities that were on layer 0 of a nested symbol move to the layer on which the included symbol was loaded in it’s host symbol or drawing.
- Explode top level symbol and block only: Controls whether a symbol or block is exploded recursively or if only the outermost symbol or block is exploded. When this option is checked, only the selected block or symbol is exploded; any blocks or symbols that were entities within the exploded block or symbol remain intact. If the option is not checked, then exploding a block or symbol explodes All blocks and symbols contained within the outer block or symbol, so that no blocks or symbols remain.
NOTE: Objects of the first active layer of the symbol will be placed on the layer that follows the last active or named layer of the current document. Other active layers of the symbol will move to document layers with numbers that follow the layer number used for the first active layer of the symbol.
Keep name when explode: When this option is set, all parts of objects that appear as a result of ”Block Explode”, “Solid Explode”, “Group Explode”, and “Selection Explode” operations will get the names of objects that underwent these operations. If the option is not set, then object constituents will keep their old names, or will get default names.
Snap Settings:
-
Enable snap commands to snap to entities in a symbol or block: Allows you to snap to entities inside a block or symbol entity. This can be useful sometimes, but it may cause a degradation in the performance of Running Snaps.
-
Enable snap commands to snap to the lines in a hatch pattern: Allows you to snap to the internal points of a hatch entity. This option may cause a degradation in speed if Running Snaps are enabled.
Example: Symbol Explode
Symbol A contains a red line drawn in layer 0,and a black box on layer 1.
Symbol B contains Symbol A on layer 7, a blue circle on layer 9, and a green star on Layer 0.
Now you include Symbol B on layer 12 of your drawing, and explode it.
- Original: The black box stays on layer 1, the blue circle stays on layer 9, and a red line and green star move to layer 12.
- Flatten: All four entities move to layer 12.
- Original2: The black box stays on layer 1, the red line moves to layer 7, the green star moves to layer 12, and the blue circle stays on layer 9.
- Flatten2: The red line moves to layer 7, the black box moves to layer 12, the green star moves to layer 12, and the blue circle moves to layer 12.