Getting Prepared
When your students sit at their keyboards, a world of possibilities lies before them. They can create anything they need—a letter, a report, a record of some random thoughts. All it takes is a little practice and they never have to worry about bad typing technique again!
Mavis Beacon Teaches Typing for Schools makes learning easy. For beginners, Mavis starts with the very basics of typing. They learn the arrangement of the keyboard and how to use the correct finger for each key. Once they have mastered these fundamentals, the program analyzes their progress and gives them personalized tutorials.
From the moment they begin their first lesson, Mavis compiles information about their progress, designing the course to meet their individual needs. It is important, therefore, that when they start lessons (at Beginner, Intermediate, or Advanced level) you instruct them to follow the program’s recommendations.
It’s also important that they take each lesson in its entirety. As they complete the lessons and become more comfortable with the material they are learning, adjust the program settings, or asking them to pause for a few minutes while you review an updated student progress report. You can also review class progress reports and change settings for the entire class.
Finally, get familiar with the program. If your students are ever are stuck or need instant information about the program, you are their primary resource for navigating. Clicking Help in the Student’s Area only provides students with guidance about finger positioning. If you would like more assistance in understanding the program, consult the User Guide or click Help from the Teacher’s Area in the program to view a dynamic digital version of the manual.
Levels of Instruction
If your students used a keyboard before, or they know nothing of the touch typing method, then they are beginners. The Beginner level introduces them to all of the alphabet keys and emphasizes accuracy. If your students type slower than thirty WPM (Words per Minute) or one hundred KPM (Keys per Minute), the program places them in this level. They must increase their speed through accuracy training before they can proceed to the next level.
Knowledge of and proficiency with all of the alphabet keys moves your students to the Intermediate level. The focus in this level is on reviewing keyboard fundamentals and providing students with some practice in typing techniques. Next, the program begins introducing the number and symbol keys. Once your students have learned them, they begin working on improving their typing speed and refining their new skills. At this point, Mavis Beacon Teaches Typing for Schools analyzes your student’s typing and suggests lessons that may help them improve. The program continues to assess ability and suggest lessons until your students have met their typing goals and move on to the Advanced level of the program.
If your students are advanced typist, the Advanced lessons get their fingers warmed up and let them type lots of interesting advanced text. Here, Mavis Beacon analyzes their typing and constructs lessons that address their weaknesses and reinforce their strengths.
At this level, students perfect their speed and accuracy with Mavis Beacon helping them every step of the way.
Keyboard, Chair, and Monitor
This section provides some general guidelines on how to arrange your students’ work environments to avoid repetitive stress injuries.
First, choose good ergonomic chairs designed specifically for typing and computer use. Ask your students to adjust their chairs’ heights, tilts, armrests, and seat depths to meet their personal requirements.
Then ask your students to set their computer monitors at a comfortable reading distance in front of them, with the top of the screen slightly below eye level. They can protect their eyes from glare by carefully positioning their monitors. You can also have your students try a glare screen (if you have access to them), light background screen color, and sufficient lighting for all your students work stations.
Next, ask your students to position their keyboards so that their bodies are relaxed and their arms and wrists are in the proper positions.
If your students use a copystand to hold their typing materials, ask them to adjust it so that it is level with their monitor. When they must look at it for long periods, instruct them to relax their eyes by occasionally looking away from the screen and focusing on a distant object.
In the workplace, many companies have health and safety regulations aimed at preventing repetitive stress injuries. In addition, some legal jurisdictions have enacted laws specifying standards for office equipment for workers who are at risk for repetitive stress injuries. Since you’re in a school setting, you may want to develop a lesson on this topic.
Correct Typing Posture
Instruct your students to sit back in their chairs with their feet firmly on the floor—or on a foot support (if you have access to them)—twelve inches or so apart. Their upper arms should be almost vertical, with their elbows hanging freely and bent at a ninety-degree angle when extended to the keyboard. The keyboard should be squarely in front of your students’ bodies, within easy reach. Instruct your students to keep their back straight and let their arms relax from the shoulders. Any strained or awkward positions can cause tension in their necks, shoulders, and arms.
Lower back support is also extremely important, and properly adjusted armrests on your students’ chairs can be very helpful. The more time they spend working at the computer, the more important it becomes to pay attention to the layout of their computer areas.
Hand Position
Tell your students to keep their hands and wrists straight when they use the keyboard (if you have access to them, your students might find wrist supports helpful for this). Extend your hands to the keyboard, and let your fingers lightly touch the Home Row keys (second row above the Spacebar key). All typing strokes begin and end here. Your students’ fingers should curl naturally over the keyboard, with their right thumbs touching the Spacebar key lightly.
Typing the Keys
Explain to your students that they must press the keys and the Spacebar key with their fingertips, using the weight of their fingers only, not the force of their wrists and arms. A key needs no more than a light press to type a character on the screen. Tell your students, “When you type, pretend that the keys on the keyboard are ‘red-hot,’ that your fingers will be burned unless you touch the keys lightly and briefly. Do not, however, let your fingers bounce on the keys. Keep your hands relaxed and in their neutral position. Stroke the keys lightly and firmly. Let your fingers move easily, not hastily.”
You can also let your students know that it’s okay to take regular breaks when they type for long periods. Allow them to get up and stretch or do stretching exercises in their chairs. Instruct them to relax their hands by stretching and rotating them at the wrist, or shaking them loosely to relieve tension.
The Backspace Key
In the days when typewriters printed directly on to paper, the Backspace key mainly aligned the keys with the paper. The typist corrected mistakes after completing the document.
Word processors allow you to use the Backspace key to back up, erase, and then correct errors as you type. Mavis Beacon considers this key useful, but its use should not compromise your students’ typing goal. She would like nothing better than for your students to learn to type quickly and accurately and not use the Backspace key at all!
However, most of us do make mistakes from time to time and the Backspace key can be useful. For this reason, by default, the Backspace key is on in the program. If you would like to turn it off—so that your students cannot use it in any of their lessons, quizzes, or tests—you can change the setting from the Teacher’s Area. The Users Manual offer more information about how to change students’ settings.
Mavis Beacon Teaches Typing for Schools does design some lessons in the regular curriculum to work without the Backspace key, especially the games. In these cases, the Backspace key automatically turns off.
The Enter/Return Key
Modern word processors have a “word wrap” feature that automatically advances lines as you type— meaning you don’t use the Enter/Return key for line breaks when typing in the real world. Because of this, the End of Line Wrap feature is on by default in Mavis Beacon Teaches Typing for Schools. If you’d like to turn it off for your students, the Users Manual offers more information about how to change students’ settings.
However, it’s still important that students learn to use the Enter/Return key for creating paragraph breaks, and the program curriculum does include paragraph breaks in its lessons, quizzes, and tests. At those times, the ¶ (paragraph) symbol indicates to your students that an Enter/Return keystroke is required.
Practice Time
Studies have shown that typing is learned more efficiently if you practice for about one hour a day—not more or less. Learning to type is more like learning a motor skill than learning an academic subject, such as math or economics. Typing has more to do with establishing habits than with your mind. So it’s recommended that you set aside a daily practice time for your students and stick to it.
You will find that Mavis Beacon Teaches Typing for Schools doesn’t give your students endless boring drills, that their practice is perceived as fun. To ensure that the entertainment continues, make sure they don’t practice too often. They won’t learn any faster if they spend eight hours in front of their keyboards and video screens. Having them each work one hour per day, either at school or at home, is a good place to start.
Increasing Your Students’ Typing Speed
Have you noticed that some keys are easier to type and that you hit them more naturally than other keys? Successful, fast typing depends on your flexibility and control of each finger. This includes how fast each of your fingers types a key and how fast they return to their Home Row position. This why it’s important to explain to your students that typing quickly is easier than typing each key correctly—that real speed comes only after you have learned accuracy.
Stress this principle in the classroom: Increase your speed to a higher level only after you have gained complete control at a lower level. Measure your typing ability, as Mavis Beacon does, by the number of errors that you make. If you make too many errors, you are typing faster than your ability to control your keystrokes.
As a general rule, explain to your students that their first typing goal should be one keystroke per second or 12 WPM (Word per Minute). They may make a few more mistakes, but gradually they decrease and your students’ typing rate will improve. Mavis Beacon Teaches Typing for Schools helps your students continue this procedure until they can type at the speed you wish, or their typing goals. Throughout their work in the program, Mavis Beacon makes specific suggestions for their continued improvement as well as offering encouragement.
Keyboard Basics: A Review
For a complete tour of the keyboard and to learn which finger types which key(s), have your students refer to the Finger Positioning guide hands. They can access this feature by selecting Help from the Student’s Area main menu or by clicking the Help button at any time in the program. For more information about this feature, see the section on it in User Guide.
With Mavis Beacon Teaches Typing for Schools, you students master the touch typing method, which relies on the Home Row as the starting position. The third row from the top and bottom of the keyboard is identified as the Home Row in the program. This is where your students’ fingers start, end, and return between keystrokes.
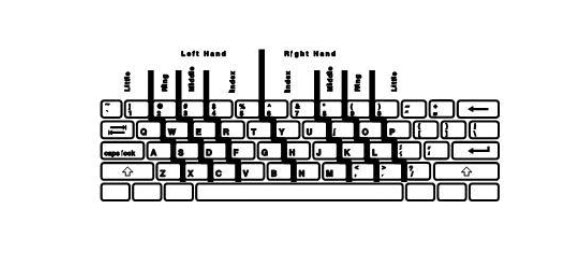
Explain to your students the Home Row position. Explain that their left hand, starting with the little finger, should rest on the [A], [S], [D], and [F] keys; that their right hand, starting with their index finger, should rest on the [J], [K], [L], and [;] keys. The program shows them how their fingers can reach to cover the entire keyboard from this position.
“Touch typing” is typing without looking at the keyboard, relying instead on the touch of the keyboard and your familiarity with it to help you type accurately navigate to the correct keys. Mastering this kinesthetic sense of finger placement helps your students increase speed as well as save energy. Instead of having constantly to look up and down, first at the words they are typing, and then at the keyboard, they can keep their eyes on their work and improve their speed.
The illustration below is a keyboard that looks like the one on which they are learning. Notice how there are lines separating the keys from each other. Between the lines, you see the keys that each finger controls. For example, the left index finger press the [F], [G], [R], [T], [V], [B], [4], and [5] keys. These keys form a group. The standard QWERTY keyboard contains five rows of keys:
The keys labeled with letters of the alphabet normally type a lowercase letter when struck. To get an uppercase letter, explain to your students that they must hold down a Shift key while they press the letter key. The correct technique is to hold down the Shift key nearest the little finger of your other hand. For example, if your students want to type an uppercase F, they should press the [F] key with their left index fingers while holding down the right Shift key with the little finger on their right hands.
Your students also learn how to use the Backspace, Enter, and Tab keys through the Mavis Beacon Teaches Typing for Schools curriculum.