The Interface
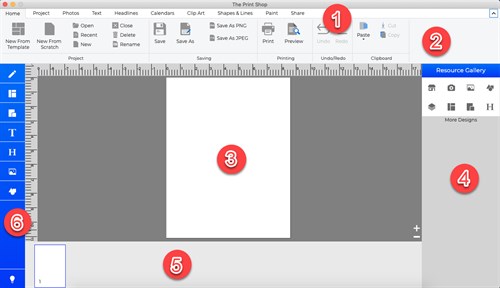
We'll start by looking at the layout of the program. The Print Shop for Macintosh interface can be divided into five areas, as shown below.

Menus and Toolbars-Most application functions can be accessed through this area.
- Menus-This area gives you access to The Print Shop's main menus like Home, Project, Photos, Text, Headlines, Calendar, Clip Art, Shapes & Lines, Paint and Share.
- Ribbon Tabs-This area gives you access to The Print Shop's editing tools.
- Page Canvas-Page elements are displayed in this area. The Page Canvas is where you will create the project by adding backgrounds, photos, clip art, images, and text.
- Resource Gallery-This panel provides quick access to a number of different page elements, including photos, clip art, shapes, and more. Click on an icon to select a category, and then drag and drop objects onto the page.
- Page Thumbnails-The bottom area of The Print Shop displays thumbnails of your project pages and allows you to rearrange, add, and delete pages. Page changes will not be reflected in the thumbnail until you open another page or save the project.
- Side bar menus-The side bar manus allow you to quickly access your desired menus which do you want to use. Click on a heading (e.g. Backgrounds, Photos, etc.) to show a list of available functions.