Snap Points
Snaps are points that the cursor can automatically jump to, such as grid points, an endpoint or midpoint of a line, or the center points of an arc.
To snap without setting points, use Move CursorOnly.
Toolbox Icon:
NOTE: When Snap commands are selected from the Snap Toolbox, you have the option of making them set a point or just move to the position; however, if you select a Snap command from the Point menu, a point will always be set.
Gravity
Menu: Point / Gravity
Shortcut Key: . (period)
Mouse Shortcut: Right Mouse Button
Toolbox Icon:

This very useful command moves the cursor to the nearest point in the drawing and sets a point there. It enables you to set a point exactly on another point without having to “zero in” on it.When you choose the command while in 3D Selection Mode, the cursor moves to the nearest point in 3D space. In 2D Selection Mode, the cursor moves to the nearest point on the screen and does not take into account the point’s location in 3D space.
This is an important difference. If you want to be able to snap to the nearest point on the screen, you should use the 2D Selection Mode. However, in 2D Selection Mode, the cursor may seem to move in an arbitrary manner along the Z axis when you snap to a point because the cursor takes on the Z value of the point that it snaps to
In 3D Selection Mode, the cursor may seem to jump to a point other than the nearest point on the screen. This is because it goes to the nearest point in the drawing, in 3D space. That point may not be the point that appears closest on the screen.
Example: Set a point exactly on the right endpoint of a line.
Select the Gravity command. Move the cursor to a point near the right end of the line. Click the mouse button. The cursor snaps to the right endpoint and sets a point.
Line Snap
Menu: Point / Line Snap Shortcut Key: K Toolbox Icon:

Moves the cursor to the nearest line and sets a point there. It can be very useful in conjunction with drawing commands. For example, if you are drawing a line and want one of the endpoints to lie exactly on another line, you can use Line Snap to accomplish this without having to “zero in” on the line.
Example: Set a point exactly on a line in your drawing.
Choose the Line command again and then, before setting a point, choose the Line Snap command. Move the cursor close to the line and click the left mouse button. The cursor snaps to the line and sets the starting point of your second line.
Intersect-1
Menu: Point / Intersect-1 Shortcut Key: F4 Toolbox Icon:
Set a point on the line on which you want to find the intersection. The cursor will move to the nearest intersection of that line and a point will be set there.
This command works on lines, circles, arcs, planes, and curves.
Example: Find the intersection of a line and a circle.
Select the Intersect-1 command. Set the cursor on the line and click the left mouse button. The cursor will move to the intersection of the line and the circle, and a point will be set there.
Intersect-2
Menu: Point / Intersect-2 Shortcut Key: Shift+F4 Toolbox Icon:

Locates the intersection of two entities, using two points as references.
Point 1: First line of intersection
Point 2: Second line of intersection
The cursor will move to the point at which they intersect. If the lines do not meet, then the cursor will move to a point where they would meet if extended.
This command works on lines, circles, arcs, planes, and curves.
Example: Find where two lines intersect in a “web” of intersecting lines.
Choose the Intersect-2 command and set a point on one of the lines. Next set a point on one of the intersecting lines. The cursor will move to the intersection of the two lines.
Midpoint
Menu: Point / Midpoint Shortcut Key: Ctrl+K Toolbox Icon:
Moves the cursor to the midpoint of the closest line or line segment and sets a point there.
NOTE: In 2D Mode, this command will snap to the mid- point of a line’s projection on the XY plane, not to the midpoint of the actual 3D line.
Midpoint2

Menu:
Point / Midpoint2
Shortcut Key:
Ctrl+Shift+K
Toolbox Icon:

Moves the cursor to the midpoint of two points, and sets a point there.
Plane Snap 
Menu: Point / Plane Snap Shortcut Key: F7 Toolbox Icon:

Moves the cursor to the nearest location on the nearest surface and sets a point there.
Line Plane 
Menu: Point / Line Plane
Toolbox Icon:

Sets a point at the intersection of a line and a plane.
Point 1: Set a point on the intersecting line
Point 2: Set a point on the intersecting plane
If the line does not touch the plane, a point will be set where the intersection would be if the line were extended.
Center of Gravity
Menu: Point / Center of Gravity
Toolbox Icon:
Finds an object’s center of gravity. For example, you can use this command to find the volumetric center of complex solids. This command is also useful for finding the geometric center of a plane.
If you select this command from the Point menu, it will always set a point. If the Move Cursor Only button is pressed on the Snap Toolbox and you select the command from the Snap Toolbox, the command will just move to the position instead of setting a point there.
Tangent Snap
Menu: Point / Tangent Snap
Toolbox Icon:

Sets a point for a line or curve tangent to an existing circle or arc.
Move the cursor near an existing circle. A small box appears to show where the cursor will snap if the current cursor position is used. Set a point, and the cursor snaps to the nearest tangent location and sets a point. Continue setting points for the line or press Enter to end the command and draw the line.
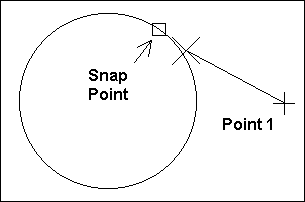
NOTE: If you are not in 2D Mode, the line and circle must lie in the same plane.
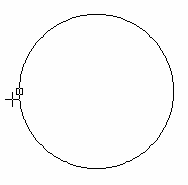
Quadrant Snap
Menu: Point / Quadrant Snap
Toolbox Icon:

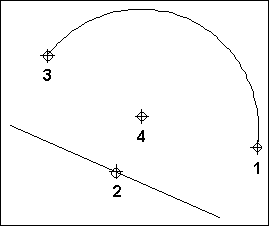
Snaps to the nearest quadrant point on a circle, arc or ellipse. Quadrant points occur at every 45 degrees (0 45 90 135 180 225 270 315 360)
A small box appears to show where the cursor will snap if the current cursor position is used.
Origin
Menu: Point / Origin
Sets the origin (0,0,0) anywhere in the drawing.
This can be convenient if you want to use coordinates relative to a particular point on the drawing.
The origin remains the same until it is changed again. The X,Y,Z location on the coordinate bar reads 0,0,0 at the selected origin.
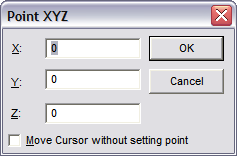
Point XYZ
Menu: Point / Point XYZ
Shortcut Key: : (colon)
Sets a point by specifying the X, Y, and Z
coordinates of that point.
Enter the coordinates in the X, Y, and Z boxes and click OK. You can also move the cursor to the new location without setting a point there.
Point Relative
Menu: Point / Point Relative
Shortcut Key: ‘ (single quote or apostrophe)
Set a point relative to the last point set, the origin, a reference point, or relative to the cursor position. The position of the new point is given in horizontal (X), vertical (Y), and depth (Z) distances from the specified location.
Enter the X coordinate in the DX box, the Y coordinate in the DY box, and the Z coordinate in the DZ box. Normally you’ll want to use the Last Cursor Position option. Click OK button to set the point.
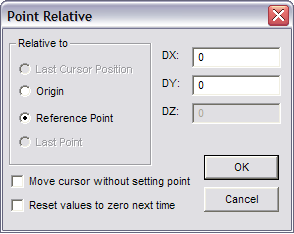
If you select the command from the pull-down menu, the Last Cursor Position option will not be available because the cursor is off the screen. The same occurs if you use the keyboard (Alt+P, then R) to activate the command. If you have set no points and you activate the command from the Command Menu, the point is placed relative to the origin or a reference point. If you press the ‘ (apostrophe) shortcut key, then you have the Last Cursor Position, Origin, and Reference Point options.
You can move the cursor to the new location
without setting a point by selecting that option.
If the Reset Values to Zero Next Time option is selected, the DX, DY, and DZ values will be reset to zero the next time the command is used. Otherwise DesignCAD will remember the DX,
DY, and DZ values and default to those the next
time the command is used.
Example: Draw a circle with a radius of exactly 10 units.
Select the Circle (Center, Outside) command and set a point for the center. Then press the ‘ (apostrophe) key to select the Point Relative command. Enter 10 in the DX box. Press Enter to complete the circle.
Point Polar
Menu: Point / Point Polar
Shortcut Key: ; (semicolon)
Sets a point by specifying the distance and angle (polar coordinates) of the new point from the last point set.
This command is used inside another drawing command (such as Line) to set a point at a specific angle and distance from the last point set or the last cursor position.
Enter the Distance and Angle from a given location.
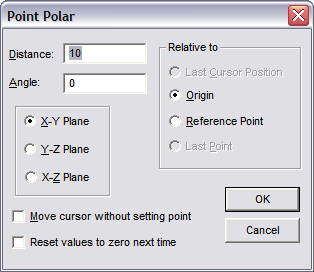
You can specify the angle in either the X-Y, Y-Z, or X-Z plane. You can also specify whether you want the new point to be relative to the Last Cursor Position, Origin, Reference Point, or Last Point.
The options available depend on how you select the command. If you select the command from the pull-down menu, you will not have the option of Last Cursor Position because the cursor is off the screen. The same occurs if you use the keyboard (Alt+P, then A) to activate
the command. If you have set no points and you activate the command from the Command Menu, the point is placed relative to the origin or a reference point. If you press the ; (semicolon) shortcut key, then you have the Last Cursor Position, Origin, and Reference Point options.
You can move the cursor to the new location without setting a point by selecting that option.
If Reset Values to Zero Next Time is selected, the Distance and Angle values will be reset the next time the command is used. Otherwise, DesignCAD will remember the Distance and Angle values and will default to them the next time the command is used.
Example: Draw a 20-unit line in the X-Y plan at an angle of 45 degrees.
Select the Line command and set the first point. Then press the ; (semicolon) key to choose the Point Polar command. Enter 20 for Distance and 45 for Angle and check the X-Y Plane and Last Point options. Press Enter to execute the command. The second point of your line will be 20 units away from the first at a 45-degree angle. Press Enter to insert the line into your drawing.
Gravity Move
Menu: Point / Gravity Move
Shortcut Key: , (comma)
Snaps the cursor to the nearest point in the drawing, but it does not set a point there.
This command lets you move the cursor to another point precisely without having to “zero in” on it. As soon as you choose the command, the cursor moves to the nearest point in the drawing, without setting a point.
Gravity Move is often convenient for moving the cursor to a point in the drawing to get to a known location before using the cursor keys or the Point Relative command.
In 3D Selection Mode, the cursor moves to the nearest point in 3D space. In 2D Selection Mode, the cursor moves to the nearest point on the screen and doesn’t take into account the point’s location in 3D space.
This is an important difference. If you want to be able to move to the nearest point on the screen, you should use the 2D Selection Mode. However, in 2D Selection Mode, the cursor may seem move in an arbitrary manner along the Z axis when you snap to a point because the cursor takes on the Z value of the point that is moved to.
In 3D Selection Mode, the cursor may seem to jump to a point other than the nearest point on the screen. This is because it goes to the nearest point in the drawing in 3D space. That point may not be the point that appears nearest on the screen.
Example: Move the cursor to the right endpoint of a line.
Select the Gravity Move command. Move the cursor to a point near the right end of the line. Click the mouse button. The cursor moves to the right endpoint but does not set a point there.
Point Control
Menu: Point / Point Control
Shortcut Key: J
The Point Control submenu contains several simple commands. These commands can be used after the first point is set in a drawing command to insert another point relative to the first by a specified angle or distance.
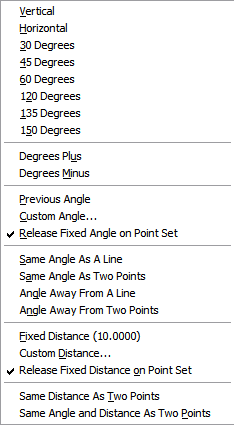
Choose the desired command from this listing. The movement of the cursor is restricted according to the command.
NOTE: The Custom Distance command is available in 2D mode and 3D mode. The other Point Control com- mands are available in 2D mode only.
Vertical, Horizontal: Forces the cursor to move parallel to the Y or X axis.
30 Degrees, 45 Degrees, etc.: Restricts movement of the cursor to a 30-degree, 45-degree, etc. angle.
Degrees Plus, Degrees Minus: Restricts the cursor movement to 5.0 degrees more or less than the previous angle. Two points must be set with one of the drawing commands before this command is accessible. These two points determine the previous angle to which the Degrees More or Less command adds or subtracts 5 degrees.
Previous Angle: Before becoming accessible, the two points must be set with one of the drawing commands. These first two points determine the angle at which the this command restricts the cursor. The third point is set so that a straight line could be drawn through all three points.
Custom Angle: Restricts cursor movement to an angle entered in the Angle window. Leave the Release Fixed Angle on Point Set option checked to release the cursor when you set a point. Uncheck the checkbox to use the Custom Angle command for several points along the same angle.
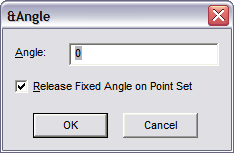
Release Fixed Angle on Point Set: This is just another way to enable or disable the same option that is available in the Custom Angle window.
Same Angle as a Line: After setting the first point in a drawing command, choose this command and set a point on an existing line. The cursor is restricted to the angle defined by the line for the insertion of the next point.
Same Angle as Two Points: After choosing this command, set two points. This command restricts the cursor to the angle defined by these two points.
Angle Away from a Line: Lets you place a point on a line. The cursor is restricted to a specified angle away from that line. Set the desired angle in the window.
Angle Away from Two Points: Allows you to set two points that define an angle. If an imaginary line were drawn through the two points, the cursor is restricted to a specified angle away from that imaginary line. Set the desired angle in the window.
Fixed Distance: Lets you set a point a fixed distance from the previous point. The distance used by this command may be changed by using the Custom Distance command.
Custom Distance: Lets you change the distance used in the Fixed Distance command. Uncheck the Release Fixed Distance on Point Set option if you want to set multiple points using the Fixed Distance command.
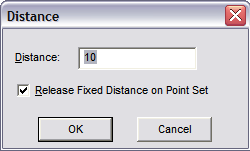
Release Fixed Distance on Point Set: This is just another way to enable or disable the same option available in the Custom Distance window.
Same Distance as Two Points: Uses two points to determine the distance that the next point will be set away from the previous point in a drawing command. For instance, this command is useful if you are drawing a line and want the current segment to be the same length as a previous segment in the line or a line segment in another line in the drawing. Just select the command, and set a Gravity point on both ends of the existing segment. The next point is constrained to that distance from the previous point in the line currently being drawn. Move the cursor to the desired angle and click the mouse button.
Same Angle and Distance as Two Points: Uses two points to determine the angle and distance that the next point will be set away from the previous point in a drawing command.For instance, this command is useful if you are drawing a line and want the current segment to be drawn at the same angle and length as a previous segment in the line or a line segment in another line in the drawing. Just select the command, and set a Gravity point on both ends of the existing segment. The next point is constrained to that angle and distance from the previous point in the line currently being drawn. Just move the cursor to determine the direction of the segment and click the mouse button.
Example: Set the second point for an arc using the Same Angle as a Line command.
Choose the
Arc (Endpoints, Center)
command. Set the first point for the arc. Choose the
Same Angle as a Line
command and set a point on the existing line that lies at the desired angle. The cursor is restricted to that angle. Set the second point for the arc. Set a third point for the radius of the arc. The angle between the two endpoints of the arc is the same as that of the line.