Coordinates
Coordinates

The location of the cursor is displayed in the Coordinate Toolbox. (For details on displaying toolboxes, see
View Options
NOTE: In 3D Mode, the Coordinate Toolbox also has a field for Z coordinates
You can use the Coordinate Toolbox to see exactly where the cursor is, or to enter exact values.
Example: Creating a line
Choose the Line command . For the first point, place your cursor inside the X field of the Coordinate Toolbox and enter 20. Press Tab to jump to the Y field and enter 10.

Press Tab again or press Enter to place the first point of the line at (x=20, Y=10). Move your cursor to see the rubber-band line (do not click to place the point). Its total length and “delta” coordinates are indicated - the distance in X and Y measured from the first point (not the absolute coordinate).
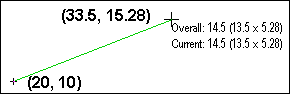
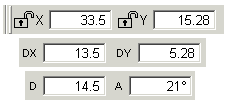
Look at the Coordinate Toolbox. X and Y contain the actual coordinates of the second point. DX and DY contain the relative distances - measured from the first point at (20, 10). D is the overall length of this segment, and A is the angle measured from horizontal.
To place the second point, place the cursor in the X field and enter 30. Enter -5 for Y and press Enter or Tab to place this point.

Now you can start to draw the second segment of this line. The Overall length is the total of all segments. The Current length is the length of just the current segment.
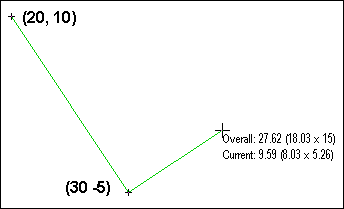
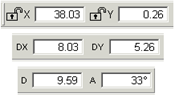
In the Coordinate Toolbox, DX and DY reflect the length measured from the (30, -5) point. The D and A fields contain the length and angle of just the current segment.
Locking Coordinates
Menu: View / Lock X (or Y, or Z) Coordinate
Shortcut Key: Shift+X, Y, or Z
Toolbox Icon: Lock symbol in Coordinate Toolbox.

Restrict points that can be set to a fixed value ofX, Y or Z.
Point 1: Point to specify the desired X coordinate
Select the Lock X (or Y, or Z) command. Set a point at the coordinate at which you want to set all points while the coordinate is locked. Snap commands and Point XYZ are useful for setting the point.While a coordinate is locked, a lock icon appears beside that coordinate in the Coordinate Toolbox.A locked coordinate may be changed by typing a new value for that coordinate directly into the
Coordinate Bar. Just remember that if you change a value in the Coordinate Bar, you need to press the Enter key to return the focus to the drawing area.
Once the coordinate no longer needs to be locked, select the Lock command again to disable it. Only one coordinate may be locked at one time.
Lock X Coordinate is handy if you are drawing in the Side View of your drawing and want to make sure that you are always using the same value of X.
Lock Y Coordinate is very helpful when you are drawing in the Top View and want to maintain a constant Y value.
Lock Z Coordinate is useful when you are drawing in the Front View and want to draw on a fixed Z depth.