PBR Photo Rendering
PBR, or physically based rendering, is a method of rendering computer graphics that aims to accurately represent the way that light interacts with different materials in the real world. In PBR rendering, the appearance of a material is defined by a set of parameters that describe its physical properties, such as its roughness, reflectivity, and transparency. These parameters are used to calculate the way that light reflects off the surface of the material, taking into account the angle of the light source and the surface normal, as well as the surface's roughness and other properties.
One of the key benefits of PBR rendering is that it allows for more realistic and consistent results, as it is based on the physical properties of real-world materials rather than arbitrary artistic choices. This makes it particularly well-suited for applications where photorealism is important, such as architectural visualization, product design, and film and game development.
Key user interface components to PBR rendering include:
• Photo Render Tool Palette
• Rendering Cameras
• Render To File
• Render Window
• Render Settings
Photo Render Tool Palette
The Photo Render tool palette provides access to many of the tools used to create photo rendered images. The tool palette is access from the Tools menu bar “Photo Render” option.
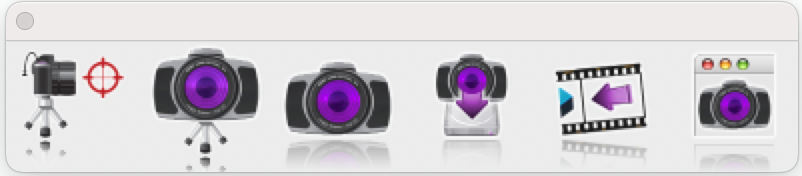
From left to right the tools are:
• Create Camera Creates a camera from eye point, reference point, and field of view. Cameras are saved with file and used with the Render Camera tool.
• Render Camera Renders a selected camera to the window.
• Render Window Renders the current window and view orientation.
• Render To File Renders current view orientation to a file with new width/height.
• Display Last Render Displays the last rendered window to drawing window.
• Render Settings Dialog box with settings for HDRI, background, materials, and other settings.
Create Camera 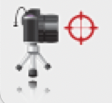
The Create Camera tool creates a camera object from eye point, reference point, and field of view. Cameras are useful for saving view orientations that can be recalled or used with the Render Camera tool. To create a camera:
-
Select the Create Camera tool from the photo render tool palette
-
Specify the eye point, defined as the camera location
-
Specify the reference point, which specifies where the camera is looking
-
The camera is created
Camera objects have two parameters that can be modified from the data entry window.
-
Field of View (size of viewing area)
-
Focal length (length of camera and controls perspective distance)
Render Camera 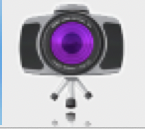
The Render Camera tool creates a photo rendered image from a selected camera.
Camera properties supported when using this command include:
--Start Point representing the camera eye point
--End point representing the camera reference point
--Field of View defines the scope of the view
Cameras are always rendered with perspective enabled. The rendered image is drawn into the drawing window.
Render Window 
The Render Window tool renders using the current view orientation. The results are displayed into the drawing window.
Render To File 
The Render Window tool renders using the current view orientation. The results are displayed into the drawing window.
Display Last Image
The Display Last Image redraws to the window the last photo rendered image.
Photo Realistic Render Settings
The Render Settings dialog provides access to the following photo render settings and parameters.
• General Settings
• HDRI
• Backgrounds
• Sun & Sky
• Textures
• Post Effects

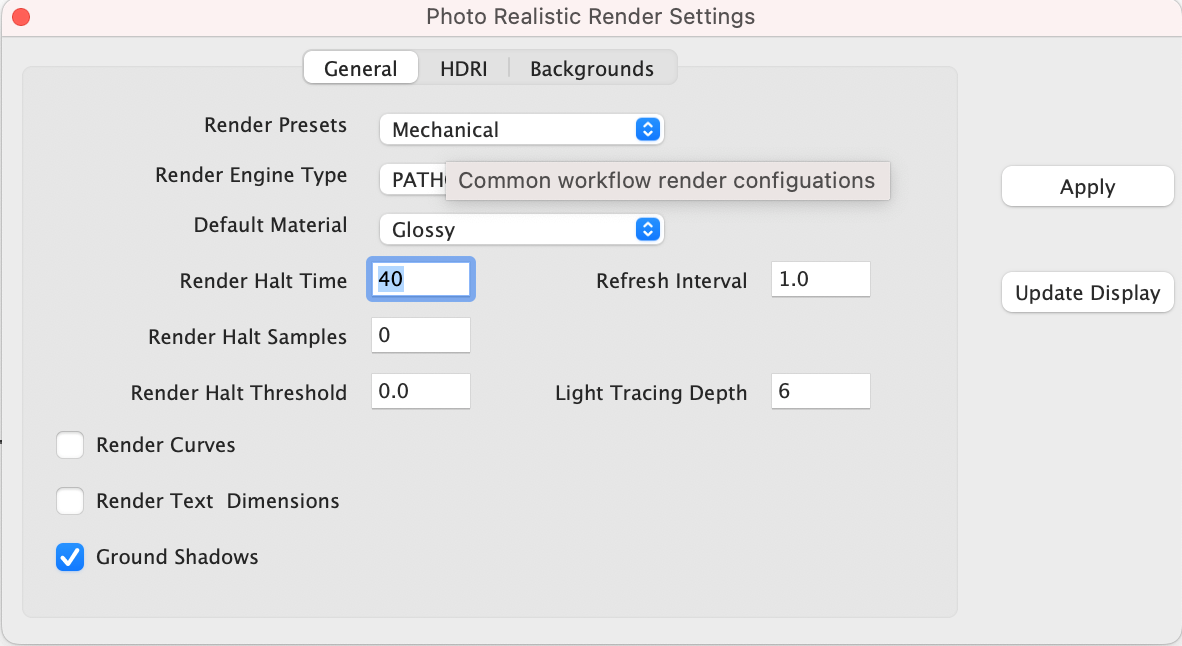
General Settings
The General Settings tab provides access to the following photo render settings and parameters:
Render Presets Presets parameters for , architectural, and jewelry scenes
Render Engine Type Method of light tracing
Default Material Glossy or Matte for parts with no materials assigned
Render Halt Time Stop rendering after so many seconds
Render Halt Samples Stop render after so many render passes
Render Halt Threshold Render until pixels stop changing by this percent
Render Curves Render curves as pipes
Render Text & Dimensions Render Text and Dimensions as polygons
Ground Shadows Create a transparent ground to catch shadows
Refresh Interval Refresh the drawing screen only after so many seconds
Light Tracing Depth The maximum number of light bounces
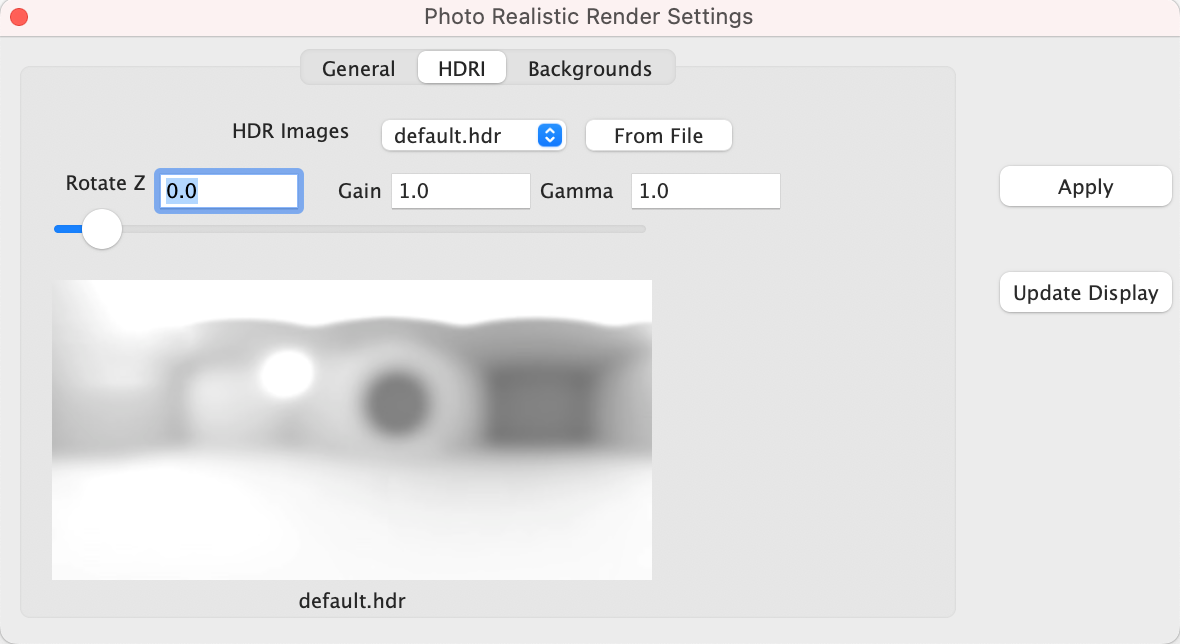
HDRI
The High-Definition Range Image (HDRI) tab provides access to the following settings and parameters:
HDR Images Drop drown containing example HDRI images
From File Select a HDRI from file system
Rotate Z Rotate the HDR from 0 to 360
Gain Increase or decrease the light intensity
Gamma Increase or decrease the contrast of the HDR image
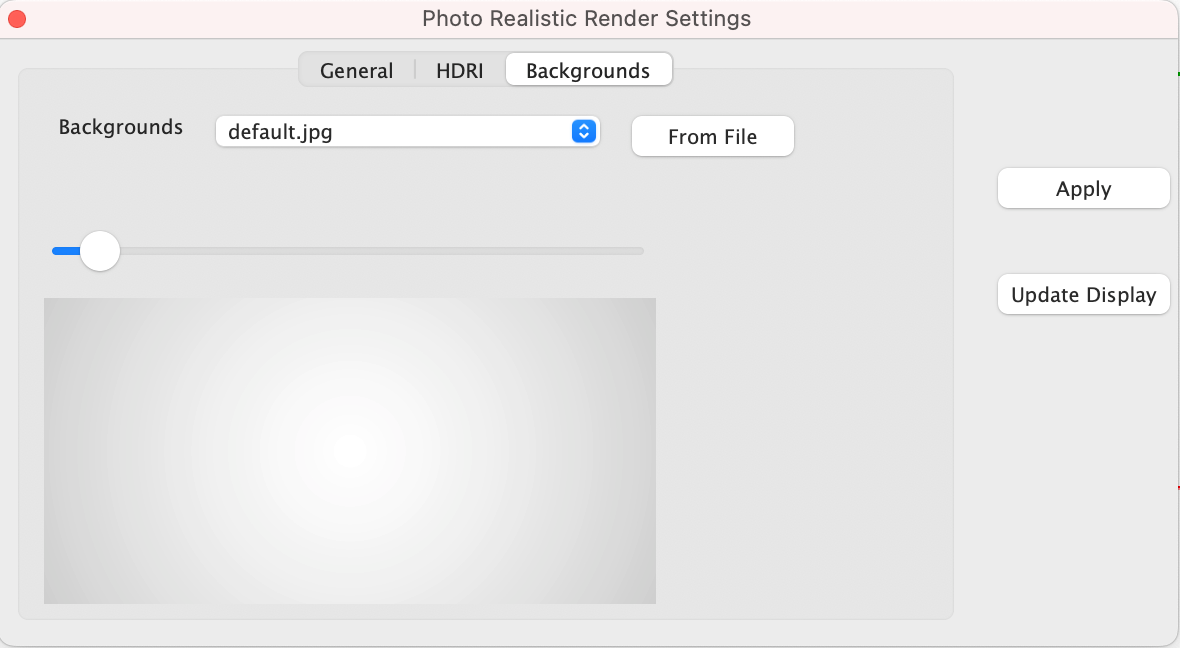
Backgrounds
The Backgrounds tab provides access to the following settings and parameters:
Backgrounds Drop drown containing example background images
From File Select a background from file system
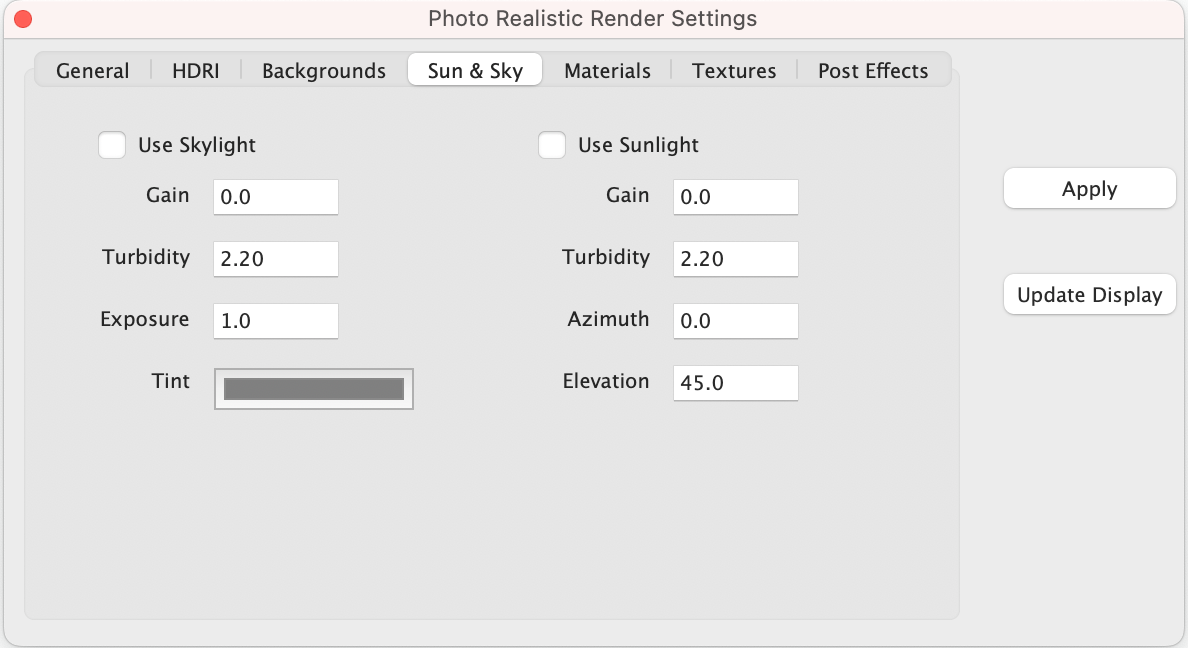
Sun & Sky
The Sun & Sky tab provides access to the following settings and parameters:
Use Skylight Enables SkyLight environment lighting
Skylight Gain Increase or decrease overall brightness
Skylight Turbidity Increase or decrease atmosphere turbulence
Skylight Exposure Increase or decrease overall intensity
Skylight Tint Controls the color of the light
Use Sunlight Enables Sunlight environment lighting
Sunlight Gain Increase or decrease overall brightness
Sunlight Turbidity Increase or decrease atmosphere turbulence
Sunlight Exposure Increase or decrease overall intensity
Sunlight Tint Controls the color of the light
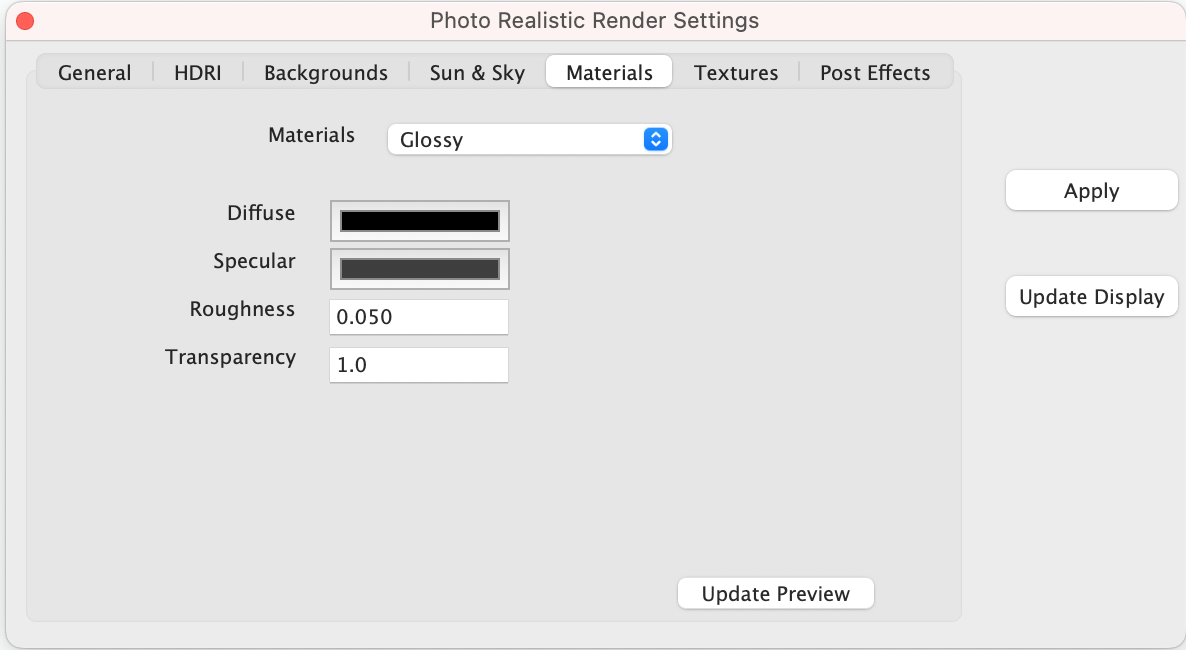
Materials
The Materials tab provides access to the following material settings and parameters:
Materials List of material shader types
Each material can have a set of unique parameters. For example, glossy has:
Diffuse Base color of object
Specular Highlight color when light is perpendicular to surface normal
Roughness How smooth or rough the material surface
Transparency Material value for transparency or opacity
* *
*
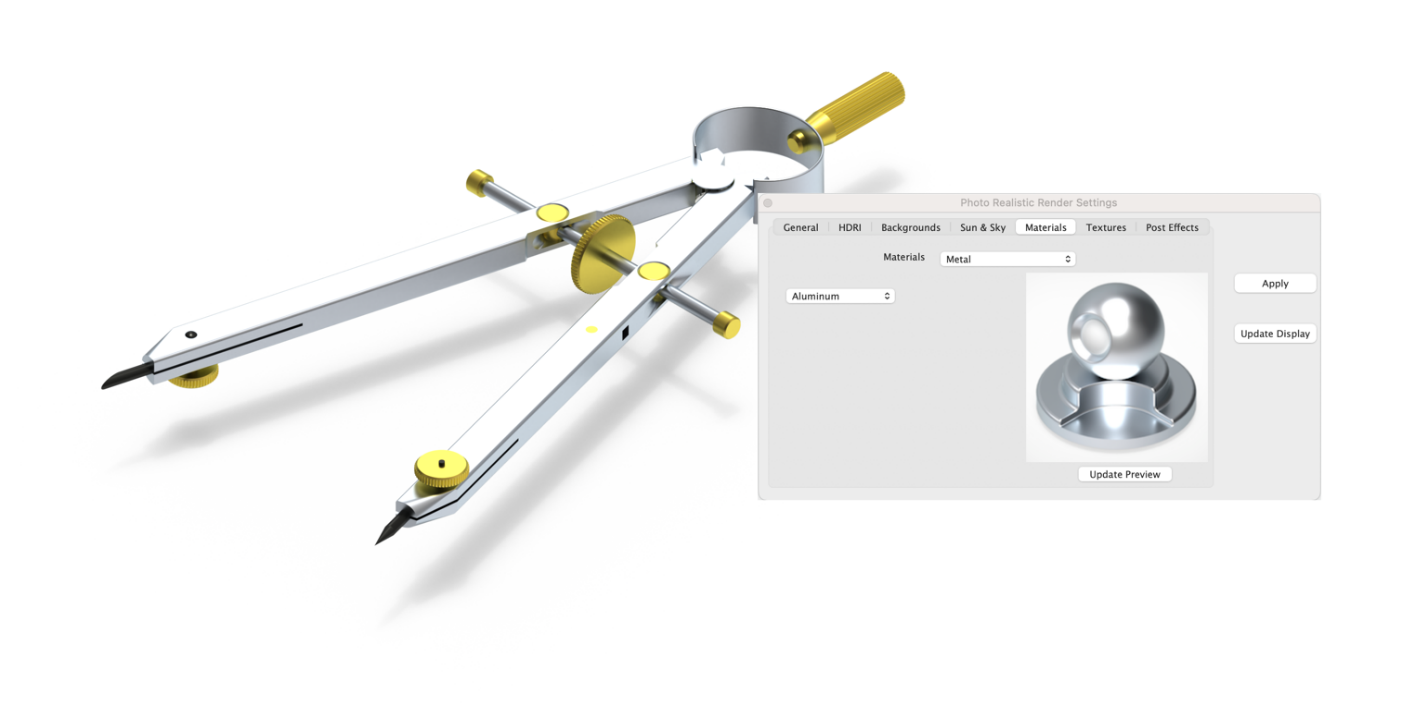
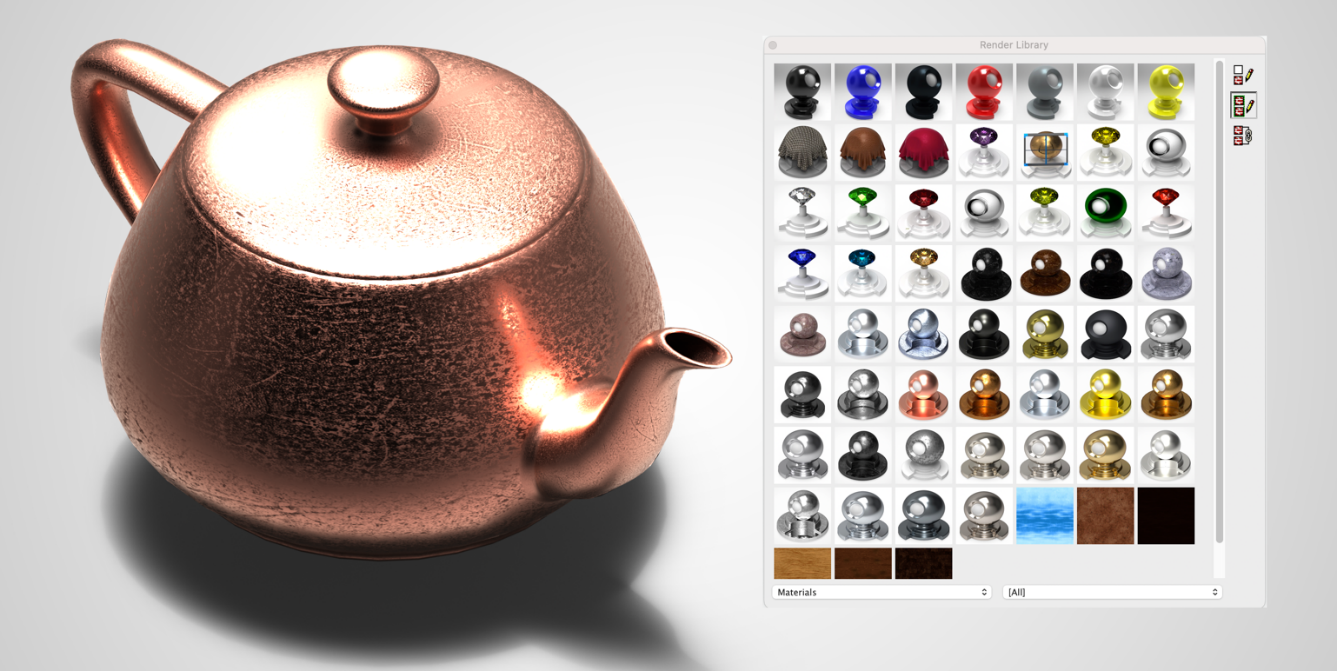
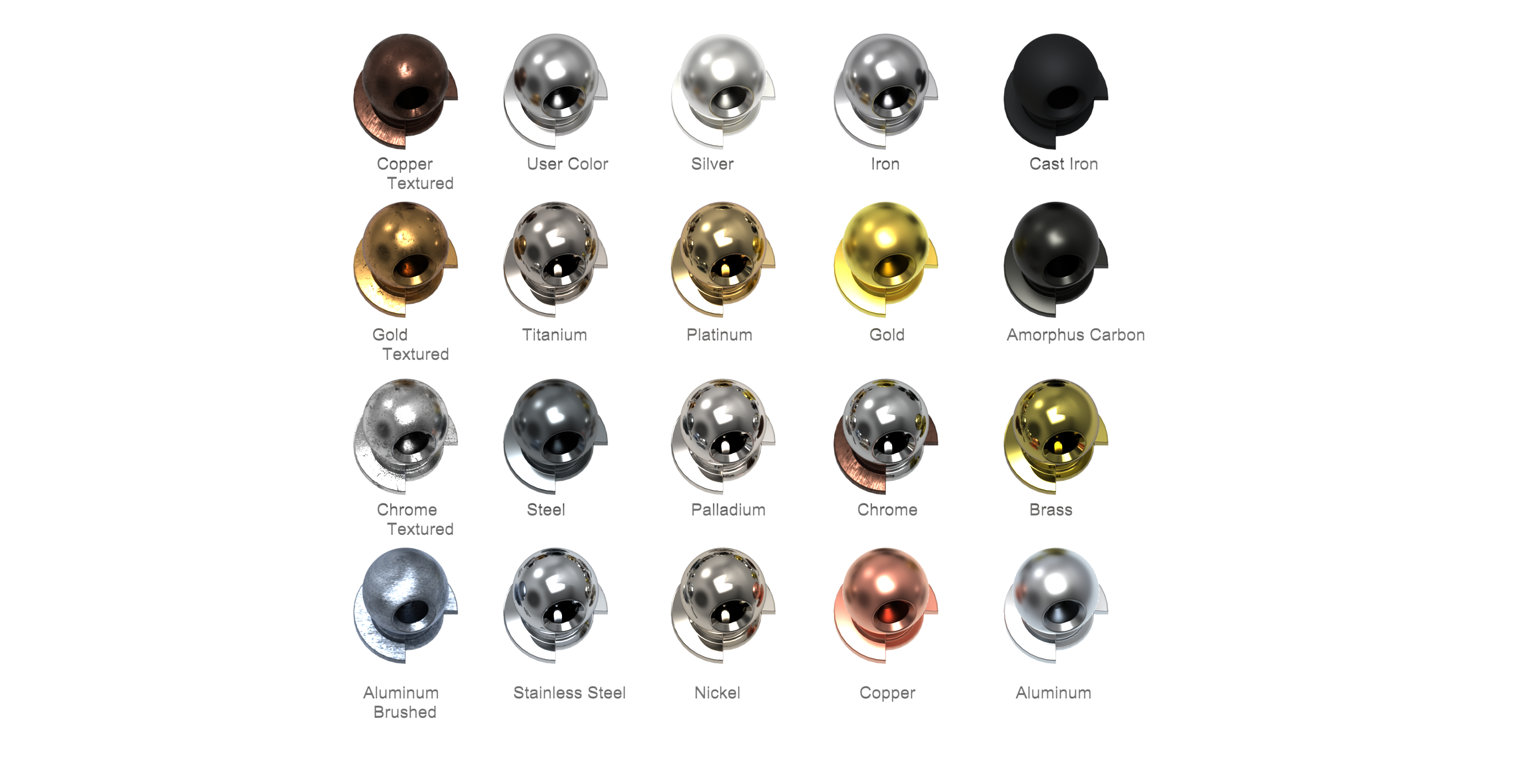
Materials: Metal Library
The Materials Metal shader provides access to a collection of preset metals that include silver, gold, chrome, copper, steel, nickel, and brass as examples.
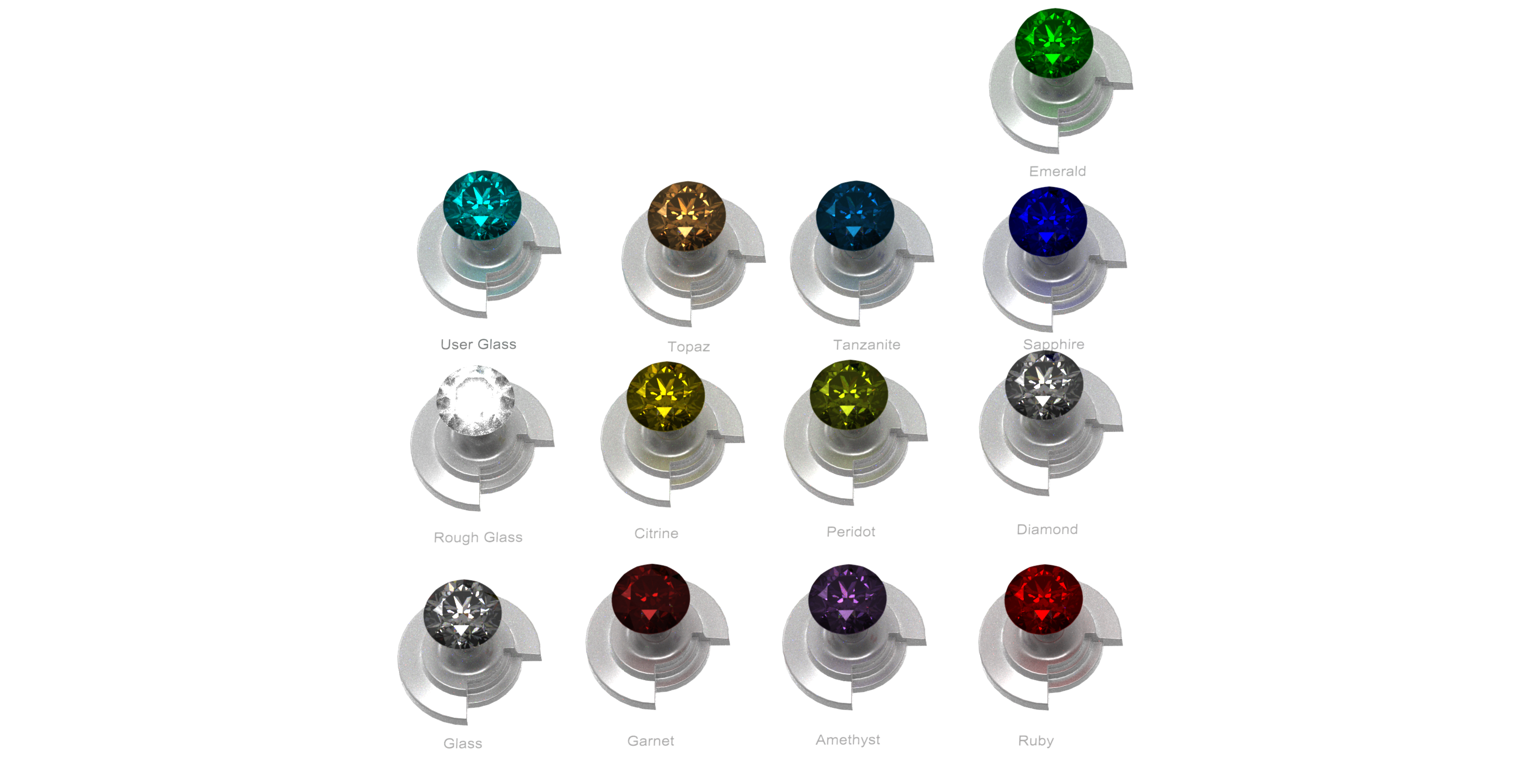
Materials: Glass Library
The Materials Glass shader provides access to a collection of preset glass and gemstones that include diamond, ruby, clear glass, and emerald.
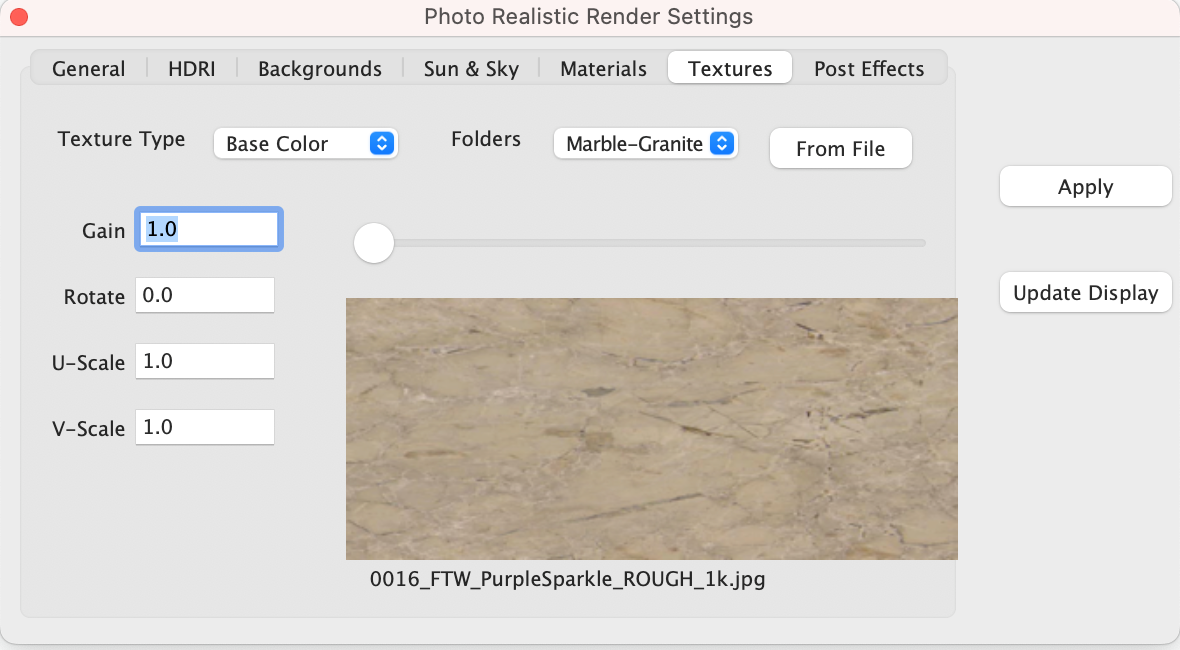
Textures
The Textures Tab provides access to a collection of preset textures that can be added to the material shader type on an object. Texture settings and parameters include:
Texture Type List of existing textures
Folders Textures organized by categories
From File Select a texture from your file system
Gain Increase or decrease the brightness of the texture
U-Scale Scale the texture coordinates along u axis
V-Scale Scale the texture coordinates along v axis
Post Effects
A post processor is a tool that allows you to apply various image-based effects to a rendered image after it has been completed. These effects can include things like tone mapping, denoising, color aberration, vignette, and gamma correction. Post processors can be very useful for improving the final appearance of a rendered image and can help to add a more polished and professional look to your work.
Post processors are accessed under the Post Effects tab in the render settings dialog box. The Post Effects tab is only available in SharkCAD, SharkCAD Pro, ViaCAD Pro, and TurboCAD Mac Pro.
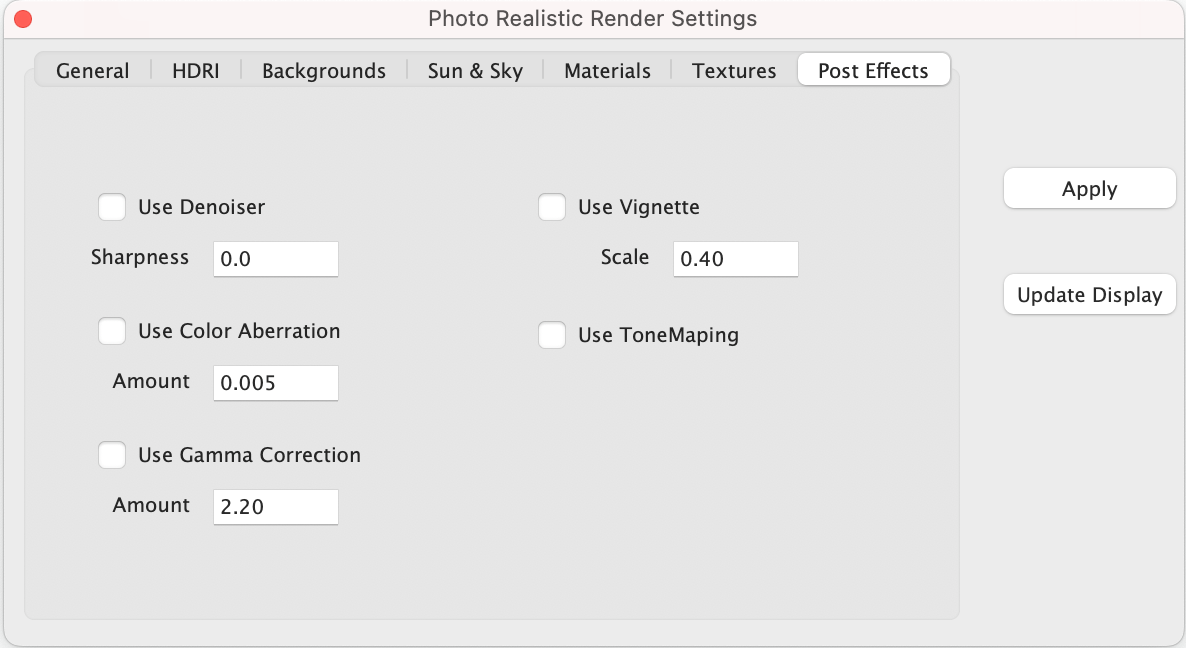
Denoiser
The denoiser used to reduce noise in images. The denoiser used is the Intel Open Image Denoiser (OIDN) which is based on a machine learning algorithm that has been trained on a large dataset of noisy and denoised images. This allows the denoiser to learn the patterns of noise present in different types of images, and to remove the noise while preserving the underlying detail and structure of the image.
To use OIDN, select the Post Effects tab and enable the “Use Denoiser” check box. The denoiser has one setting called Sharpness. By default, the Sharpness value for denoiser is set to zero which is “full” filtering. The value of 1 represents little to no denoising.
Note: The denoiser only works in CPU and will add a slight pause to each sample rendered.
Gamma Correction
Gamma Correction is a method used to adjust the brightness and contrast of an image by applying a nonlinear transformation to the pixel values. This transformation is typically used to correct for the nonlinear behavior of some displays, which can cause the displayed image to appear too dark or too bright.
Gamma correction is applied in the post-processing stage of the rendering process accessed by enabling the “Gamma Correction” check box. The “Amount” value specifies the
exponent used in the nonlinear transformation, with a value of 2.2 being commonly used for sRGB displays.
By adjusting the "Gamma" value, you can adjust the overall brightness and contrast of the rendered image, as well as correct for any color shifts that may occur due to the nonlinear behavior of the display.
Tone Mapping
Tone mapping is the process of converting the high dynamic range (HDR) pixel values of a rendered image into low dynamic range (LDR) pixel values that can be displayed on a standard monitor. This is necessary because the dynamic range of an image, which is the range of luminance values from the darkest to the lightest parts of the image, is often much larger than the range of values that can be displayed on a standard monitor.
By adjusting the tone mapping parameters, you can control the overall appearance of the rendered image and make it more visually appealing.
To perform tone mapping, select the Post Effects tab and pick the “Tone Mapper” check box.
Vignette
Vignette is a post-processing effect that darkens the edges of an image, creating a concentric gradient from the center of the image to the edges. Vignette is often used to draw the viewer's attention towards the center of the image and create a sense of depth and focus.
To enable vignette, you can select the "Vignette" setting in the "Post Effects" tab of the render settings. When the "Vignette" setting is enabled, you can adjust the "Scale" parameter to control the strength and size of the vignette effect. The "Scale" parameter controls the size of the area affected by the vignette effect.
Color Aberration
Color aberration is a post-processing effect that simulates the chromatic aberration that can occur in real-world lenses. Chromatic aberration is an optical phenomenon that occurs when the different wavelengths of light are not focused on the same plane, causing different colors to appear slightly offset from one another. This can cause the edges of objects in an image
to appear distorted or fringed with color.
To enable color aberration, pick the Post Effects tab and select the "Color Aberration" check box. When the "Color Aberration" setting is enabled, you can adjust the “Scale" parameter to control the size of the area affected by the color aberration effect. The "Scale" parameter specifies the size of the color fringes, with higher values resulting in larger fringes.
Photo Render Library
The Photo Render Library provides a collection of materials, HDRI, and backgrounds via a drag and drop user interface. To access the Library, select the Render Library from the Tools menu bar.
Materials/HDR/Backgrounds
The library category type provides access drag and drop materials, HDRI, backgrounds, and textures. Select a category such as materials to show various options for fabric, marble, glass, and metals. Position your cursor over the desired material and press and move to the object.