Attributes and BOM
The Bill of Materials tools provide a means to apply custom attributes to entities and display that data in a table or export it to an external application such as Microsoft Excel.
There are twelve predefined attribute templates that come with TurboCAD. These templates are:
Area
Calculates the surface area of any polygon, surface or solid.
Area 2D
Calculates the 2D area and centroid properties for curves.
MarkUp
Assigns markups to an entity
Mass Properties
Calculates the mass properties for solids. (Uses material assigned in Verify: Mass Properties command.)
Material
Assigns a material to an entity.
Perimeter
Calculates the 2D perimeter for curves.
Price
Assigns a price to an entity.
Standard
Assigns part number and description to an entity.
Stock Size
Assigns part number, stock size, and description to an entity.
Vender No.
Assigns part and vendor number, and description to entity.
Volume
Calculates the volume of a solid.
Weight
Calculates the weight of a solid. (Uses material assigned in Verify: Mass Properties command.)
Some of the templates automatically extract attribute information from the entity, others require the user to supply the information associated with the attribute. Any editable fields should be filled in manually.
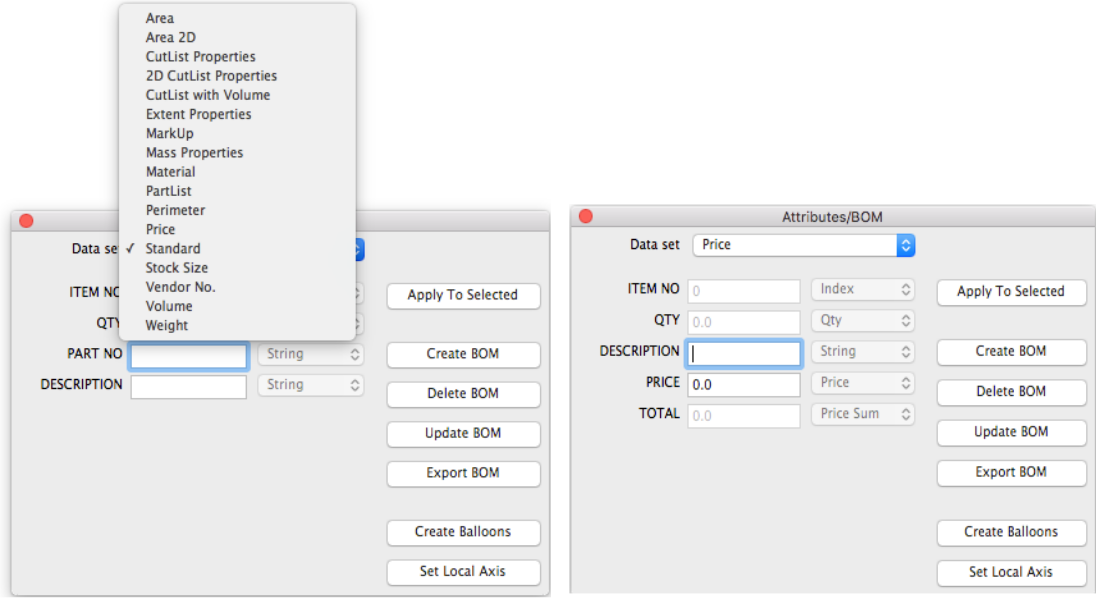
The BOM dialog box has four button options for applying attributes, creating a Bill of Materials table, assigning balloon items, and exporting the attributes to a text delimited file.
Apply to Selected
This button option applies the current BOM attribute to the selected entities.
Create BOM
This option creates a Bill of Materials Table using the current set of attributes defined by the pull-down menu. The user is prompted to enter the text height, column width, and item order.
This option creates a Bill of Materials Table using the current set of attributes defined by the pull-down menu. The user is prompted to enter the text height, column width, and item order.

Items Numbers Down

Items Numbers Up
Weight and Volume Tables
Whether you’re designing an aircraft, automobile, or picnic table, weight is key control parameter in a design. V12 introduces a new Bill of Material (BOM) attribute specific for creating a summed weight table. Creating a weight table is based on the designer assigning a material using the Verify: Properties dialog box followed up by applying a weight attribute. With just these two steps, designers can create an accurate Weight table used to explore impacts of material types on design weights.
Highlights of the Weight BOM tool:
Volume:
Precisely calculates the volume of any NURB or analytic based part .
Weight:
Apply a material from a large selection of predefined materials for woods, plastics, and metals. Or add your new material to the list. Provides a total weight value for the objects in the table.
Associative Parts and Tables:
Changing a part size(volume) or applying a different material will automatically update the table for quick design exploration that impact weight calculations.
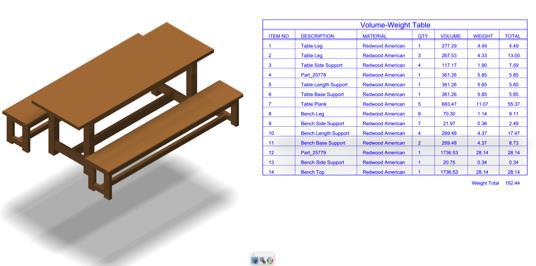
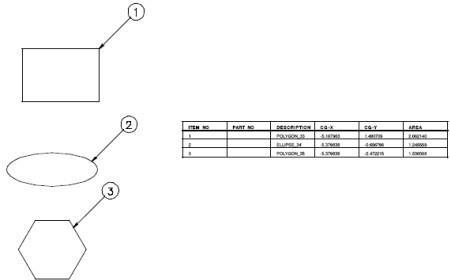
Bill of Materials: Weight Table
Using the BOM Tool to create a Weight/Volume Table
-
Select the Attributes and BOM tool from the Window menu .
-
Select the Weight & Volume Table from the Attribute pull down.
-
Select a solid entity that you want to attach an attribute.
-
Select Apply to Selected.
-
Repeat until all solids have desired attribute attached.
-
Select Create BOM
-
Select table attributes such as text size and click OK
-
Table is created in the current work plane
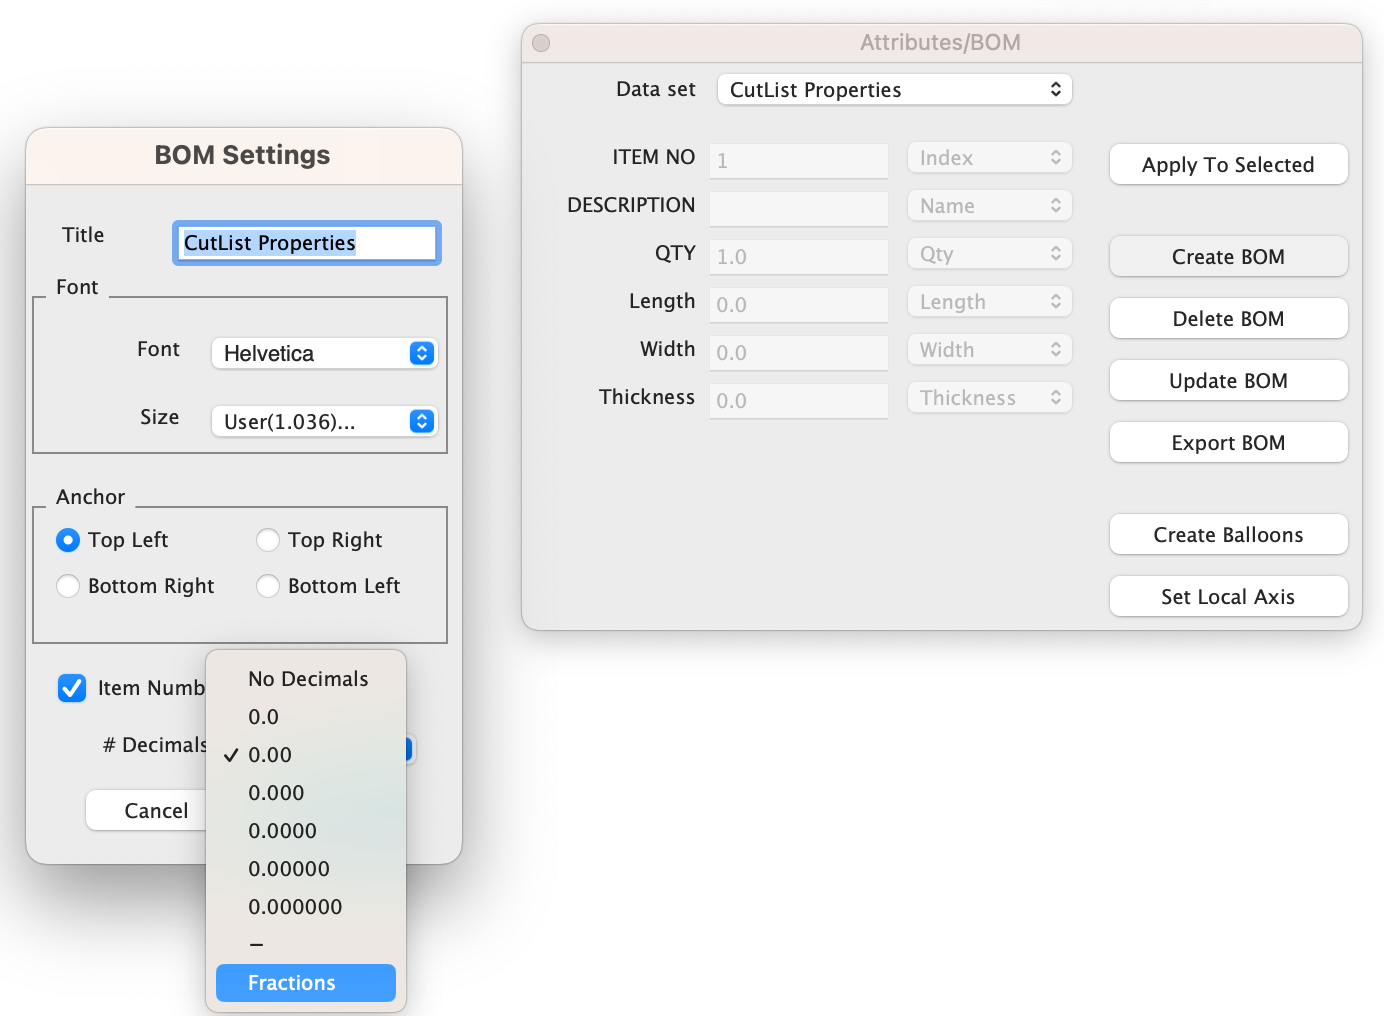
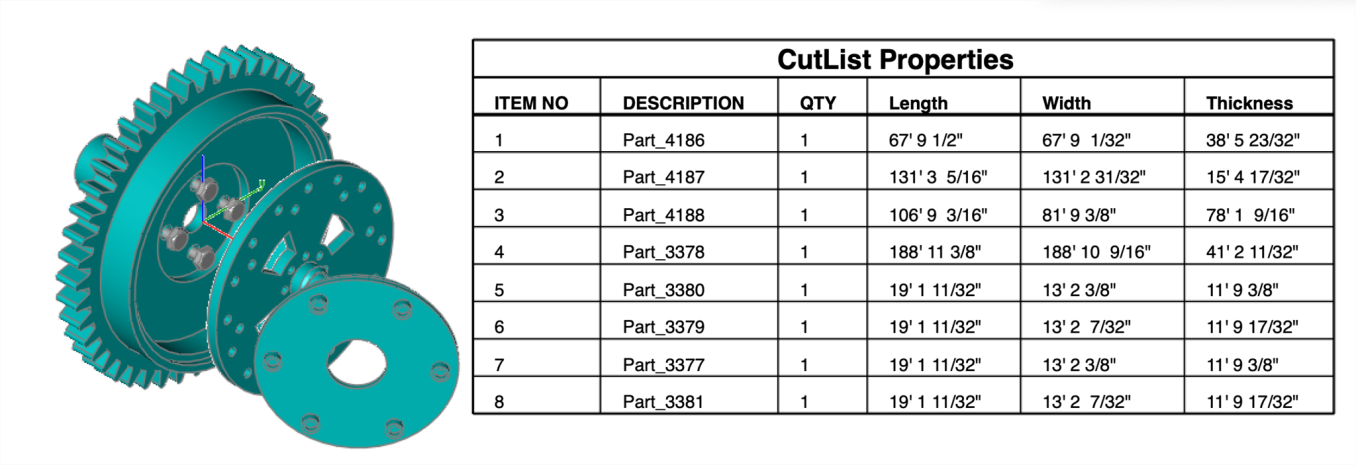
###### BOM with Fraction Option
The Bill of Material Create table feature has a new option to support fraction measurements. To use this feature, select the Attributes and BOM dialog box from the Tools menu. Select your objects and associated a data set such as CutList properties.
Apply to Selected. Now select the Create BOM option to create a table. In the BOM Settings dialog box, select the Decimals pull down option. And then Select Fractions to display measurements as factions of feet and inches.
Create Balloons
Clicking the Create Balloons button will add balloon item dimensions to the geometry. This requires an item number type be used with the attribute. All of the supplied attribute files have item numbers.
Export BOM
The Export BOM option creates a comma delimited file that can be read into Microsoft Excel or other similar spreadsheets.
User Defined Templates
You can create user-defined templates by creating an attribute definition file. Attribute definition files are located in the BOM folder found in the standard install directory. The first line of the file contains the attribute name. This is the name that will appear in the attribute pull-down menu. The next line contains two columns. The first column contains the attribute definition string, and the second, the attribute type. A comma separates the two columns. The following attribute types are supported:
Float
User-assigned signed decimal value.
Integer
User-assigned signed integer value.
String
User-assigned character string.
Area
Calculates the entity area and assign.
Perimeter
Calculates the entity perimeter and assign.
Volume
Calculates the entity volume and assign.
Weight
Calculates the entity weight and assign.
Qty
Counts the number of occurrences this attribute is used.
Index
Index used to refer to the attribute in the BOM table or ballooncallout.
Name
Extracts the name from the entity.
CG-X
Calculates the CG-X value from an entity.
CG-Y
Calculates the CG-Y value from an entity.
CG-Z
Calculates the CG-Z value from an entity.
Sum
Calculates the sum of the previous attributes.
Material
Extracts the material type from the entity.
Below is an example file for a user-defined attribute:
Material/Name
ITEM NO, index
QTY, qty
NAME, name
MATERIAL, string
DESCRIPTION, string