Array
Toolbox Icon:
Copies a selected object a specified number of times in as many as three directions. The object you want to copy must be selected before you use this command.
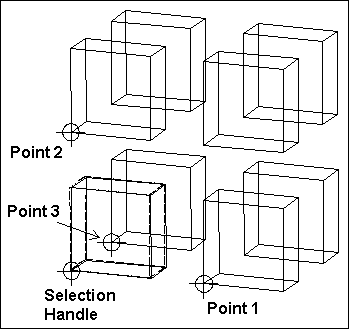
Point 1: Location and direction of first copy(relative to handle)
Point 2: Axis of Rows (relative to handle on the original)
Point 3: Axis of Tiers (relative to handle on the original)
First select the object you want to copy. Then choose the Array command.
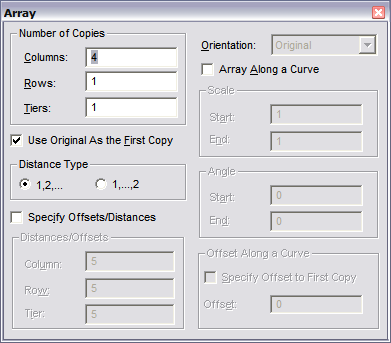
To copy in a single direction or dimension, enter the number of copies in Columns, and enter 1 for Rows and Tiers. Set a point for the location of the second copy of the object. (The first copy is the original unless the Use Original as the First Copy option is disabled.) The copy is
positioned so that the point that corresponds to the selection handle on the original is located on that point. Subsequent copies are placed at the same direction and distance as the first point from the selection handle of the original. In other words, all copies are evenly spaced based on the spacing of the first two copies.
To copy in two dimensions, enter the number of columns and rows, leaving Tiers set to 1. Set a point for the offset (the distance and direction) of copies in the first column. Then set a second point for the offset of the columns themselves.
For example, you might want to set the first point to the right of the selection handle, and the second point directly below the selection handle.
To make a 3D array, add a number for tiers and add a third point for the offset of each tier.
Use Original as the First Copy: Determines whether or not the selection is used as the first copy for the directions of the array. If disabled, the first point set for the command determines the position of the first copy of the array. This copy and the subsequent array can be set far from the original. The second point set for the command determines the columns, the third determines the rows, and the fourth determines the tiers.
Distance Type: Changes the way that distances are determined for the array. When the 1,2,… distance type is used, the distance between the points set determine the distance between the first and second copies of a given direction. When the 1,…,2 distance type is used, the distance between the points set determine the distance between the first and last copies of a given direction.
Specify Offsets/Distances: Lets you set the distance from one copy to another in Drawing Units. The points set then only dictate the direction of the copies from the original. Enter the offset distances for the copies in the appropriate fields in the window.
Orientation: The alignment of the object to be arrayed. For most of these choices to be used properly, you must correctly place your handles. Imagine the object you are copying is a man. The first handle is the man’s feet. The second handle is the direction he is facing. The third handle is his head. His feet always touch the curve. His head is always in the “up” direction relative to the plane of the curve. He can walk forward or backward along the curve, or he can step along the curve sideways while facing to the left or the right of the curve. He can also slide along the curve while always maintaining his original orientation
Array Along a Curve: Curve arrays always start with a fresh copy of the selected object, so the Use Original as the First Copy option is disabled. Set the number of copies to be drawn along the curve in the Columns field and set a point on the curve the array is to be drawn along. The easiest way to set the point on the curve for the array is to use the Gravity command to snap to one of the endpoints of the curve.
NOTE: The curve’s sense of “up” is calculated once for the entire curve; it is not evaluated separately at each point on the curve, so curves that do not lie in a plane may give unexpected results. Also, it may sometimes go in an unexpected direction. What you expected to be “up” might in fact be “down.” Be prepared to change your selection handles accordingly if you get unexpected results.
- Original: Maintains the orientation of the original object, regardless of which direction the curve twists and turns. For this orientation, only the first selection handle is used; the copied object is never rotated.
- Forward, Backward: The object along the curve so that it is always “facing” in a forward or backward direction along the curve. Objects rotate as they move along the curve to maintain their forward/backward orientation relative to the curve.
- Left, Right: Moves each copy along the curve so that it is “facing” to the left or right of the curve’s direction of travel.
- Perpendicular: Treats the handles differently than other options. For this option, the plane created by the selection handles is always rotated to be perpendicular to the curve’s direction of travel. This option re-quires much less setup on the user’s part, but on the other hand gives the user very little control over the final orientation of the copy.
Scale: Specify the starting and ending scales for the arrayed object(s). Intermediate objects are scaled smoothly between the starting and ending scales.
Angle: If arraying along a curve, and an orientation of Forward, Backward, Left, or Right has been chosen, the selected object can also be rotated about the direction of travel. This lets the array spin around the curve. The start angle is how much the imaginary man is leaning relative to “up” when he first starts his walk along the curve. The end angle is how much he is leaning at the end of his walk. Intermediate copies are tilted proportionately.
Offset Along a Curve: If the Specify Offsets/ Distances and Array Along a Curve options are both enabled, this option can be enabled and used to determine the distance from the beginning of the curve to the first copy in the array. Two points need to be set on the curve when this option is used. The first point specifies the curve to be used for the array. The second point determines the direction of travel of the array along the curve.The end of the curve that designated as the beginning is determined by the direction travel.
Example: Make two columns, two rows, and two
tiers of a box.
Select the box and choose the Array command. Enter 2 for each direction (Columns, Rows, and Tiers). Set a point directly to the right of the selection handle, and a second point above it. Finally, set a point on the third axis, away from the handle on the original box. The box will be duplicated in a 2 x 2 x 2 formation.