Shading

Menu: Tools / Shading
Shortcut Key: F8
Toolbox Icon:
Shades all or part of a drawing. Only solids,surfaces, and planes can be shaded.
Point 1: First corner of shading region (optional)
Point 2: Opposite corner of shading region(optional)
Light and material settings can be used to make the shaded rendering appear realistic.
The only way to show textures, such as oak or marble (see “Materials” on page 149) is to use DesignCAD’s native rendering, and this is only available through the Shading command.
Example: You want to see all four default views in a rendered state, all the time. (Note that this only works well for small- to-medium sized drawings.) You would choose View/Display Types (All Views) / Smooth Shading Mode. Now as you add new 3D objects to your drawing, they are automatically drawn as shaded objects. If you then want to apply a texture to one of the objects, select it and apply the material. If you’re still using the OpenGL display mode, it only changes color. To see the actual texture, you need to use Shading, choose Phong or Gouraud shading, and uncheck Enable graphics acceleration. This reverts that view to wireframe mode – once you regenerate after the Shading command, everything is shown in wireframe.
These options are available on the Shading Options window:
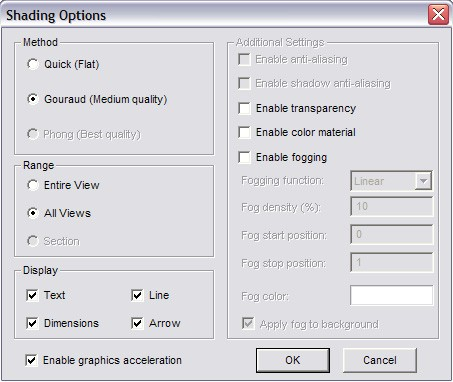
Quick (Flat): Quite a bit faster than Phong or Gouraud shading, but the shading is coarser and less realistic. No smoothing takes place, and material textures and texture mapping are not represented.
Gouraud (Medium Quality): Displays the material texture and/or texture mapping, but the resulting shading is not quite as fine as that of Phong shading.
Phong (Best Quality): Uses a fine shading pattern, and displays the material texture and/or texture mapping.
All three shading methods can be done either for the active view, all views, or for a rectangular region of the screen. The method you choose becomes the default selection the next time you use the Shading command.
If your graphics card supports graphics acceleration, check the Enable Graphics Acceleration option to improve performance.
This will enable interactive shading. Interactive shading will allow you to move and edit existing drawing items and even add new ones, all while the specified view(s) maintain shading. The view(s) will remain in shading mode until you change the status of the view(s) to wireframe or hidden line removal.
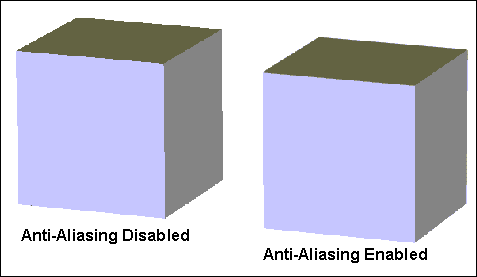
Enable Anti-aliasing: Determines whether or not to change the color of the object at its edges slightly so that all straight edges will appear smoother. If checked, the edges will be smoothed. Otherwise some of the edges will appear slightly jagged.
Enable shadow anti-aliasing: smooth the edges of rendered shadows.
Enable Transparency: When Phong or Gouraud shading is used and graphics acceleration is disabled, this option can be enabled to show
transparencies when a drawing contains objects that have been assigned materials that have transparent qualities and the drawing is shaded.
Enable Color Material: Uses the base color of the material as the color of the object.
Enable Fogging: When Phong or Gouraud shading is used and graphics acceleration is disabled, this option can be enabled to add a fog effect to the rendered drawing.
Fogging Function: The function used to create the fog. Linear produces proportionally more fog the “deeper” into the drawing you go. Exp produces a less dense fog than Linear. Exp2 also produces a less dense fog than Linear, following a different function than Exp.
Fog Density (%): The maximum fog density.
Fog Start Position: The point in the drawing where the fog is at its minimum. This value is a scale factor based on the depth of the drawing from the front to the back at the current view settings. A value of 0 starts the fog at the very front of the drawing. A value of -1 starts the fog one drawing-depth in front of the drawing’s front. A value of 0.5 starts the fog in the middle of the drawing.
NOTE: This position and scaling will vary depending on the size of the drawing, the viewing angle, and distance settings.
Fog Stop Position: The point in the drawing where the fog reaches its maximum thickness. Like the Fog Start Position, this value is a scale factor based on the depth of the current view of the drawing.
Fog Color: The base color for the fog. Click the color box to select a color from the palette.
Apply Fog to Background: If checked, the entire drawing background becomes the same color as the fog.
If Windows is configured for only 16 colors, the shaded drawing is not very realistic. If Windows is configured for 32,000 or more colors, however,the shading will be fastest and look very realistic. You can change the number of colors and the screen resolution used by Windows in the Windows Control Panel, under Display.
In latest version of DesignCAD, when you Mirror an object or use the Reverse the Order of the Points tool in the Info Box, the existing surface normals are eliminated and new ones re-calculated based on the mirrored/reversed object's geometry; as a result the object now renders correctly in OpenGL. The point reversal tool can also be used to correct objects from older drawings that were rendering incorrectly.