Info Box
Menu: View / Info Box
Shortcut Key: Ctrl+I
Toolbar Icon:

Tab
NOTE: This tab only appears if Panes are displayed. You can set this in Options / Options, in the View tab.
Used to view and edit properties of a selected object or objects. To activate the command, you must select an object before executing the command
The available items in the Info Box vary depending on the type of object you have selected.
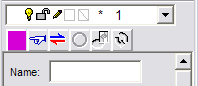
To keep the Info Box open, click the thumbtack icon. When the thumbtack is vertical, the Info Box will remain displayed. Otherwise, it will disappear until re-opened.

NOTE: If multiple objects are selected, the maximum number of common options will be shown.
There are different kinds of Info Box configurations based on object categories. Each contains information relevant to the specific category of object.
All Info Boxes contain the selected objects’ Layer (see Layer Options) and Color information.
To change any property, click its box and select the new property.
Same As (hand icon): Lets you match the parameters of an existing entity. Just click on the Same As button, then click on the entity already in the drawing that has the properties you want for the selected entity.
Reverse Points: If enabled (only when vector entities and/or spline curves are selected), click it to change the numbering of the points. The point designations are reordered; the first point becomes the last point and the last point becomes the first point.
Compliment Arc: If enabled (only when arcs or elliptical arcs are selected), click it to change the arc to its complimenting arc.
Texture Mapping: If enabled, click it to display the Texture Mapping window. See Texture Mapping.
Show Detail: If enabled, click it to display additional details on the selected object like point locations, scale, etc.
Name: Allows you specify a name for the selected object/s. If you want entity names created automatically, check Automatic Entity Names in the General tab of Options / Options.