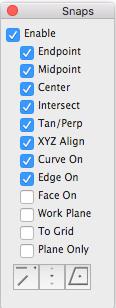
Snaps
The intuitive Snap tool is one of the features that makes this application unique among computer aided design products. The Snap tool intelligently infers positions from geometry and alignments between geometry.
Intelligent snapping also makes it easy to select existing points for construction by displaying information about the pointer’s location in the drawing area. If a snap notation is displayed when you click, the construction snaps onto the geometry precisely, without requiring finely-tuned, eye-hand coordination or tedious selection of special modifiers, modes or other specialized construction tools.
In addition to the precision allowed by Snap tools, a unique mechanism is enabled called the LogiCursor.
Snapping onto Geometry
When the pointer is in the drawing area, it has a snap point function. The snap point locks onto specific points on existing objects as you move the pointer near them. The Snap tool tells you when the snap point is on an object and if the snap is locked onto an object point such as center, endpoint, intersection, midpoint, quadrant or vertex.
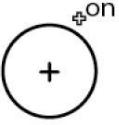
on
Projects the pointer location onto an object.
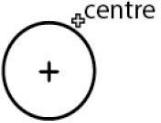
center
The center of an arc or circle. Move the pointer across the arc or circle to display on for the arc or circle, then move the pointer near the center to display the center point notation.
endpoint
The endpoint of lines, arcs, circles, ellipses, and splines.

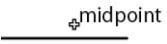
midpoint
The midpoint of lines, arcs, circles, ellipses, and splines.
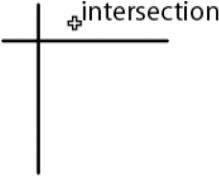
intersection
The intersection of two lines or curves (both permanent lines and the Snap tool’s dynamic construction lines).
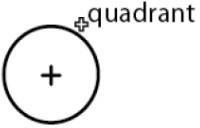
quadrant
Quadrant points on an arc or circle displayed at 3 o’clock, 6 o’clock, 9 o’clock, and 12 o’clock.
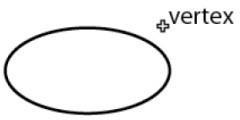
vertex
The vertices of an ellipse, spline or dimension point.
Using Tangents and Perpendiculars
With the Single Line tool enabled, if you click a point on an arc or circle and drag the pointer away at about a 45-degree angle, the Snap tool locks onto the tangent. If you drag away at a 90-degree angle the Snap tool locks onto a perpendicular.
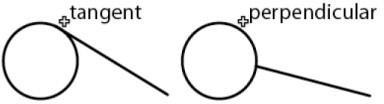
If you continue holding down the mouse button, the line remains tangent or perpendicular while you drag the ending point around the object. This is a very useful feature if, for example, you want to create a line from and tangent to an existing circle to the tangent point of another circle. Once a line is tangent to the circle, it can be dragged to the tangent point on the other circle, with the tangency maintained at both ends.

Snap Settings
Snap settings are changed in the Preferences option located in the File pull-down menu. The dialog box allows you to change the hit radius, alignment, angles, and other settings.
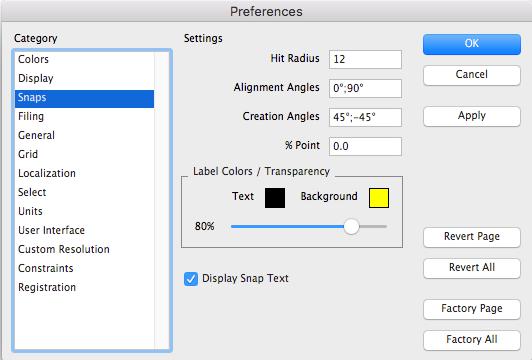
Hit Radius
This setting determines the detection distance in pixels. When the pointer is within the specified Hit Radius, the Snap tool notations are displayed and the object is selected when you click the mouse.
Alignment Angles
These angles define the dynamic construction lines that the Snap tool automatically uses. If you want to change the orientation of your drawing, you can change these specifications. For example, you could set these angles to 30, 90, and 15 for an isometric drawing. The defaults are 0 (horizontal) and 90 (vertical). Use a semicolon to separate the values. To display a temporary construction line through a point, move the pointer to the point to activate it (a diamond appears); construction lines automatically display through the active point. You can have as many as eight active points. When you activate the ninth point, the first one in the series is deactivated.
Additional Creation Angles
These lines are used by the Snap tool only when you are creating geometry and they are not part of the list of lines generated from the eight active points. The defaults are 45 and -45. Use a semicolon to separate the values.
% point
The divisions of a curve for Snap tool notations. If you want to divide the line into quarters, use a 25 specification. The default is 50, which shows the midpoint of lines. For example, entering 25 instructs the Snap tool to tell you when the pointer is 25% of the distance along a line.
Label Colors/Transparency
The Preferences: Snaps dialog box contains settings for the user to control several attributes associated with snap text. These attributes include the Snap Text Color, Snap Text Background Color, and Background Transparency. The transparent slider set at 100% is fully see through to the drawing window.
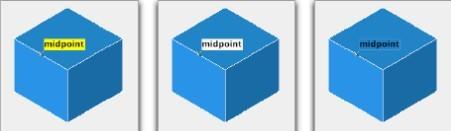
(a) Yellow (b) White (c) Transparent
Snap Filters
The Snap filters enable/disable specific snap checks. By default, the surface and solid edge/face projections are turned off. The options remain on/off until changed again through the dialog box.
Selecting the Apparent Intersection Snap, Midpoint Snap, Centroid Snap or Relative Snap disables the other Snap options.
Snap Locking
Pressing the x, y or z key will lock a snap along an axis alignment. Snap locking takes the current cursor location and projects to the x, y or z alignment axis. Once you press a lock key, additional wake ups are ignored, fixing the lock to the alignment at the time the key was hit. Snap locking does allow you to reference other points that are then precisely projected unto the alignment axis.
Log Cursor
The Log Cursor allows you to align the cursor with an existing entity, for precise placement. Unlike snaps, which distinguish point on a surface, the Log Cursor displays intersections along an axis, tangent, perpendicular, 45-degree angle., parallel, and co-planar and cylindrical faces.
Note: The Gripper’s Face Snapping must be enabled for co--planar and cylindrical inference. For more information, see “Gripper Properties”.