Welcome
FloorPlan Home & Landscape Software is a professional-level home design system developed for anyone who needs fast, accurate home drawings and wants the flexibility to view and edit their plan in 3D.
Uses for FloorPlan Home & Landscape Software include:
- Architectural drawings
- Presentations
- Deck design
- 3D visualization
- DXF/DWG Import and Export
- Electrical plans
- Framing customization
- Interior design
- Landscaping
It’s simple to start designing the home of your dreams. Take a few minutes to familiarize yourself with the contents of this manual, so you’ll know where to quickly find the answers. Be sure to see “A Quick Tour” for an overview of the screen layout and a quick tour of the program.
For a basic overview of tools and techniques that you’ll use throughout the design process, see “Drawing in 2D”.
A very important adjustment to make before beginning work with FloorPlan Home & Landscape Software will be setting your display to 32-bit color. To do this, right-click the Desktop, then click Properties on the pop-up menu. Click the Settings Tab on the Display Properties dialog box, then select True Color (32-bit). Select Monitor if you have multiple.
Note: Please note that not all the features in this User's Guide are available in every FloorPlan software title. Some Features such as Photo-realistic renderings are only available in FloorPlan Pro variant.
System Requirements
In order to run FloorPlan Home & Landscape Software, it is recommended that you have a Pentium-based computer. In addition, your system should include the following:
- Windows® 11, Windows 10, Windows 8 and Windows 7 (only 64-bit)
- Intel® or compatible 1.0 GHz processor or higher (multi-core processor supported)
- 4 GB of RAM or more recommended.
- 4 GB of Hard Disk Space
- VGA Video Card displaying at least 1024x768 with 32-bit color
- DVD-ROM drive for media installations only
- Mouse with wheel recommended
- 256 MB Video Card Memory
- Internet access and Internet Service Provider account required
- Mouse with wheel recommended
Some of your computer’s settings can impact FloorPlan Home & Landscape Software’s efficiency. By changing one (or more) of these settings, you can control how the program performs.
- Set your Display Settings to at least 1024x768 pixels and True Color (32-bit). Right Click, Select Screen Resolution.
Note: Refer to your computer’s Help information for recommended display settings.
- By default, the program determines the default Unit of Measure based on the computer’s location and regional settings. To choose a different setting, click Design menu > Unit of Measure and choose the desired units from the Measurement Units drop-down menu.
- The recommended computer text size is 96 dpi. To configure the dpi settings, follow the steps based on your operating system.
Windows 7 and above
-
Right-click the Desktop and choose Personalize.
-
Click Display at the bottom of the left pane and then click Set custom text size (DPI).
-
Ensure the DPI setting is 96 pixels per inch and then click OK.
Installing FloorPlan Home & Landscape Software
To install FloorPlan Home & Landscape Software, you must run Setup. You can’t install or reconfigure FloorPlan Home & Landscape Software by copying files directly from the distribution DVD to your hard drive.
To install FloorPlan Home & Landscape Software via DVD
-
Insert FloorPlan Home & Landscape Software Installation DVD into your DVD-ROM drive. Installation begins as soon as you insert the DVD.
-
Follow the installation prompts that appear.
Note: If installation did not begin when you inserted the FloorPlan Home & Landscape Software Installation DVD into your DVD-ROM drive, Autorun may be turned off on your computer.
To install FloorPlan Home & Landscape Software if installation does not begin automatically
-
Insert FloorPlan Home & Landscape Software Installation DVD into your DVD-ROM drive.
-
Navigate to your computer disk drives (for example, Start > Computer for a Windows 7 operating system).
-
Double-click the DVD-ROM drive (most computers will begin the installation at this point).
-
Double-click SETUP.
About This Guide
The text and graphics in this guide are tailored to help you find the information you need quickly and get the most out of FloorPlan Home & Landscape Software. Each section of this guide is divided into a series of step-by-step instructions,
making it easy for you to scan a page to find exactly what you need. You can also refer to the index for additional topics on the same subject, if necessary. You can access this guide quickly from the Help menu, or from any of the available tool tip pop-ups that are displayed in the application.
Instructions for installing and using Microsoft Windows do not appear in this guide. If you’re uncomfortable with your knowledge of Windows or with the concepts associated with a user interface object, you should review Windows online Help before attempting any serious work with FloorPlan Home & Landscape Software.
Basic Terms
The following is a list of terms used throughout this guide. Take a moment to familiarize yourself with the language used in this guide and to reinforce your understanding of basic terminology.
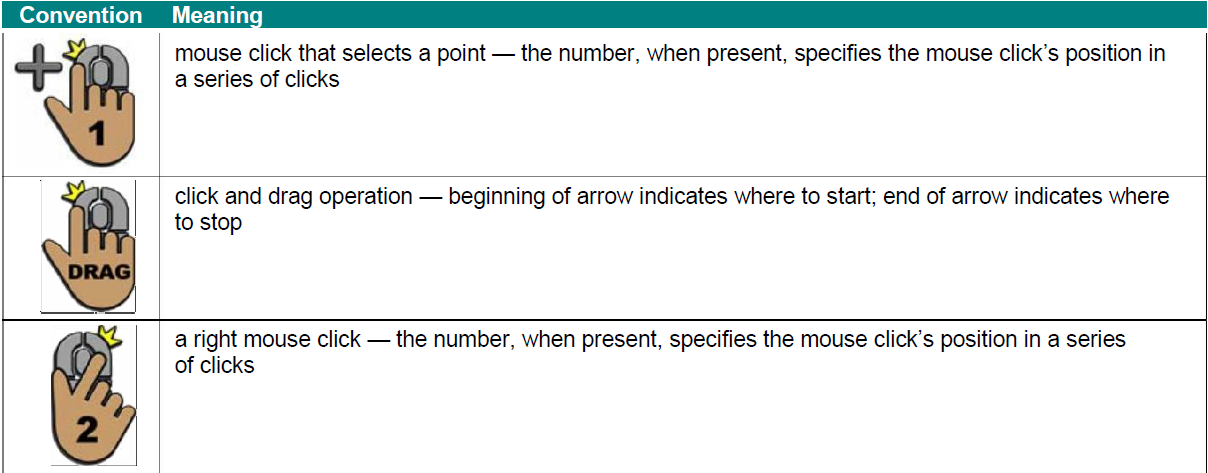
- Click Pressing and releasing the left mouse button once.
- Right-click Pressing and releasing the right mouse button once.
- Double-click Pressing and releasing the left mouse button twice.
- Click-and-drag Pressing the left mouse button, holding it down and moving the mouse, simultaneously.
- Drag-and-drop Clicking to select an item, holding down the mouse button, then dragging and releasing.
- Scroll Using the scroll bars on the sides of the application window by clicking the slider box, holding down the mouse button and dragging.
Graphic Cues
This guide uses several types of graphic elements. Some show the window or a dialog box that is displayed during an operation. When this type of graphic illustration is used, every effort is made to show the element exactly as it is displayed on the screen.
Keyboard commands are visually called out in a different font; for example, SHIFT and ENTER.
Graphic Cues Used in this Guide
Integrated Help
There are various ways to access the help information provided with FloorPlan Home & Landscape Software.
To access the user’s guide
- Click Help menu > User’s Guide (or press F1).
To access help for a specific part of your 2D drawing
- Right-click the feature, object, or plant that you want help with and choose Help from the context menu. The User’s Guide open for the selection.
To access tutorial videos for a specific part of your 2D drawing
- Right-click the feature, object, or plant that you want help with and choose Video Tutorial from the context menu. The Training Center opens for your selection using your default web browser.
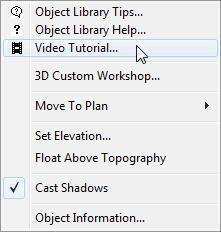
Accessing Video Tutorial for specific object Object Library Help
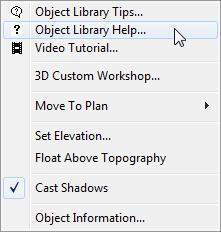
Object Library Help
Tool Tip Pop-Ups
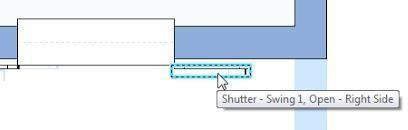
Tool tip pop-ups are displayed when you hover over most of the tools or buttons in the application. These tool tips provide a quick description of the tool or button and in some cases, a preview is available to demonstrate the functionality.
Additionally, links to more detailed information in the User Guide or a video tutorial may be available as well. Below is an example of the tool tip pop-up for the Room Addition Tool, which includes a preview and links to more detailed information.
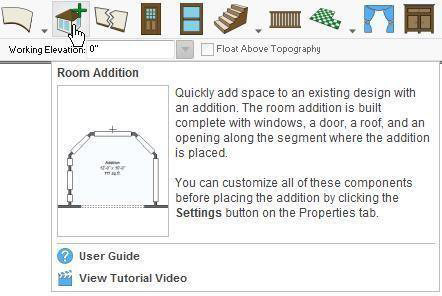
Descriptions are also displayed when you hover over an item in the design window. In some cases, more information may be available. For example, when hovering over a pathway, the material and area of the pathway is also displayed.
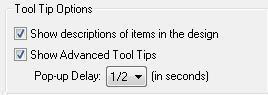
The tool tips settings are controlled in the Preferences window.
- Show descriptions of items in the design checkbox turn on or off the pop-up descriptions when hovering over items in the design window.
- Show Advanced Tool Tips checkbox turns on or off the tool tips. When selected, tool tips are displayed.
- Pop-up Delay controls how long you need to hover over a tool or button before the pop-up is displayed.
Note: You can keep the pop-up open by moving the cursor over the pop-up window after it appears.
To access tool tip settings
- Click Edit menu > Preferences > User Interface and edit the Tool Tip Options as needed.
Tips & Tricks
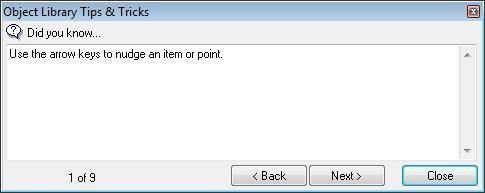
FloorPlan Home & Landscape Software makes it easy to get started by providing users with tips and tricks for each tool. Tips & Tricks provide information about each tool and some general information about the program.
To access tips & tricks for a part of your 2D drawing
- Right-click the feature, object, or plant that you want help with and choose Tips at the top of the context menu. The Tips & Tricks menu for that feature, object, or plant is displayed.
- Click Back or Next to cycle through the tips available for that feature, object, or plant.
Training Center
You can get started easily with FloorPlan Home & Landscape Software’s Step-by-Step Tutorials. They are available at all times, in the Training Center. Also available in the Training Center are videos showing exactly how most tools function.
To access the video tutorials and tooltips
-
Click Help menu > Training Center. The Training Center is displayed in your default web browser. The topics are displayed on the left side of the window, organized into categories.
-
Click to expand Tools or Tutorials and then choose a category to display the cascading list of videos available.
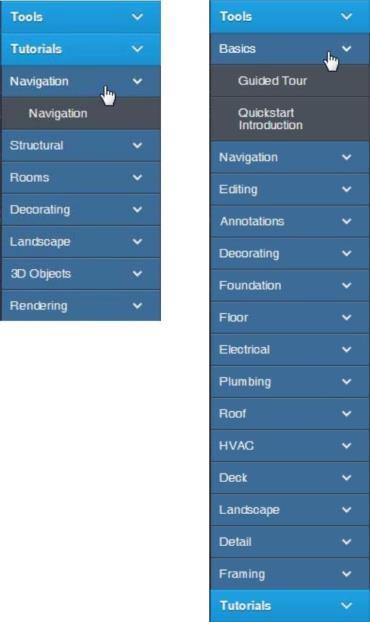
- Click the video you want to view and the video is displayed.
Note: (optional) You can download the corresponding tutorial drawing by clicking the link below the video; save the file to a location on your computer and then open the drawing file.
Technical Support
- Before contacting FloorPlan Technical Support, please verify that the answer to your question is not available from one of the following resources:
- FloorPlan Home & Landscape Software User’s Guide.
- Tutorials provided in the Training Center.
- The FloorPlan Online Community is available at http://forums.turbofloorplan.com At the Online Community, users can post questions and trade useful tips and tricks.
- The Customer Support Center is available at http://support.imsidesign.com.
The Customer Support Center can only answer questions that are related to features of FloorPlan Home & Landscape Software. They cannot answer specific questions about home building, local building codes, or other questions not related to the use or functionary of the software.
When contacting the Support Center, please provide the following details:
- Serial Number - located on the Help > About FloorPlan Home & Landscape Software dialog box.
- Your computer’s operating system.
- Make and model of your computer.
- Video card manufacturer and model.
- Video card driver date and version.
- Video RAM.
- Display settings, including hardware acceleration.
When you call, you should be in front of your computer, with the program running, and have the above information handy. The technical support contact information can be located at the Customer Support Center - http://support.imsidesign.com.
Speed Tips
You can “Speed Up” FloorPlan Home & Landscape Software by changing some of the program's settings.
- Close the 3D View window when you are not working in 3D. No 3D calculations are performed when the 3D View window is closed.
- Turn off shadows. For more information, see “Adding Lighting and Shadows”.
- Hide floors that are not active. Turning off inactive floors means the program will not waste resources on them.
- Decrease the render quality. Click 3D menu > 3D Rendering > Rendering Options. The Design Options dialog box is displayed with the Navigation & Render Quality options displayed. The lower the render quality settings, the faster 3D View renders your design.
- (alternatively) Click 3D menu > 3D Rendering > Final Quality Options > Low.
- Hide unused 3D objects. Click 3D menu > 3D Rendering > Rendering Options > Visible 3D Elements. Deselect unneeded elements to hide them in the 3D view and then click OK.
Display Settings
FloorPlan Home & Landscape Software is designed to run effectively, based on the system requirements printed on the software packaging and noted on the software’s website. However, there are some specific settings you can select to obtain the best display possible.
To adjust your display settings
-
On the Start menu, click Control Panel. The Control Panel program group is displayed
-
If Category view is active, under Appearance and Personalization click Adjust screen resolution and then click Advanced settings.
-
If Icon view is active, click Display and then click Screen Resolution > Advanced settings.
-
On the Monitor tab, choose True Color (32-bit) from the Colors drop-down menu and then click
OK. (optional) Adjust the Resolution to at least 1024x768 pixels.
- Click OK and close the Control Panel window. The new window settings are applied. You may be prompted to restart your computer to apply the new settings. If so, click OK or Yes.
Setting the Units of Measurement
You can set units of measurement by selecting either English or Metric measurements. You can also set the default measurements and options to be applied when any previously-drawn design is opened. For more information, see “Setting the Units of Measurement”.
Setting the Scale
Scale is the ratio between real-world size of objects and items in your drawing and their size when printed. For more information, see “Setting the Scale”.
Check for Software Updates
By default, the software checks for newly available updates upon startup. You can also disable this and manually check for software updates to make sure you’re using the most recent version available.
To disable automatic updates at startup
-
Click Edit menu > Preferences. The Preferences dialog box is displayed.
-
Click User Interface and, under the Startup section, deselect Automatically check for updates and then click OK.
To enable automatic updates at startup
-
Click Edit menu > Preferences. The Preferences dialog box is displayed.
-
Click User Interface and, under the Startup section, select Automatically check for updates and then click OK.
To check for software updates
-
Click Help menu > Check for Updates. If updates are available, the FloorPlan Updater is displayed with a summary of the update.
-
Click Install to install the update.
-
When the download completes, click OK and restart the application.
About FloorPlan Product Providers
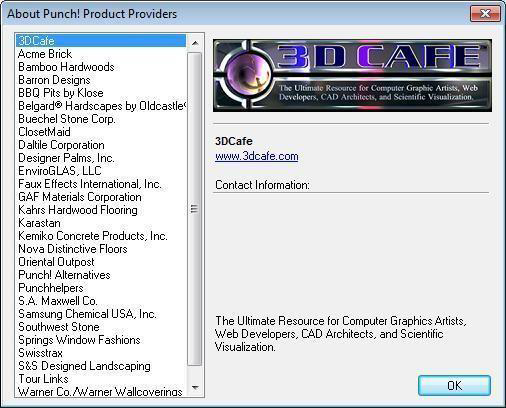
You can access information about each manufacturer of name-brand content, for example, materials, paint, or flooring.
To access information about product providers
-
Click Help menu > About FloorPlan Product Providers. The About FloorPlan Product Providers dialog box is displayed.
-
Click a product provider’s name to read information about them, and then click OK to close the window.
About FloorPlan Home & Landscape Software
You can access your serial number or check the version of your program, with one click, at any time.

To access your serial number
-
Click Help menu > About FloorPlan Home & Landscape. The program’s splash screen is displayed.
-
Click Close to close the window.