Fence Designer
Whether it’s selecting the picket type for an ornamental iron fence, setting the railing heights on a gate, or adding color or texture to fence sections, the Fence Designer lets you customize images of fences and gates so you can tour a realistic rendering of your garden plan in FloorPlan Home & Landscape Software.
Designing Fences
Fence Designer gives you two powerful toolsets to use in your fence designs. Controlled Detailing tools allow you to control attributes such as rail placement and picket caps. Freehand Detailing tools allow you to modify the appearance of those elements or even draw new elements.
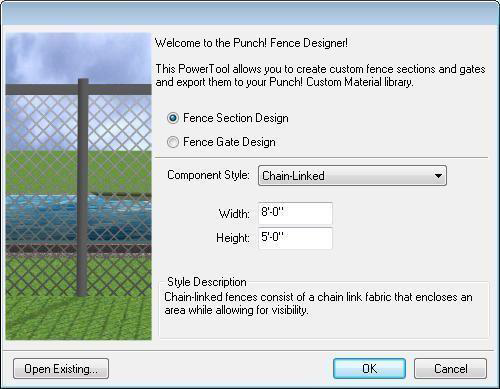
The first step to creating your fence is choose the style fence you want. The Fence Design dialog box allows you to select basic style options to get your fence started, then you can customize each component’s property to make it your own.
Launching Fence Designer
-
Click Design menu > Launch PowerTool. The PowerTool Launcher is displayed.
-
Click to select Fence Designer and click the Launch button. The Fence Designer is launched.
To select a fence style and size
-
To display the Fence Design dialog box, launch the PowerTool, or click File menu > New. The Fence Design dialog box is displayed.
-
Select either Fence Section Design or Fence Gate Design.
-
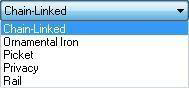
From the Component Style drop-down menu, choose the style fence you want.
-
Type the width and height you want in the corresponding text boxes.
-
Click OK. The fence is displayed, based on your specifications.
To create a new fence style
Click File menu > New. The Fence Design dialog box is displayed.
Customizing Chain-Link Fence Properties
Chain-link fences are made up of the following components: Chain Link Fabric and Frame Work. To access properties for each component, click the drop-down menu at the top of the Properties Bar.
Chain Link Fabric
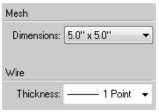
1. Mesh Dimensions defines the width and height that makes up the mesh. The smaller the dimension, the more condensed the mesh is displayed
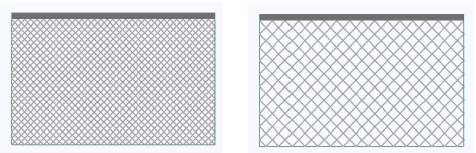
Mesh 3"x3" Mesh 6"x6"
- Wire Thickness defines the thickness of the wires that make up the mesh.
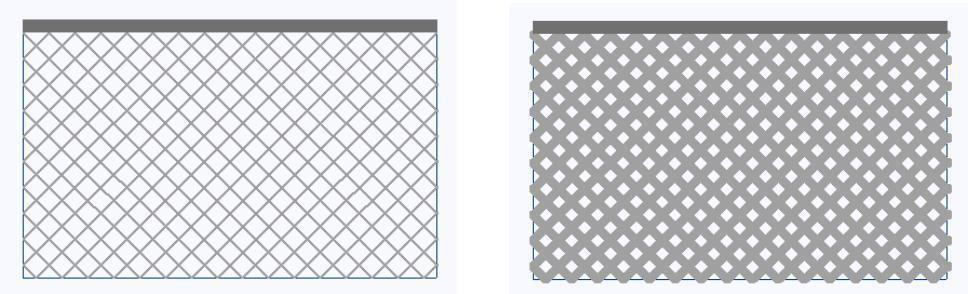
Wire 1pt" Wire 4pt"
Frame Work
1. Upper Frame Rail defines the height and elevation of the upper frame rail. Type the Height and Elevation you want for the upper rail. Press ENTER to accept each value.
2. Lower Beam checkbox Controls whether or not a lower rail is included. To include a lower rail, select the checkbox. Type the Height you want in the corresponding text box.

Note: You can resize and reshape the upper and lower rails by dragging selection points using Object or Points Level editing. For more information, see “Editing Detail Shapes”.
Customizing Ornamental Iron Fence Properties
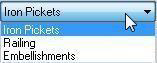
Ornamental iron fences are made up of the following components: Iron Pickets, Railing, and Embellishments. To access properties for each component, click the drop-down menu at the top of the Properties Bar.
Iron Pickets
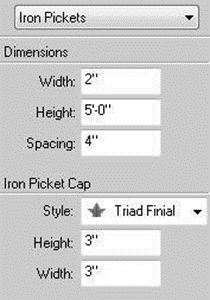
- Dimensions defines the width, height, and spacing for each of the pickets.
Note: The number of pickets that are displayed will vary depending on the width.
Note: The height is based on the original width specified on the Fence Design dialog box.
2- Iron Picket Cap defines the style, height, and width of the picket cap.
Railing
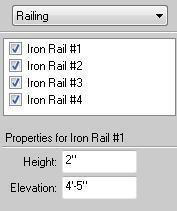
-
Select the rails to be included or deselect to exclude.
-
To define the height and elevation for a rail, click to select the rail # and then type the dimensions you want. Press ENTER to accept each new value.
Embellishments
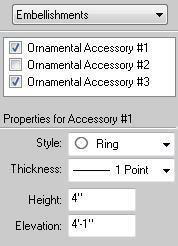
-
Select the accessory to be included or deselect to exclude.
-
To define the properties for each accessory, click to select it and specify the style, thickness, height, and elevation you want. Press ENTER to accept each new value.
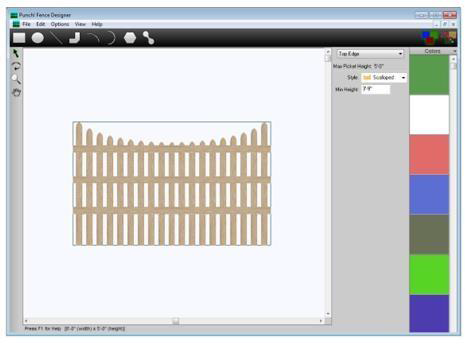
Customizing Picket Fence Properties
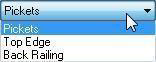
Picket fences are made up of the following components: Pickets, Top Edge, and Back Railing. To access properties for each component, click the drop-down menu at the top of the Properties Bar.
Pickets
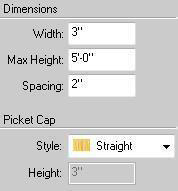
- Dimensions define the width height and spacing for the pickets. Press ENTER to accept each new value.
- Picket Cap specifies the cap style and height.
Note: The Picket Cap height is not available for the Straight style, as all of the caps will be at the same height. When a different style is chosen, the Height text box becomes active.
Top Edge
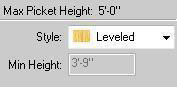
Specifies the style and minimum height you want.
Note: The Min Height is not available for the Leveled style, as the top will be at the same height. When a different style is chosen, the Min Height text box becomes active.
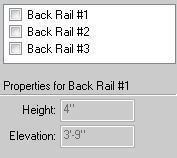
Back Railing
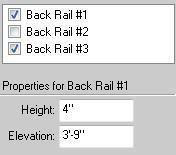
-
Select the rail(s) to be included or deselect to exclude.
-
To define the properties for each rail, click to select it and specify the height and elevation you want. Press ENTER to accept each new value.
Customizing Privacy Fence Properties
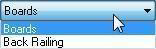
Privacy fences are made up of the following components: Boards and Back Railing. To access properties for each component, click the drop-down menu at the top of the Properties Bar.
Boards
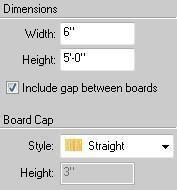
- Dimensions define the width and height you want. Press ENTER to accept each new value.
- Include gap between boards checkbox controls the spacing between boards. By default, the boards are placed with a small gap between them. Deselect this option to remove the gap.
- Board Cap specifies the style and height of the boards.
Note: The Board Cap Height is not available for the Straight style, as all of the boards will be at the same height. When a different style is chosen, the Height text box becomes active.
Back Railing
-
Select the rail(s) to be included or deselect to exclude.
-
To define the properties for each rail, click to select it and specify the height and elevation you want. Press ENTER to accept each new value.
Customizing Rail Fence Properties
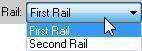
Rail fences are made up of the following components: First Rail and Second Rail. To access properties for each component, click the Rail drop-down menu and choose which rail you want to work on.
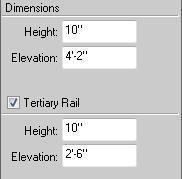
- Dimensions defines the height and elevation you want for the selected rail.
- Tertiary Rail checkbox controls the display of a third rail. By default, a tertiary rail is included, positioned between the first and second rail. Deselect the checkbox to exclude it.
Freehand Detail Drawing
In Freehand Detailing mode, you can move, rotate, or apply colors and textures to individual components of the fence or gate. You can even add custom shapes to the design.

All shapes drawn in Fence Designer can be edited in a variety of ways. They can be moved specified amounts, rotated, layered, and even converted to other types of drawing shapes. Object-Level Editing is active by default. Object-Level Editing, along with Point-Level Editing, controls how your edits impact your object. If you are in object selection mode, changes affect the object as a whole. If you are working in point selection mode, each edge of the object is treated separately as you edit.
For more information on using drawing tools, see “Detail Plan Tab”.
To display dimensions as you draw
Click Options menu > Show Tracking Dimensions. Dimensions are displayed as you draw. When this item is checked Fence Designer automatically displays dimensions, as you draw, making it easy to precisely place shapes in your drawing.
Editing Fence Shapes
You can edit a shape or part of a fence to reshape, reposition, and reorient existing elements. The following options are available for editing your fence design:
 ■ Rotate selections (see “Rotating a Selection”.)
 ■ Moving selections (see “Moving a Selection”)
To control layering
Right-click the element you want to position and choose Bring to Front or Send to Back from the context menu.
To remove fence elements
Right-click the element and choose Clear.
To adjust curvature
Right-click a shape and choose Smooth. For more information, see “Changing Curve Tension”.
To resize or reshape a fence or gate manually
Right-click a shape and choose either Object-Level Editing or Point-Level Editing. For more information, see “Editing Detail Shapes”.
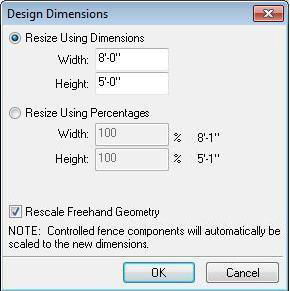
To resize a fence section or gate using dimensions
-
Click Edit menu > Adjust Design Dimensions. The Design Dimensions dialog box is displayed.
-
Click either Resize Using Dimensions or Resize Using Percentages, then enter new values for the width and height in the corresponding text boxes.
-
(optional) Select Rescale Freehand Geometry if you want to scale any shapes you have already drawn in the design.
- Click OK.
Customizing Fence Materials and Color
The following editing modes are available in Fence Designer:

-
Custom Color Tools in this mode will completely replace the original color, in your selected area, with a custom color of your choice.
-
Custom Material Library Tools in this mode completely replace the original material, in your selected area, with a custom material of your choice.
To apply color or texture to a fence component or shape
-
Select a fence component (such as a rail or a picket or a shape).
-
Click the editing mode that you want to apply, then select a color or material from the Preview Bar. The color or texture is applied to that shape.
File Management
You can return to a Fence Designer project simply by opening an existing fence design file. Fence designs are saved with the file extension *.FDD. When you’re ready to use your fence design in a home design project, simply export it to one of the custom material libraries.
To open an existing fence definition
-
Click File menu > Open. The Open Design dialog box is displayed.
-
In the File Name box, type the name of the file you want to open, or search for the file by switching folders or drives.
-
Select the file you want and click Open.
To save a fence image to a material library
-
Click File menu > Export to Material Library. The FloorPlan Fence Designer dialog box is displayed.
-
Choose the User Library category where you want the fence stored.
Tip: Add the fence to an existing Fence library so all of the fence options are available from the same place.
- Type a name for the new fence or gate in the Material File Name text box.
- Type a description of the new fence or gate in the Material Description text box.
- Click OK.
Using Fence Designer Materials in Your Project
Once you’ve created your own custom fence or gate materials in Fence Designer you can easily apply them back in your FloorPlan Home & Landscape Software project. After you’ve drawn a fence on the Landscaping tab, simply navigate to the library where you stored the new image and drag the image to the fence in your 3D view.
To apply Fence Designer materials
-
Click the Libraries tab and choose Materials from the Libraries drop-down menu. The Materials categories become available.
-
Click the Categories drop-down menu and choose the User Library tab and category you want to view. Its contents are displayed in the Preview Bar.
-
Drag-and-drop the custom fence material you want to apply onto the fence or gate in the 3D view window. The custom material you selected is applied.