Rendering Overview
Rendering is the process of creating shaded images of 3D scenes. ViaCAD supports two distinct types of rendering. The first method uses OpenGL for fast interactive manipulation. The second uses Rendering which utilizes slower raytracing methods but creates photorealistic images. This chapter provides a general overview of both OpenGL and Rendering.
OpenGL Shading
OpenGL shading uses software and hardware technology that is already preinstalled on most computers. OpenGL is designed for fast interactive manipulation of 3D geometry. OpenGL is an industry 3D standard that is a very popular rendering option for CAD software as well as the gaming communities.
For more information about OpenGL, visit the OpenGL consortium at http://www.opengl.org.
ViaCAD uses OpenGL shading for static and dynamic repainting of the screen. Commands such as repaint, change view, zoom view, etc. all use OpenGL. There are various different options for shading in OpenGL that include wireframe, flat, Gouraud, and Phong plus combinations of showing or not showing associated surface or solid edges. To set the rendering method and a variety of other options, see the Shade Options dialog box under the View menu.
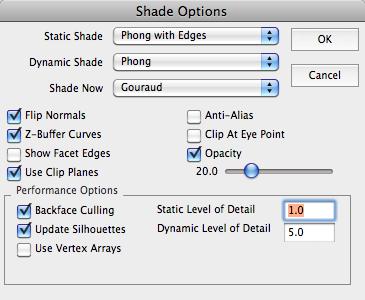
OpenGL Shade Option
The Static Shade mode applies to commands such as:
Repaint, Change View
Zoom All, Extents, Home
The Dynamic Shade mode applies to commands such as:
- Wheel Mouse
- Dynamic Zoom, Pan, Rotate (in View Tool Palette)
The Shade Now option applies to a repaint operation associated with hitting the Shade Now command or a short cut key assigned to the Shade Now command.
The pull-down menu for Static, Dynamic, and Shade Now contains a list of rendering and edge methods.
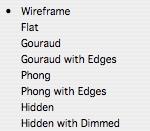
OpenGL Shade Methods
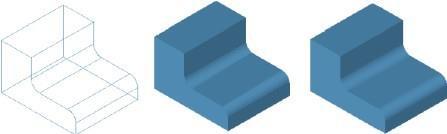
(a) Wireframe (b) Flat (c) Gouraud
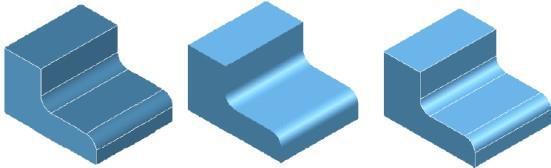
(d) Gouraud w/Edges (e) Phong (f) Phong W Edges
OpenGL Render Methods
The render methods that include edges have options for the user to change the edge color. To change the edge color, access the Preferences: Display dialog box located in the File menu. Please note this is a global setting for all surfaces or solids.

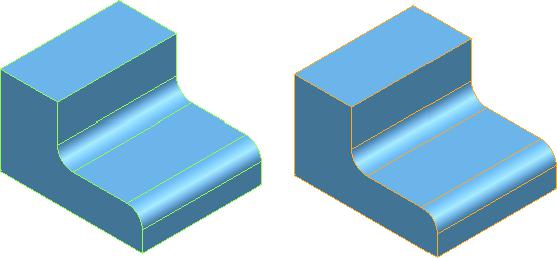
Different Edge Color Options
Drivers
The quality and performance of OpenGL rendering can depend on the choice of graphics adapter and driver version. If you are experience problems, be sure to check that you have the latest software driver for your given adapter board. In several cases, using a different graphics adapter and driver version combination results in serious display problems and in some cases causes instability problems.
Lights
OpenGL and Render use the same light tools for either render method. Use the light tool palette to create distant, point, and source lights. Use the Inspector to change parameters associated with a light. And turn on the light defining points with Edit: Show Points to modify position directly within the drawing. However, there are some notable differences between the two. For example, in OpenGL shadows are not supported. In addition, facets are illuminated according to how much light falls on their vertices. If a light is positioned over a large flat face (such as a floor), it will not seem to be casting light. Setting the object’s resolution to “Very fine” or “Super fine” and setting the Precise Facets settings will increase the facet vertex density.
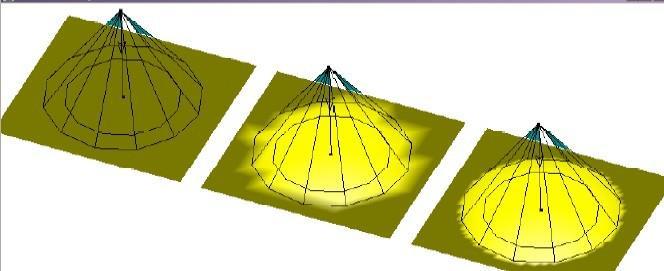
(a) Fine (b) Very Fine (c) Super Fine
Vertex Density and OpenGL Lighting
OpenGL Settings
Render is a set of tools that controls the definition and generation of photo-realistic images. Unlike OpenGL shading, Rendering is not used during geometry construction and editing. Rendering is a post process tool that interacts with the geometry already created.
To effectively use Rendering, the user needs to create a scene. A scene may consist of one or more positional lights, ambient light characteristics, materials, decals, and background and foreground properties.
Lights
The positional light tools are used to define the lighting characteristics of a model. There are three light tools available. Use the Ambient Light Settings dialog box to define the ambient light characteristics.
Render Library
The Render Library window is used to apply materials and decals to objects, and to select the background and foreground properties. The Render Library supports a drag-and-drop approach to applying materials, and decals onto objects. To use a material, just drag it onto the object.
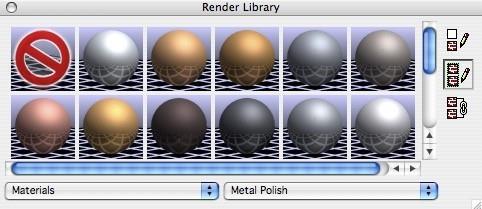
Render Library
Advanced Material Editing
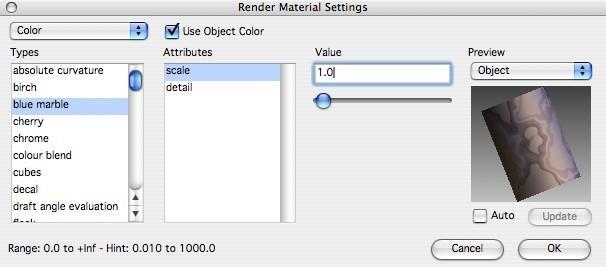
The Render Library provides an extremely easy means to add material characteristics to your geometry. The Advanced Material Editor provides you with a means to further tweak a material. To access the advanced material editor, select the object and display the Inspector. Next, click the Render tab such that you see the Advanced button in the lower right.
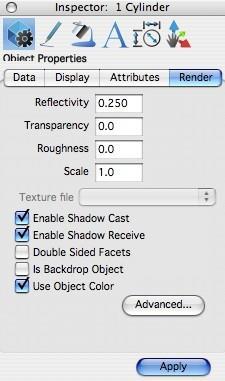
Inspector Advanced Material Button
Clicking the Advanced button displays a dialog box for advanced material editing. Advanced material editing provides a means to modify the following material attributes:
-
Shader Class
-
Shader Types
-
Attribute
-
Attribute Values