Adding 3D Features
FloorPlan Home Design Software lets you view your home in photo-realistic 3D. You can select exterior and interior wall color, add realistic roof materials and select from a variety of woods to make your home design completely unique. View all your customizations in the 3D View window.
By adding color, trim, and materials, you can make decorative changes to the 3D presentation of your home design as quickly as you think of them. This makes it easy to experiment with a variety of colors, both inside and outside your home, before picking up a paintbrush!
Organizing Library Content
The Content pop-up menu provides access to the Standard Library and User Library for each of the available content libraries. Content libraries include 2D Symbols, 3D Objects, Materials, Paint Colors, Plants, Templates, and Trim. The available content depends on the view that is visible. For example, Materials are only available when a 3D view is open. Each of the content libraries includes a Standard Library of content and a customizable User Library.
Standard Library
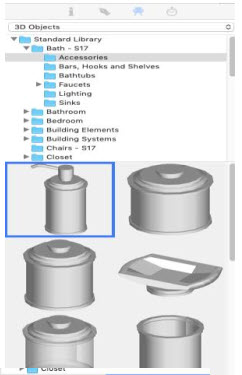
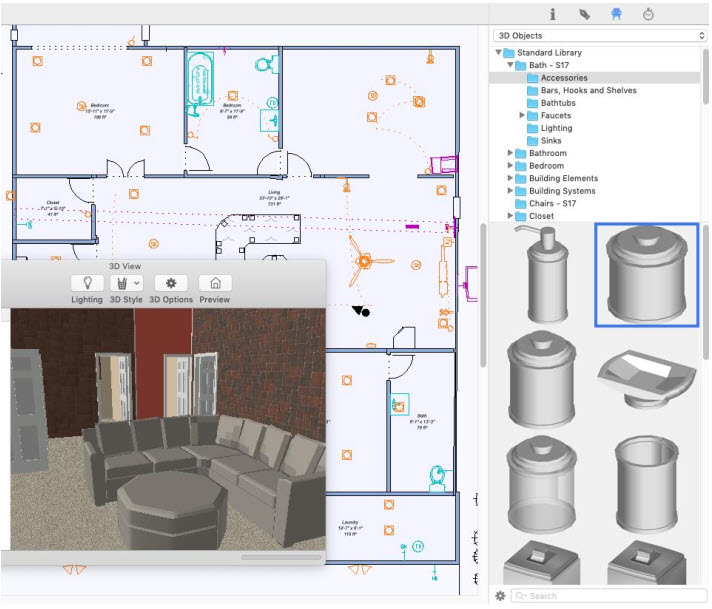
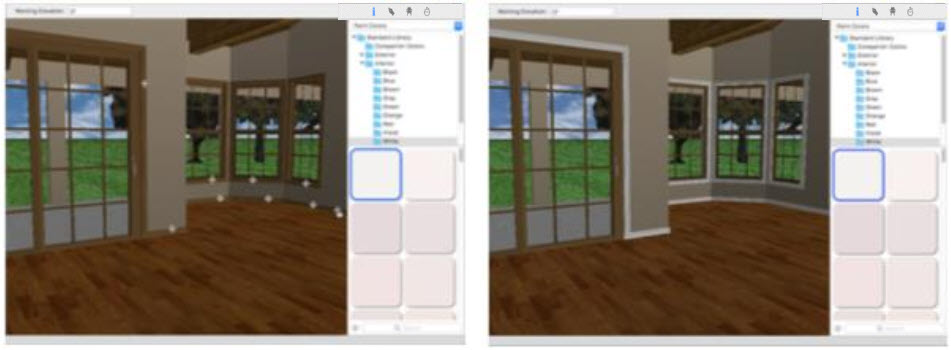
The Standard Library includes content that is delivered with the initial installation of the software. This content cannot be edited directly, however, you can copy these items to a User Library for editing. The library categories and subcategories that appear change when you switch content libraries. In the example below, the 3D Objects content library is active.
User Library
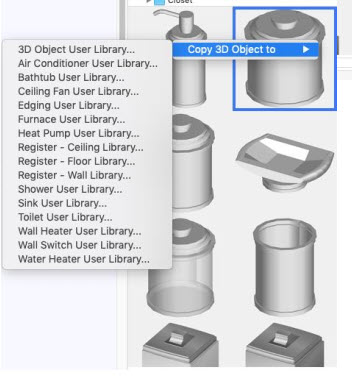
The User Library is populated when you copy items from a Standard Library to the User Library. This is useful when you want to edit object or component details, or to organize content based on the room where it will be used, for example. Each of the Content libraries has an associated User Library that you can copy to. When copying an item from the 3D Objects library, you can choose the 3D Objects User Library, or choose a component User Library. For example, when copying an object from the Bathroom Accessories category, you have the option of copying it to the 3D Objects User Library, or one of the components of the User Libraries. User Library content is organized by category, so when you copy an item to the User Library you must choose a category. You can choose to have one category for all of your User Library content or create multiple categories, and sub-categories, to organize your content; this is based on your personal preferences.
Organizing the User Library
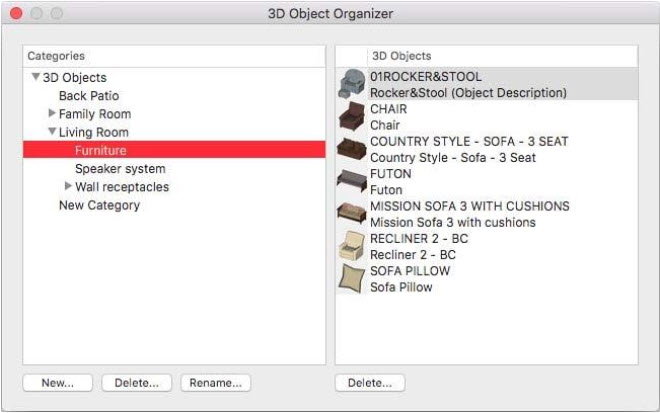
You can create categories and customize lists of furnishings, accessories, receptacles, and so on, to make FloorPlan Home Design Software more personal. In this example, we will use the 3D Object Organizer, but all Organizers work the same way. By default, the New Category library exists. You can add content to this library, or add new sub-categories under this library. You can also rename the New Category library.
To create a new category
1 Open the content library or component library where you want to create a new User Library category.
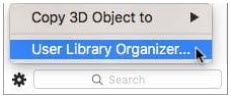
2 At the bottom of the Content pane, click the gear button and choose User Library Organizer from the pop-up menu. The organizer window appears.
3 Select the category where you want to create a new category; new folders are created within the selected category.
4 Click the New button and enter the category name you want, then click Create.
To copy an item to a user library
1 Select the content you want to copy and then click the gear button at the bottom of the pane and choose
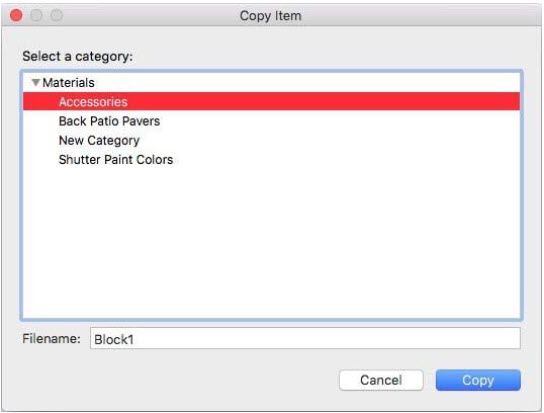
Copy Material Object to User Library. (The exact name depends on the library you are copying from). The Copy Item dialog appears.
(alternatively) Right-click the content you want to copy and choose Copy Material to User Library.
Note: In some cases, you can choose from more than one User Library. If presented with a submenu of options, choose the User Library where you want the selection copied.
2 Choose the category where you want the content copied.
(optional) Enter a name in the Filename field.
3 Click Copy.
To rename a category
1 Open the content library or component library where you want to edit a User Library category.
2 Choose the category you want to rename and click the Rename button. A dialog appears.
3 Enter the name you want and click Rename.
4 Close the organizer.
To delete a category
1 Open the content library or component library where you want to delete a User Library category.
2 Choose the Category you want to delete and click the Delete button. A warning dialog appears.
3 Click Delete to delete the category and all of its contents.
4 Close the organizer.
To delete an item from the User Library
1 Open the content library or component library where you want to delete an item.
2 Choose the category with the item you want to delete. The category’s contents appear on the right.
3 Select the object you want to delete and click the Delete button. A warning dialog appears.
4 Click Delete to permanently delete the object from the User Library.
5 Close the organizer.
To find the User Library source folder
You can find the source folder location for User Library content and for User Library categories.
■ Right-click the User Library category or content and choose Show in Finder. The Finder opens to the location.
3D Objects Libraries
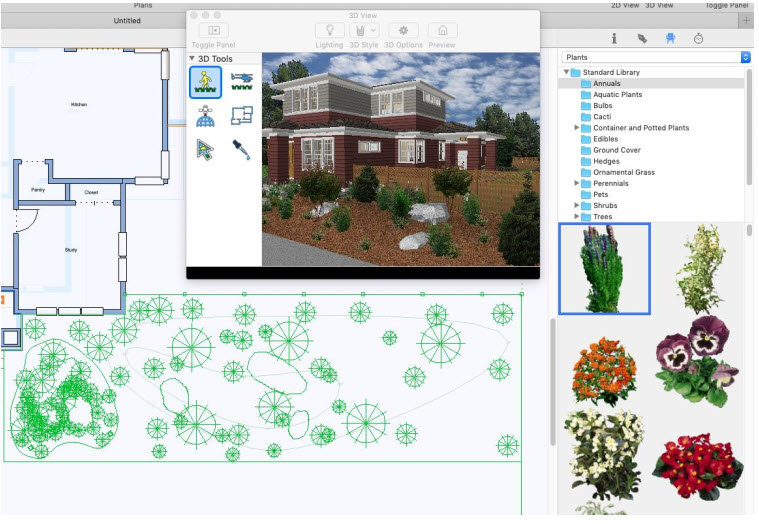
FloorPlan lets you add a variety of 3D objects to enhance the presentation of your design. The 3D Objects Standard Library offers many categories of objects for you to add to the interior and exterior. Additionally, the 3D Objects User Library allows you to organize your 3D Objects into your own categories and edit object details. When a category is selected its contents are displayed in the Preview Bar. You can then drag an object into the design window or directly into a 3D view window. When dropped into a 3D view, the object elevation is based on the location of your pointer. If dropped onto a floor or ceiling surface, the object is automatically placed at the surface elevation. Objects only appear in 3D when you are viewing in 3D mode; in the design, window objects appear as 2D symbols. The 3D Objects library is accessible at any time and objects can be placed on any plan tab. For details on importing 3D objects, see “Importing Files”.
There are also a number of library options for organizing content as you design. For information on creating User Libraries, see “Organizing Library Content”.
To add 3D objects to your design
1 In the right sidebar, click the Content tab  . A pop-up menu is available in the pane that appears.
2 Choose 3D Objects from the pop-up menu and then choose the library category you want. Most of the library categories are organized into sub-categories, contained within disclosure triangles, for example, the Bathroom library. To access those libraries, click the drop-down menu
3 Scroll through the previews in the Preview Bar and drag the object you want into the design window or into a 3D view window.
(optional) Drag the object you just placed to move it to another location in the design.
Editing 3D Objects
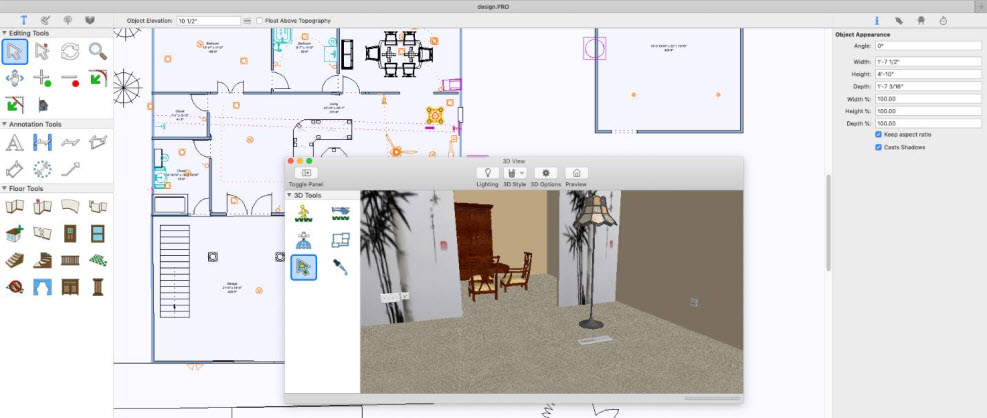
Once you’ve placed 3D objects in your drawing, it’s easy to move, delete, copy, and rotate objects, usually involving just one or two mouse clicks. You can select objects in either the 2D plan view or in a 3D view. In the example below, a lamp is selected in the 3D view and its properties are displayed on the Properties pane, including its rotation angle, sizing, and Shadow options.
To resize an object
1 Click to select the object you want to edit.
■ 2D Plan View: Choose the Select Objects  button from the Editing Tools group.
■ 3D View: Choose the Select Objects  button from the 3D Tools group.
2 Click the Properties  tab on the right sidebar and edit the size in feet and inches or percentages. Be sure to press the Return key to accept new values.
(optional) If you want to maintain the width and height size ratio, select the “Keep aspect ratio” checkbox.
(optional) If you want shadows, make sure the “Cast Shadow” checkbox is selected.
(optional) Enter an angle, if you want to rotate the object.
To rename objects
1 Choose the Select Objects button from the Editing Tools group.
2 Right-click an object in the 2D plan view and choose Object Information from the shortcut menu. A dialog appears.
3 Enter a new name in the field then click OK.
Note: This is the name that will be listed in the spreadsheet, created by the Estimator Power Tool.
2D Symbols Library
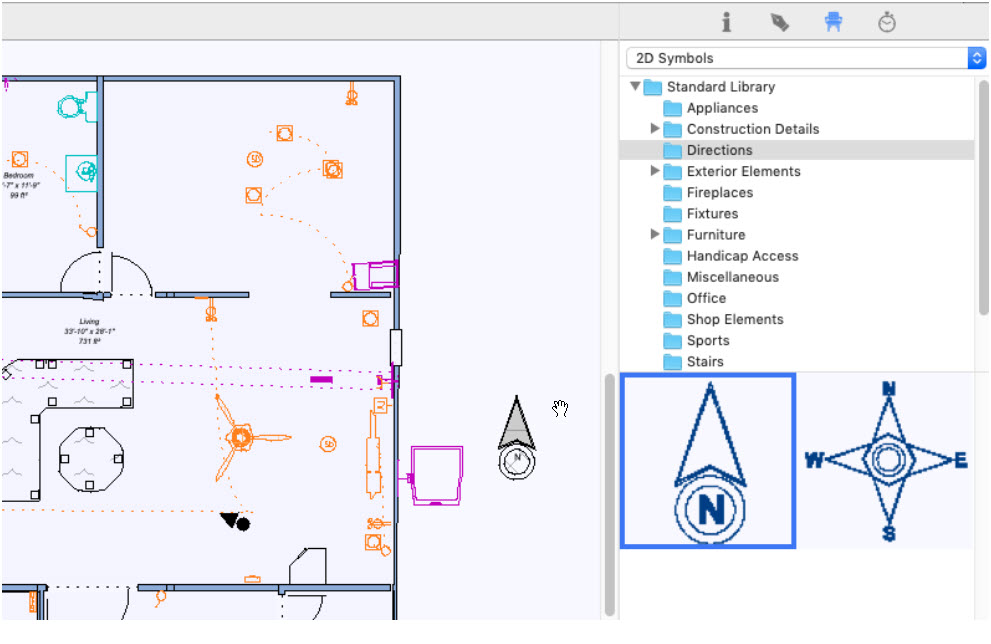
The 2D Symbols library includes many categories of symbols for you to add to your design. When a category is selected its contents are displayed in the Preview Bar. You can then drag-and-drop a symbol into your design. These are visual representations you can add to your design that do not appear in the 3D view. Additionally, the 2D Symbols User Library allows you to organize your 2D Symbols into your own categories and edit object details. For more information on the different content libraries, see “Organizing Library Content”.
To add 2D symbols
1 In the right sidebar, click the Content  tab . A pop-up menu is available in the pane that appears.
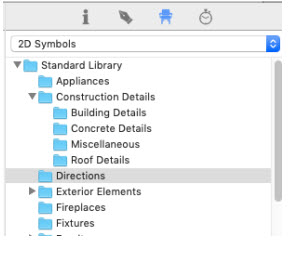
2 Choose 2D Symbols from the pop-up menu and then choose the library category you want. Most of the library categories are organized into sub-categories, contained within disclosure triangles, for example, the Construction Details library. To access those libraries, click the disclosure triangle.
3 Scroll through the previews in the Preview Bar and drag the object you want into the design window.
(optional) Drag the object you just placed to move it to another location in the design.
Plants Libraries
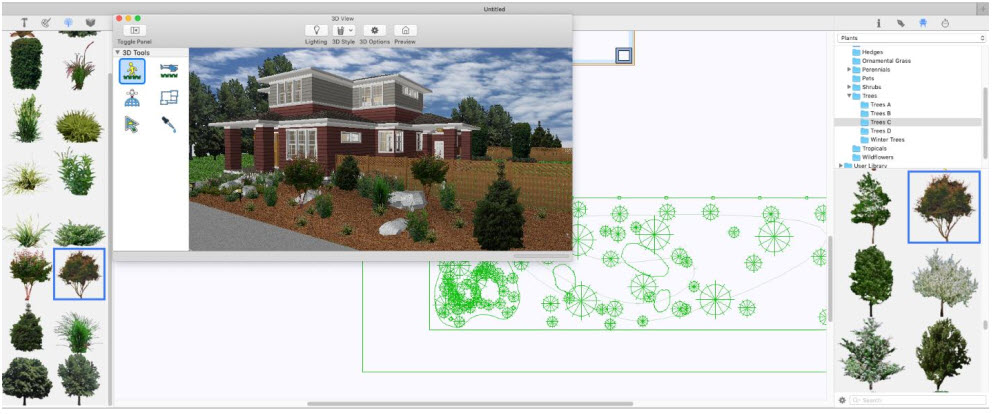
FloorPlan includes thousands of plants to make designing the landscape easy and fun. The Standard Library offers many categories of plants to add to your design and tools are available to help you choose the ones that grow best in your region. Additionally, the Plants User Library allows you to organize plants into your own categories and edit plant details. You can also import a plant image and a corresponding plant information file to add your own plant(s).
Plants can be dropped into the design window or dropped into a 3D view window. When dropped into a 3D view, the plant elevation is based on the location of your pointer. If dropped onto an elevated planter bed, for example, the plant is automatically placed at the planter’s top surface elevation. Tip: If hover your cursor over the preview of the plant its name is displayed in the Status Bar.
Note: You can see all of the plants in your drawing by showing the Plant Inventory Bar. For more information, see “Plant Inventory”
To add plants
1 In the right sidebar, click the Content tab. A pop-up menu is available in the pane that appears.
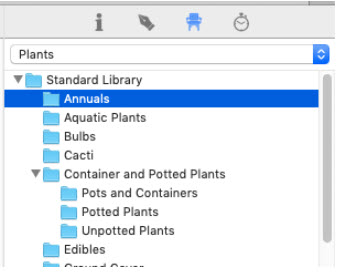
2 Choose Plants from the pop-up menu and then choose the library category you want. Most of the library categories are organized into sub-categories, contained within disclosure triangles, for example, the Container and Potted Plants library. To access those libraries, click the disclosure triangle.
3 Scroll through the previews in the Preview Bar and drag the plant you want into the design window.
(optional) Drag the plant you just placed to move it to another location in the design.
Note: You can apply a series of one plant using Auto-Click Placement. For more information, see “AutoClick Placement”.
To view a plant description, requirements, and growth information
■ Right-click the plant in the 2D plan view or in the Preview Bar and choose Plant Details on the shortcut menu.
To edit plant description, requirements, and growth information
1 Copy the plant to the Plants User Library. For information on working with the different libraries, see “Organizing Library Content”.
2 Navigate to the plant in the Plants User Library Preview Bar, then right-click the plant and choose Edit Plant Details. The Plant Details dialog appears.
3 Edit the details you want to change and then click OK.
To import a plant
1 Choose File > Import > Image to Plant Library. A dialog appears.
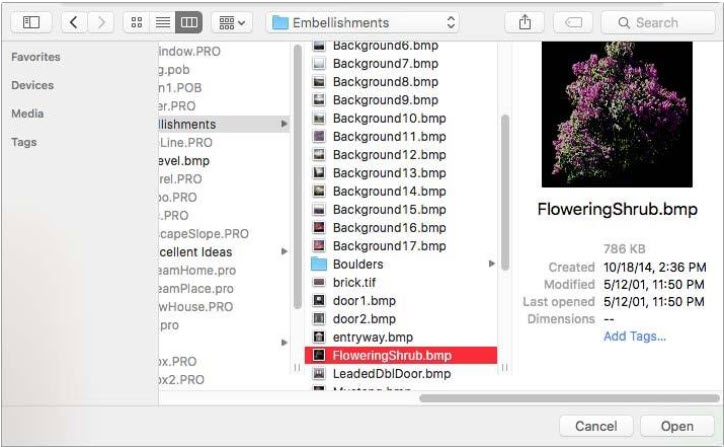
2 Select the file you want to open and click Open. The plant appears in the Import Plant to Library dialog.
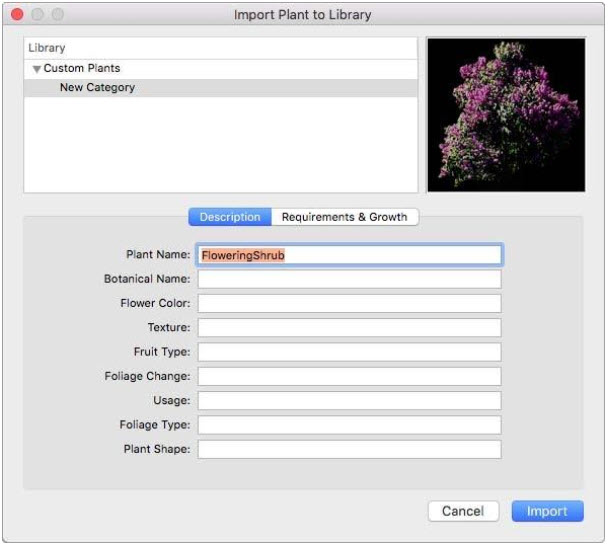
3 All imported plants are saved to the Plants User Library. Choose the Library where you want to save your new plant. For more information on accessing and organizing the User Library, see “Organizing Library Content”.
4 By default, the Description tab is active. Enter the plant’s descriptive details in the corresponding fields.
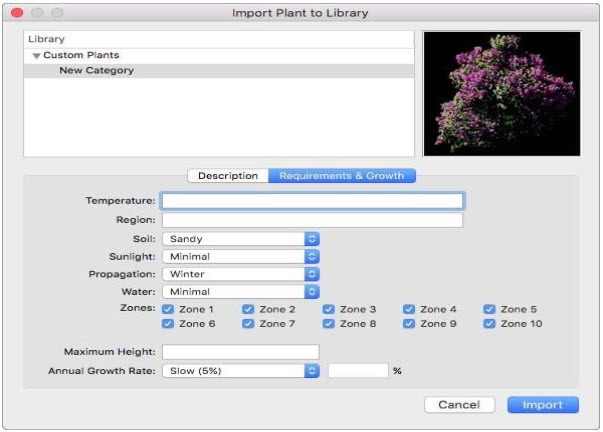
5 Click the Requirements & Growth tab and enter details and choose options to specify the plant’s requirements and growth rate.
6 Click the Import button. The plant is imported and appears in the library you selected.
Plant Properties
When a plant is selected in the design window, you can edit the plant's age, customize its size, and even customize the 2D appearance by selecting different plant symbols. For information on growing the entire landscape, see “Growing the Landscape”.
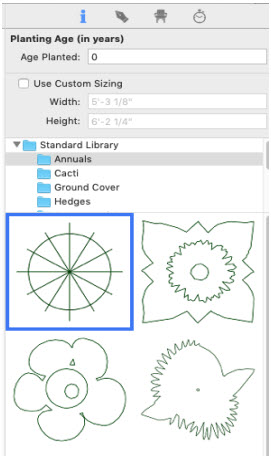
Age Planted You can specify the age of each plant individually to affect maturity one plant at a time (or select a few and update them together).
Use Custom Sizing checkbox allows you to edit the width and height of the plant. This size is an absolute size for the whole plant.
Standard Library allows you to choose the 2D symbol you want for the plant.
Plant Inventory
FloorPlan keeps track of which plants you have used in your landscape. The Plant Inventory pane shows all plants that are on the visible plan and on the active floor. From this pane, you can easily find and/or replace all occurrences of each plant in your design. When the Plant Inventory pane is visible, you can select all occurrences of a plant in your design, delete plants from your design, and replace plants in your design by dragging a different plant onto an existing plant in the Plant Bar.
To select all occurrences of a plant in your design
■ In the left sidebar, click the  tab and then right-click a plant and choose Select Plants. All occurrences of that plant are selected in the plan.
To delete a plant
■ In the left sidebar, click the Plant Inventory  tab and then right-click a plant and choose Delete Plants. All occurrences of that plant are deleted from the design.
To replace all occurrences of a plant
1 Select the plant you want from the Plants library. For more information on accessing the Plants library, see “Plants Libraries”.
2 In the left sidebar, click the Plant Inventory tab to see all of the plants in your design.
3 Drag the plant from the Preview Bar into the Plant Inventory pane to replace the existing plant with the plant you want. All occurrences of that plant are updated in the design.
Viewing Hardiness Zones
FloorPlan includes USDA Hardiness Zone maps for the contiguous 44 states, Alaska and Hawaii, Canada, Europe, and Australia. The zones in the hardiness zone map correspond to the zones listed in the plant details for each plant, so you can easily find the ideal plants for your location. All plants included in FloorPlan can be sorted using this information.

For information on sorting plants see “Finding Plants”. For steps to access plant details see “To view a plant description, requirements, and growth information”.
To view a hardiness zone map
1 In the right sidebar, click the Content tab and choose Plants from the pop-up menu.
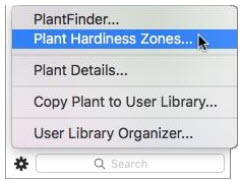
2 At the bottom of the Content pane, click the gear button and choose Plant Hardiness Zones from the pop-up menu. The Hardiness Zones map appears.
3 Choose the map you want to see from the Plant Hardiness Zone pop-up menu.
4 Click the Close button to close the map.
Finding Plants
FloorPlan includes thousands of plants to make designing your landscape easy and fun. PlantFinder is a powerful sorting engine that lets you see only the plants that fit your particular criteria. You can also find plants that are already in your design or by searching for a plant name.
Sorting Plants
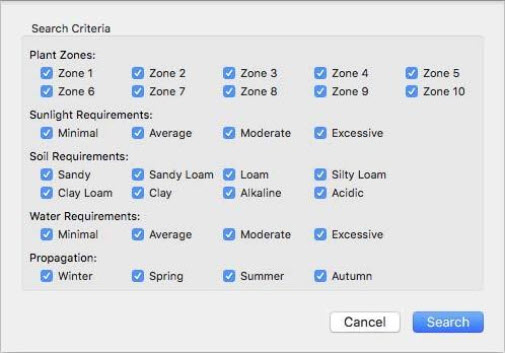
By selecting the plant characteristics you want and deselecting the ones you don’t want, you can filter the plants that are displayed in the Preview Bar for a selected plant category. Only the plants matching all of the selected options are displayed in the Preview Bar. Tip: To narrow your search, check fewer boxes.
To sort plants
1 In the right sidebar, click the Content tab and choose Plants from the pop-up menu.
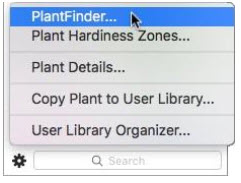
2 At the bottom of the Content pane, click the gear button and choose and choose PlantFinder from the pop-up menu. The PlantFinder appears.
3 Deselect the criteria that do not meet your needs, then click Search. Only the plants matching all the variables selected are displayed in the Preview Bar when viewing a plant category.
Locating a Plant in your Design
With so many plant options, you may lose track of where you found a plant that you’ve added to your design. There is an easy way to track down a plant from your design window or from a 3D view window.
To locate a plant in the design window
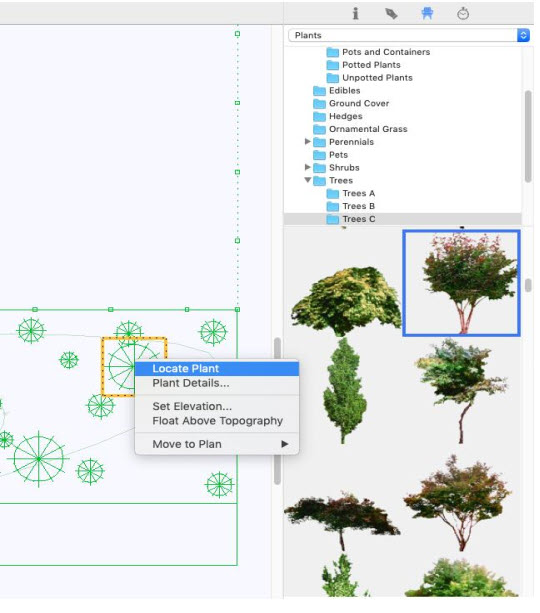
■ In the design window, right-click the plant you want to locate and choose Locate Plant on the submenu. The plant category is displayed on the Content pane and the plant is selected in the Preview Bar.
To find a plant by name
1 In the right sidebar, click the Content tab and choose Plants from the pop-up menu.
2 At the bottom of the Content pane, enter the type of plant, or plant name, in the Search field and press the Return key.
The search results appear in the Preview Bar.
1 In the right sidebar, click the Content tab and choose Plants from the pop-up menu.
2 At the bottom of the Content pane, click the gear button and choose and choose PlantFinder from the pop-up menu. The PlantFinder appears.
3 Deselect the criteria that do not meet your needs, then click Search. Only the plants matching all the variables selected are displayed in the Preview Bar when viewing a plant category.
Locating a Plant in your Design
With so many plant options, you may lose track of where you found a plant that you’ve added to your design. There is an easy way to track down a plant from your design window or from a 3D view window.
To locate a plant in the design window
■ In the design window, right-click the plant you want to locate and choose Locate Plant on the submenu. The plant category is displayed on the Content pane and the plant is selected in the Preview Bar.
To find a plant by name
1 In the right sidebar, click the Content tab  and choose Plants from the pop-up menu.
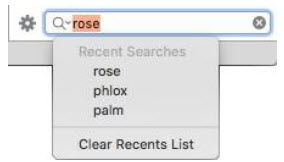
2 At the bottom of the Content pane, enter the type of plant, or plant name, in the Search field and press the Return key. The search results appear in the Preview Bar.
The Recent Searches list retains the most recent five search items. Choose Clear Recent List to remove all search data.
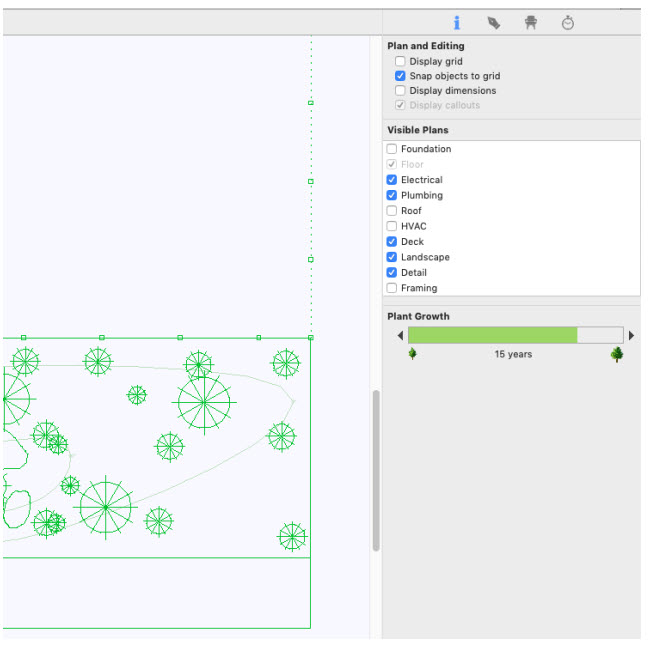
Growing the Landscape
With FloorPlan you can watch the landscape grow from year to year. With just a couple of mouse clicks, you can watch your landscape change over 20 years. The Plant Growth meter allows you to grow all of your landscape together incrementally, one click at a time. The Plant Growth meter becomes available on the Properties pane when nothing is selected in your drawing. When growing your landscape, be sure you’re on the Landscape plan so all of the plants and landscape objects are visible. To edit the age planted for individual plants, see “Plant Properties”.
Note: For information on opening a 3D view, see “Working with 3D Views”.
Note: For information on navigating in 3D, see “Moving Around in 3D”.
To grow the landscape incrementally
1 Open a 3D view and navigate so you can easily see the area of your landscape you want to grow.
2 Be sure nothing is selected in the design window and click the Properties  tab . The Plant Growth meter appears on the pane.
3 Click the left arrow to make the plants appear younger or click the right arrow to make them appear older. The age changes as you click.
To edit the maximum growing age
The default maximum plant growth age is 20 years, but you can increase or decrease this age by editing the maximum growing age.
1 Choose Design > Set Plant Growth Projection.
2 Enter the number of years you want as the maximum growing age and then click OK. The plant growth meter will only grow the landscape to the maximum age you entered.
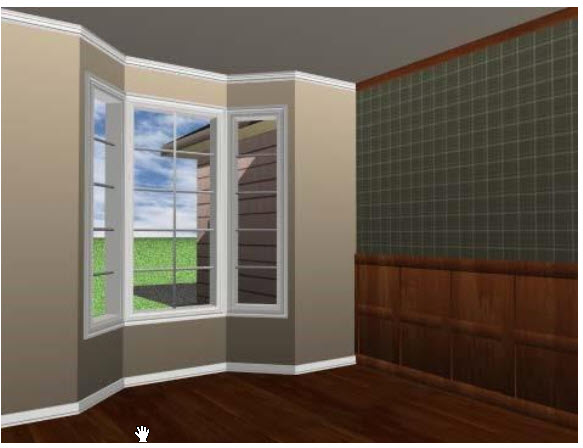
Applying Trims
It is easy to add base trim, crown molding, or library paneling for an elegant appearance, or you can use wainscoting so you can apply two different materials on one wall. You can also add casing molding around doors and windows and even apply trim to the top of cabinets for a completely unique look. Trim is applied by dragging the trim onto a surface in the 3D view, so you must have a 3D view open to access the trims styles. You can change a trim style by applying a new style right on top of an existing style and even remove trim after it has been applied. The Base Trim Library and Crown Trim Library include categories of trim, including window and door casing styles. The Library Paneling library includes various heights of paneling to apply to your design.
If SmartWand is enabled, you can choose to apply it to the individual surface or to all similar surfaces. For more information, see “Using the SmartWand”. To apply paint and materials to trim, see “Applying Paint Colors” see “Applying Building Materials”.
To apply trim and library paneling
1 Open a 3D view and navigate so you can see the surface where you want to apply trim.
2 In the right sidebar, click the Content  tab and choose Trim from the pop-up menu. The Trim libraries appear. Some of the library categories are organized into sub-categories, contained within disclosure triangles, the Base Trim library, for example.
3 Choose the library you want and its contents appear in the Preview Bar.
4 Scroll through the trim previews and drag the one you want onto a wall in the 3D view. The trim is applied.
To apply a series of the same trim
You can apply a series of the same trim to multiple surfaces using Auto-Click Placement. For more information, see “AutoClick Placement”.
To remove wall trim
1 Open a 3D view and navigate so you can see the surface where you want to remove the trim.
2 In the right sidebar, click the Content tab and choose Trim from the pop-up menu. The Trim libraries appear. Some of the library categories are organized into sub-categories, contained within disclosure triangles, the Base Trim library, for example. Each Trim category contains its own remove trim style.
3 Choose the library for the type of trim you want to remove and drag the Remove Trim  style onto the wall where you want that trim removed.
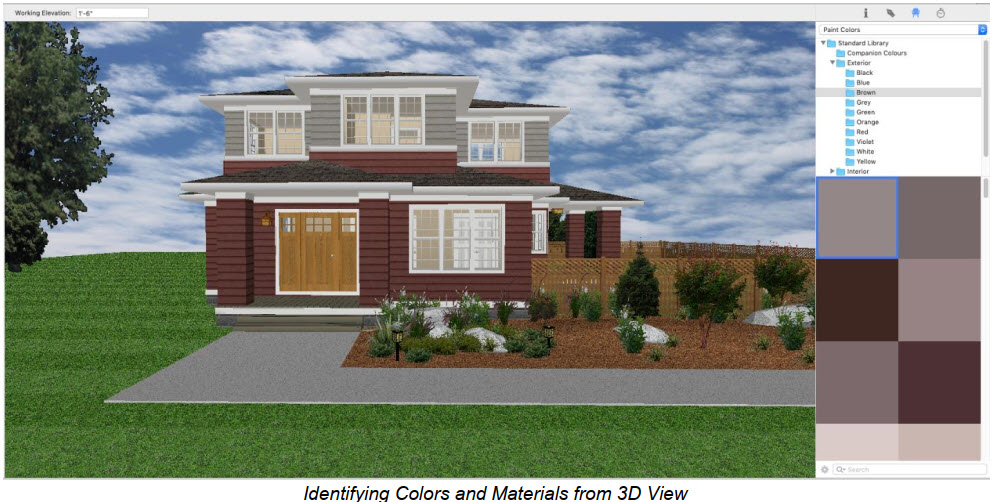
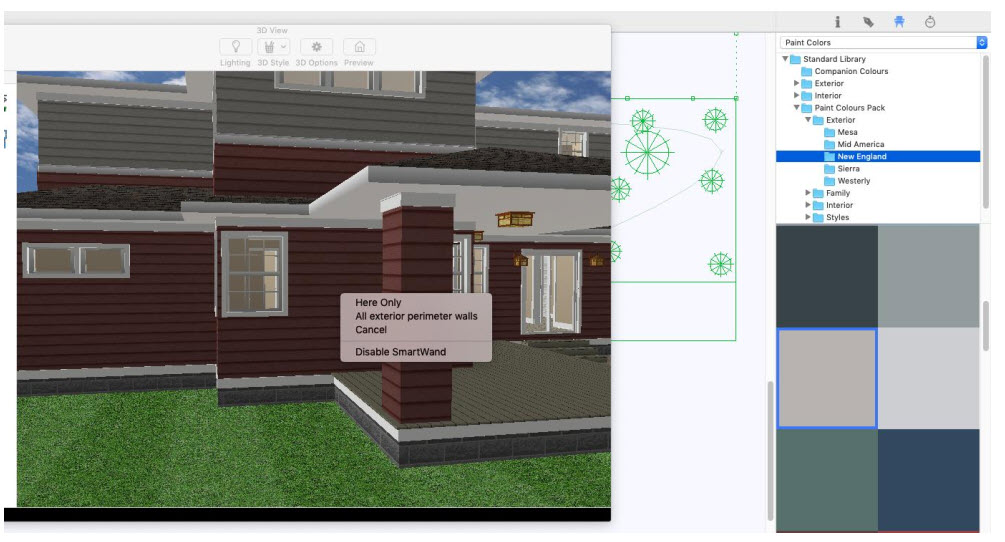
Applying Paint Colors
With FloorPlan, you can try out various color schemes with ease. Now you can choose between color families, predefined groupings, or even explore the vast selection of interior and exterior color libraries. Wall surfaces are just one example of what can be painted; you can also apply paint to furniture, window trim, doors, and more. Paint is applied by dragging a color onto a surface in the 3D view, so you must have a 3D window open to access the paint colors. You can change color by applying a new color right on top of an existing color.
The Paint Colors library provides access to a variety of options, including:
■ Companion Colors: Colors with a similar tone that have been combined to match easily
■ Interior & Exterior libraries: Colors categories for the interior and exterior of your design
■ Paint Colors Pack: Exterior styles, Color Families, Interior themes, and Thematic Styles curated to make choosing your colors a breeze
Note: To make designing easier, you can create custom Decorator Palettes. For more information, see “Using the Decorator Palette”.
Note: If SmartWand is enabled, you can choose to apply it to the individual surface or to all similar surfaces. For more information, see “Using the SmartWand”.
To apply paint
1 Open a 3D view and navigate so you can see the surface where you want to apply paint.
2 In the right sidebar, click the Content tab and choose Paint Colors from the pop-up menu. The paint libraries appear. Some of the library categories are organized into sub-categories, contained within disclosure triangles, the Interior library, for example.
3 Choose the library you want and its contents appear in the Preview Bar.
4 Scroll through the color previews and drag the one you want onto a surface in the 3D view. The paint is applied.
To apply a series of the same color
You can apply a series of one color to multiple surfaces using Auto-Click Placement. For more information, see “AutoClick Placement”.
To search for a color
1 In the right sidebar, click the Content  tab and choose Paint Colors from the pop-up menu.
2 At the bottom of the Content pane, enter the color you want in the Search field and press the Return key. The search results appear in the Preview Bar. The Recent Searches list retains the most recent five search items. Choose Clear Recent List to remove all search data.
Identifying Colors and Materials from 3D View
As you experiment with different colors and materials during the design process, you may want to identify a previously used material. This is easy with FloorPlan’s Material/Color Finder Tool. The material identified in the example below is the placemat on the table.
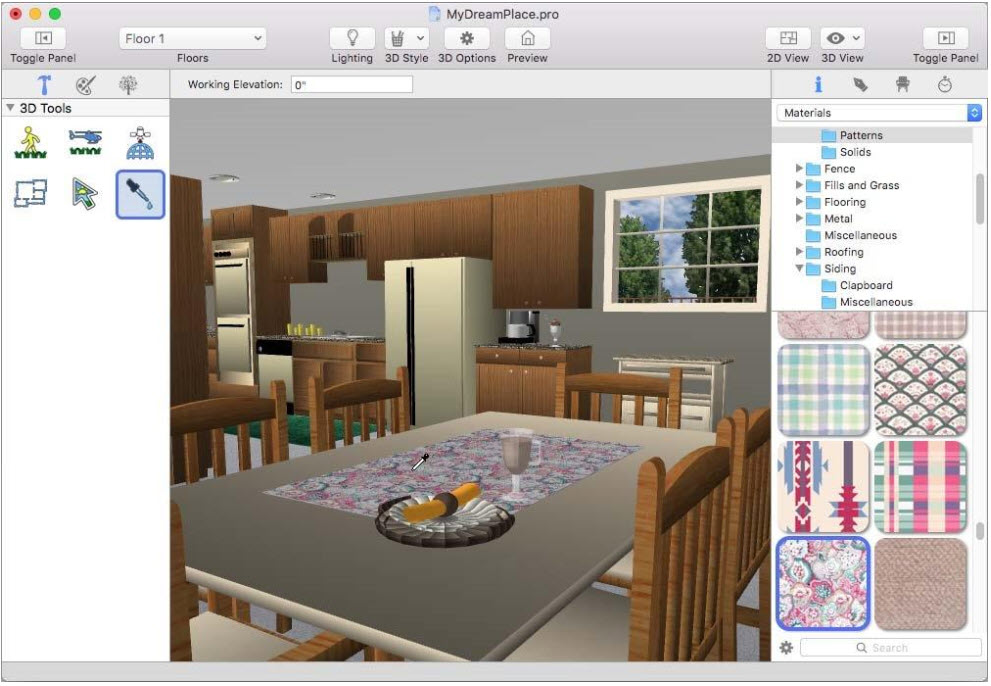
To use the select material/paint tool
1 Choose the Material/Color Finder  button from the toolbar.
2 In the 3D View window, click the color or material that you want to identify. That color or material appears in the Preview window.
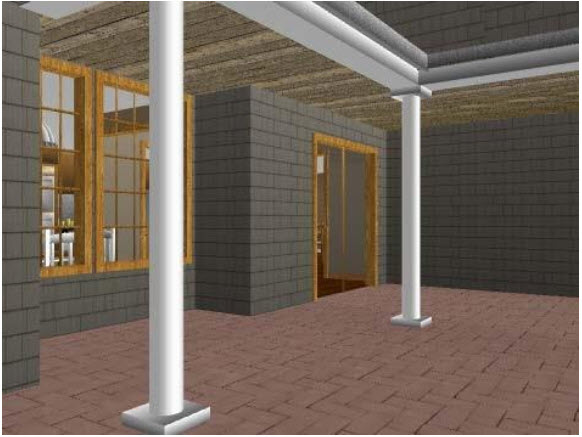
Applying Building Materials
With FloorPlan, customizing the exterior of your home is a simple drag-and-drop procedure. Available materials include brick, stucco, gravel, roofing, and so on. Available materials include backgrounds, brick, stucco, gravel, roofing, and many more. You can even apply two different materials to a wall, using the Wainscoting feature. For more information, see“Applying Trims”.
You can create and import your own custom materials and background images. When importing materials, the User Library is the location where materials are imported. If you do not have a User Library folder created for Materials, you can create a new folder when importing. For more information on working with the libraries, see “Organizing Library Content”. Materials are applied by dragging a material onto a surface in the 3D view, so you must have a 3D window open to access the materials. You can change material by applying a new material right on top of the existing material.
Note: To increase the accuracy of applying materials, zoom in closer to the surface you are texturing.
If SmartWand is enabled, you can choose to apply it to the individual surface or to all similar surfaces. For more information, see “Using the SmartWand”.
To apply materials
1 Open a 3D view and navigate so you can see the surface where you want to apply a material.
2 In the right sidebar, click the Content  tab and choose Materials from the pop-up menu. The Materials libraries appear. Some of the library categories are organized into sub-categories, contained within disclosure triangles, the Brick and Stone library, for example.
3 Choose the library you want and its contents appear in the Preview Bar.
4 Scroll through the material previews and drag the one you want onto a surface in the 3D view. The material is applied.
To apply a series of the same material
You can apply a series of one material to multiple surfaces using Auto-Click Placement. For more information, see “AutoClick Placement”.
To import a material
1 Choose File > Import > Image to 3D Material Library. A dialog appears.
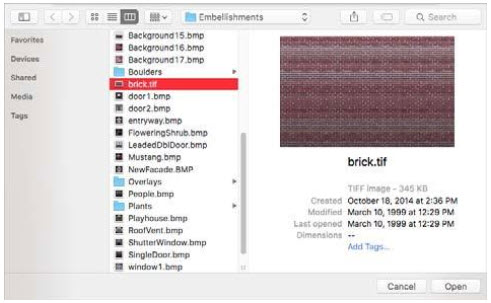
2 Select the file you want and click Open. The material appears in the Import Material to Library dialog.
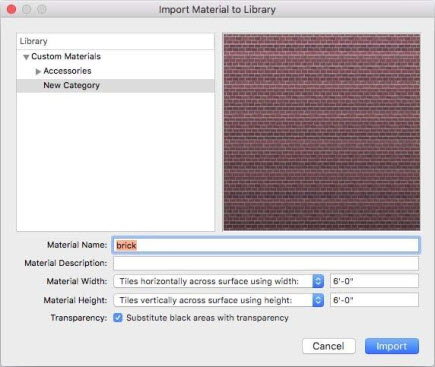
The library defines where the material is stored so you can access it. All imported materials are saved to the Materials User Library. Choose the Library where you want to save your new material.
Material Name Edit the name of the material. Material Description Enter a description of the material. This is the text that appears in the Status Bar when the material hovers over in the Preview Bar (up to 128 characters).
Material Width Choose to have the material tile horizontally across the surface where it is applied or stretch across the surface where it is applied. When a material is tiled across the surface, you can specify the size of the tiles.
Material Height Choose to have the material tile vertically across the surface where it is applied or stretch across the surface where it is applied. When a material is tiled across the surface, you can specify the size of the tiles.
The transparency checkbox, when selected, designates all black areas (RGB=0,0,0) of the material image as transparent. When deselected all black areas appear as part of the material.
3 Choose the Library where you want to save your new material and set the material options you want and then click Import.
Note: To edit a material’s details after it has been imported, see “User Library”.
To import a 3D background
1 Choose File > Import > Background Image. A dialog appears.
2 Select the file you want and click Open. A dialog appears. Library defines where the background is stored so you can access it. All imported materials are saved to the Materials User Library. Background Name Edit the name of the background. Background Description Enter a description of the background. This is the text that appears in the Status Bar when the background hovers over in the Preview Bar (up to 128 characters).
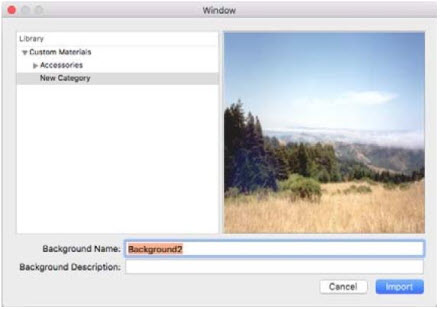
3 Choose the Library where you want to save your new background and set the background options you want and then click Import.
Using the SmartWand
You can easily apply the same material, paint, or trim to multiple surfaces using SmartWand, to update similar walls, ceilings, doors, stairs, cabinets, and more all at the same time. To apply using SmartWand, drag the item you want from the Preview Bar onto a surface in the 3D view window. The SmartWand menu lists all of the available options for the surface you’re applying to. Typically, this includes the option to apply to the individual surface only, or other similar surfaces in the room (or structure).
Note: When SmartWand is enabled, AutoClick Placement is disabled.
For information on applying trim, paint, and materials, see:
■ “Applying Trims”.
■ “Applying Paint Colors”.
■ “Applying Building Materials”.
To enable or disable SmartWand
■ Choose 3D > Enable SmartWand to turn on this functionality, or Disable SmartWand to turn it off. You can also disable SmartWand from the shortcut menu that appears when applying to a surface.
Building Rooms Using Templates
FloorPlan includes dozens of room templates that will make designing your home easy and fun. Templates are organized into several categories and are available on the Content pane. Templates are added by dragging from the Preview Bar into the 2D plan view, so be sure you can see the area where you want the template in the design window.
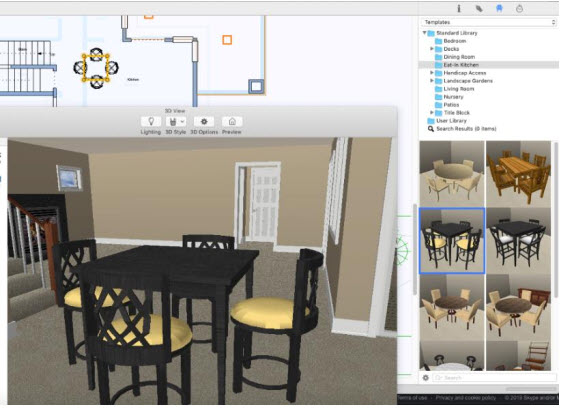
To place a template
1 Open the 3D Window View and then, in the right sidebar, click the Content  tab. A pop-up menu is available in the pane that appears.
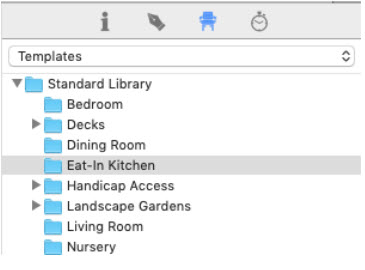
2 Choose Templates from the pop-up menu and then choose the library category you want. Most of the library categories are organized into sub-categories, contained within disclosure triangles, for example, the Decks library. To access those libraries, click the disclosure triangle.
3 Scroll through the previews in the Preview Bar and drag the template you want into the design window.
(optional) Drag the template you just placed to move it to another location in the design.
AutoClick Placement
AutoClick Placement allows you to tag the surfaces where you want a color, material, or other content applied and then apply it in your design all at once. This offers flexibility in choosing only certain surfaces on one object or different surfaces on multiple objects in your design. Note: When SmartWand is enabled, AutoClick Placement is disabled. For information on enabling and disabling SmartWand, see “Using the SmartWand”
To use AutoClick Placement
1 Find the content you want to apply from one of the libraries in the Content tab and select it in the Preview Bar.
2 Click in the 3D view (or design window for plants or objects) to make the window active.
3 Press the Option key. Notice the pointer changes to a pointing finger. This means auto-click placement is active.
4 With the Option key pressed, click each surface where you want the selection to appear to tag the surface. A crosshair appears on each surface.
5 To place, release the Option key and the series is visible in the 3D view.