Drawing 2D & 3D Entities
3D Custom Workshop is an extremely useful CAD (computer-aided design) PowerTool. Whether you want to draw angular objects like cabinets and desks, or curved objects like lamps and round mirrors, there is a tool to match each task.
You may find it easier to begin your design in 2D and add the third dimension later. You will find the 2D design tools are extremely useful for this technique. Once you’ve drawn a 2D shape, you can convert it to 3D, creating as much depth as you want in any direction necessary.
In this chapter, each drawing tool’s function will be explained. You will also learn the Draw from Center, Draw from Corner, Object Editing, and Point Editing techniques, which will make drawing any object you want easier.
Drawing from Corner or Center
The options to Draw from Corner and Draw from Center controls the beginning points of objects drawn with the drawing tools.
Draw from Corner
This makes drawing cabinets, tables and most other angular objects much easier. This method works with the rectangle, oval, and line/plane tools only.

To draw from corner
- Click the button at the bottom of the design window so Draw from Corner icon is displayed. (alternatively) Click Options menu > Draw from Corner.
Draw from Center
Makes drawing concentric objects a breeze. This method is applicable with the rectangle, oval, and Line/plane tools only.

To draw from center
- Click the button at the bottom of the design window so Draw from Center icon is displayed. (alternatively) Click Options menu > Draw from Center.
Switching Between 2D and 3D Tools
The toolbar displays the 3D drawing tools by default. You can switch to the 2D tools or back to the 3D tools at any time using the Toggle 2D/3D Design Tools button on the left side of the toolbar.

2D Tools

3D Tools
To toggle the 2D and 3D tools
- On the Design toolbar, click the Toggle 2D/3D Design Tools button to access the toolbar you want.
(alternatively) On the View menu, click 2D Design Tools or 3D Design Tools.
Drawing Shapes
You can draw 2D and 3D shapes to edit an object or create your own. Before you draw, choose the Draw Grid (see “Drawing Grids”, which begins on page 432) and the Draw Method (see “Drawing from Corner or Center”, which begins on page 437).
As your draw your shape, dimensions are displayed in the Readout Bar at the bottom of the design window. Below are some references that may be helpful as you design:
- Controlling Selection Mode
- 2D/3D Shape Properties
- Editing 2D & 3D Objects
2D/3D Rectangle
In 3D rectangle drawing mode, you can draw squares and rectangles as well as cubes and boxes. You will find this tool useful when drawing tables, cabinets, counters, and more.
To draw a 2D rectangle
- On the Design toolbar, click the 3D Rectangle Tool.
- Position your cursor at the start point for the rectangle and then click-and-drag to extend the shape to the size you want and release the mouse button.

3- Move the mouse in the direction you want to extrude the rectangle and click again to place the shape.

To draw a 2D rectangle
- On the Design toolbar, click the 2D Rectangle Tool and then use the Click-and- Drag drawing method to drag the shape to the size you want.

2D/3D Oval
In ellipse drawing mode, you can draw circles and ovals. You will find this tool useful when drawing lamps, couches, planters, rugs, and more.
To draw a 3D oval
- On the Design toolbar, click the 3D Oval Tool.
- Position your cursor at the start point for the oval and then click-and-drag to extend the shape to the size you want and release the mouse button.
(optional) Press and hold SHIFT while drawing to draw a perfect circle from its center point.

3- Move the mouse in the direction you want to extrude the oval and click again to place the shape.

To draw a 2D oval
- On the Design toolbar, click the 2D Oval Tool and then use the Click-and-Drag
drawing method to drag the shape to the size you want.
(optional) Press and hold SHIFT while drawing to draw a perfect circle.

3D Multigon
In multigon drawing mode you are able to draw objects with a specified number of equal-length sides. You will find this tool useful when drawing mirrors, tabletops, hot tubs, and other shapes with more than four edges. By default, multigons are drawn with 6 sides. You can edit the number of sides before you draw in the Custom Options window.

To set number of multigon sides
- Click the Custom Options button (or click Options menu > Custom Options) and change the Multigon Tool - # of Sides text box, then click OK to close the window.
To draw a 3D multigon
- On the Design toolbar, click the 3D Multigon Tool.
- Position your cursor at the start point (center) for the multigon and then click-and-drag to extend the shape to the size you want and release the mouse button. The radius measurement will appear in the position readout bar, as you draw.
Note: Although you can define any number of sides, the more sides you specify, the more the multigon will begin to look like a circle.

3- Move the mouse in the direction you want to extrude the multigon and click again to place the shape.

To draw a 2D multigon
- On the Design toolbar, click the 2D Multigon Tool and then use the Click-and- Drag drawing method to drag the shape from its center point to the size you want.

2D/3D Polygon
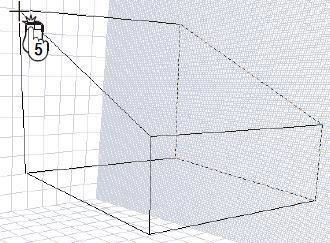
In polygon drawing mode, you can draw an object with any number of sides at any angle or length. You will find this tool useful when drawing corner cabinets, futons, and more.
To draw a 3D polygon
- On the Design toolbar, click the 3D Polygon Tool.
- In the design window, click to set the start point and drag to define the shape of the polygon.
- Continue to click points and drag to define the shape of the polygon and then right-click to place the 2D shape.

4- Move the mouse in the direction you want to extrude the object and click again to place the shape.
To draw a 2D polygon
- On the Design toolbar, click the 2D Polygon Tool
- In the design window, click to set the start point and drag to define the shape of the polygon.
- Continue to click points and drag to define the shape of the polygon and then right-click to place the 2D shape.

2D/3D Closed Arc
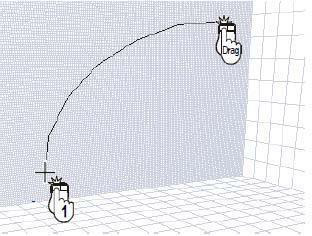
In closed arc drawing mode, you will be able to draw an elliptical arc, which will automatically close along the bottom. You will find this tool useful when drawing couches, chairs, and drop-leaf tables, for example.
To draw a 3D closed arc
- On the Design toolbar, click the Closed Arc Tool.
- Position your cursor at the start point for the closed arc and then click-and-drag to extend the shape to the size you want and release the mouse button.

(optional) Press and hold SHIFT while drawing to constrain the arc to 90-degrees
3- Move the mouse in the direction you want to extrude the oval and click again to place the shape.

To draw a 2D closed arc
- On the Design toolbar, click the 2D Closed Arc Tool and then use the Click-and- Drag drawing method to drag the shape to the size you want.
(optional) Press and hold SHIFT while drawing to constrain the arc to 90-degrees.
2D/3D Circular Closed Arc
In circular closed arc drawing mode, you will be able to draw circular objects that are closed within the shape boundaries. You will find this tool useful when drawing moldings for cabinets and other unique details.
To draw a 3D circular closed arc
- On the Design toolbar, click the Circular Closed Arc Tool.
- Position your cursor at the center point of the arc and then click-and-drag to extend the radius to the size you want. Dimensions are displayed in the readout bar as you draw.

3- Release the mouse button and move the cursor clockwise or counter-clockwise to set the angle you want and then click.
(optional) Press and hold SHIFT while drawing to invert the arc angle.

4- Move the mouse in the direction you want to extrude the object and click again to place the shape.

To draw a 2D circular closed arc
- On the Design toolbar, click the 2D Closed Circular Arc Tool and position your cursor at the center point of the arc and then click-and-drag to extend the radius to the size you want. Dimensions are displayed in the readout bar as you draw.
- Release the mouse button and move the cursor clockwise or counter-clockwise to create the shape you want, and then click to end drawing mode.

2D/3D Closed Curve
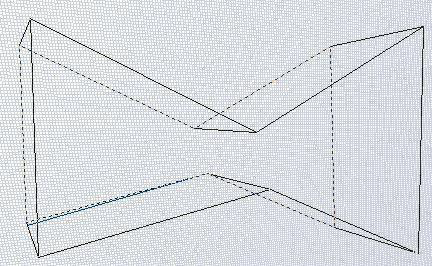
In closed curve drawing mode, you can draw enclosed curved objects and areas. You will find this useful for creating curved cabinets or furniture pieces.
To draw a 3D closed curve
- On the Design toolbar, click the 3D Closed Curve Tool.
- In the design window, click to set the start point and drag to define the shape of the 3D closed curve.
- Continue to click points and drag to define the shape of the curve and then right-click to place the 2D shape.

(optional) Press and hold SHIFT while drawing to constrain the lines to 90-degrees.
Note: Although the lines will initially appear to be angular, they will become curved when you end drawing mode.
4- Move the mouse in the direction you want to extrude the object and click again to place the shape.
To draw a 2D closed curve
- On the Design toolbar, click the 2D Closed Curve Tool.
- In the design window, click to set the start point and drag to define the shape of the curve.
- Continue to click points and drag to define the shape of the curve and then right-click to place.
(optional) Press and hold SHIFT while drawing to constrain the arc to 90-degrees.
Note: Although the lines will initially appear to be angular, they will become curved when you end drawing mode.

2D/3D Open Polygon
In open polygon drawing mode, you will be able to draw polygons with an open side. You will find this tool useful for creating fences, bay windows, and other unique open-ended shapes and objects.
To draw an 3D open polygon
- On the Design toolbar, click the 3D Open Polygon Tool.
- In the design window, click to set the start point and drag to define the shape of the polygon.
- Continue to click points and drag to define the shape of the polygon and then right-click to place. (optional) Press and hold SHIFT while drawing to constrain a line to 90-degrees.

4- Move the mouse in the direction you want to extrude the object and click again to place the shape.

To draw an 2D open polygon
- On the Design toolbar, click the 2D Open Polygon Tool.
- In the design window, click to set the start point and drag to define the shape of the polygon.
- Continue to click points and drag to define the shape of the polygon and then right-click to place. (optional) Press and hold SHIFT while drawing to constrain a line to 90-degrees.

2D/3D Open Arc
In open arc drawing mode, you will be able to draw an elliptical arc which will remain open along the bottom. You will find this tool useful when drawing outdoor bridges, slides, and more.
To draw an 3D open arc
- On the Design toolbar, click the 3D Open Arc Tool.
- Position your cursor at the start point for the arc and then click-and-drag to extend the shape to the size you want and release the mouse button.
(optional) Press and hold SHIFT while drawing to constrain the arc to 90-degrees

3- Move the mouse in the direction you want to extrude the object and click again to place the shape.

To draw an 2D open arc
- On the Design toolbar, click the 2D Open Arc Tool and use the Click-and-Drag drawing method to drag the shape to the size you want.
(optional) Press and hold SHIFT while drawing to constrain the arc to 90-degrees.

2D/3D Circular Arc
In circular arc drawing mode, you can draw an arc of any radius. You will find this tool useful when drawing decorative edges, barrel planters, and more.
To draw a 3D circular arc
- On the Design toolbar, click the 3D Open Circular Arc Tool.
- Position your cursor at the center point of the arc and then click-and-drag to extend the radius to the size you want. Dimensions are displayed in the readout bar as you draw.

3- Release the mouse button and move the cursor clockwise or counter-clockwise to set the angle you want and then click.
(optional) Press and hold SHIFT while drawing to invert the arc angle.

4- Move the mouse in the direction you want to extrude the object and click again to place the shape.

To draw a 2D circular arc
- On the Design toolbar, click the 2D Open Circular Arc Tool and position your cursor at the center point of the arc and then click-and-drag to extend the radius to the size you want. Dimensions are displayed in the readout bar as you draw.
(optional) Press and hold SHIFT while drawing to invert the arc angle.
2. Release the mouse button and move the cursor clockwise
2D/3D Plane
In plane drawing mode, you will be able to draw flat planes to the size you want. You will find this tool useful when adding angular details to cabinets, for example.
To draw a 3D plane
- On the Design toolbar, click the 3D Line Tool.
- Position your cursor at the start point for the line and then click-and-drag to extend the shape to the size you want and release the mouse button.

(optional) Press and hold SHIFT while drawing to constrain the line horizontally or vertically.
3- Move the mouse in the direction you want to extrude the line and click again to place the shape.

To draw a 2D line
- On the Design toolbar, click the 2D Line Tool and use the Click-and-Drag drawing method to drag the shape to the size you want.
(optional) Press and hold SHIFT while drawing to constrain the line horizontally or vertically.

2D/3D Open Curve
In curve drawing mode, you will be able to draw an open curved shape which changes direction. You will find this tool useful when drawing curved ceilings, outdoor grills, and more.
To draw a 3D open curve
- On the Design toolbar, click the 3D Open Curve Tool.
- In the design window, click to set the start point and drag to define the shape of the curve.
- Continue to click points and drag to define the shape of the curve and then right-click to place.

(optional) Press and hold SHIFT while drawing to constrain the lines to 90-degrees.
Note: Although the lines will initially appear to be angular, they will become curved when you end drawing mode.
4- Move the mouse in the direction you want to extrude the object and click again to place the shape.

To draw a 2D open curve
- On the Design toolbar, click the 2D Open Curve Tool.
- In the design window, click to set the start point and drag to define the shape of the curve.
- Continue to click points and drag to define the shape of the curve and then right-click to place. (optional) Press and hold SHIFT while drawing to constrain the lines to 90-degrees.
Note: Although the lines will initially appear to be angular, they will become curved when you end drawing mode.

2D/3D Shape Properties

When a shape is selected properties become available on the Properties Bar. You can select more than one shape at a time to edit properties on multiple objects at once. To do this, press the SHIFT key as you click points or objects.
For information on using object and point selection mode, see “Controlling Selection Mode”, on page 458.
Note: Always press the ENTER to accept new values in a text box.
- Layer displays the selection’s current layer. Using the Move to Layer button you can quickly move the selection to a different layer. For more information on layers, see “Working in Layers”, on page 466.
- Open and Closed radio buttons allow you to quickly change an open-ended object to a closed object with just a couple clicks of the mouse. Just as easily, you can change a closed object to be open-ended.
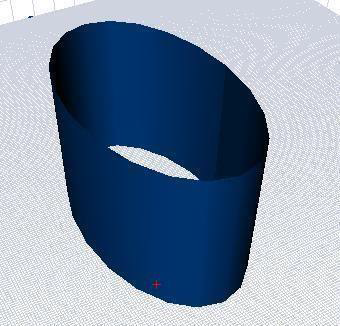
Select Open to remove a segment from a closed object. Select Closed to add a segment to enclose an open object.
3- Capped and UnCapped radio buttons control whether a 3D shape appears hollow or filled. By default, objects are drawn with their center filled, or capped. You can “uncap” objects to create a hollow shape. Select Capped to fill the object. Select UnCapped to hollow out an object.
4- Texture Mapping settings control how a material or texture of applied to the surfaces of an object. Planar Mapping applies a texture across each individual surface of a group of objects while Surface Mapping applies a texture across a group for a seamless look. Surface Mapping is best suited for objects with complex surfaces that require a lot of individual planes
5- Shading controls shading across multiple segments. When a revolving object is created, the shading starts over with each segment; this can increase render times. Once you’ve created a revolving object, you can smooth out the shading to create a more fluid appearance and, in turn, speed up rendering.
Choose Smooth to apply smoothness to all the segments. Select Normal to restart shading with each segment.

Smooth Enabled Normal Enabled
6- Adjust Curve button open the Curve Tension dialog box, where you can adjust the tension or straighten a selection. For more information, see “Changing Curve Tension”.
7- Resize Object(s) button opens the Object Size dialog box where you can control the size using precise specifications. For more information, see “Specifying Object Size”.
8- Move text boxes allow you to move the selection a specified distance along the corresponding axis. You can also move by dragging to a new location. For more information, see “Moving an Object”.
9- Cabinet Cutout checkbox allows you to convert a 2D shape into a cutout area in cabinets created using one of the cabinet tools. This is useful when adding a sink from one of the content libraries to an existing cabinet. The cutout must be created on the Floor Grid at zero elevation (and do not extrude the 2D shape).
10- Translucency button opens the Object Translucency dialog box where you can adjust the translucency percentage. The higher the Translucency, the more transparent an object appears.

Applying Materials
Just like applying color, it’s easy to apply the appropriate material. 3D Custom Workshop includes both the Punch! Library and the Custom Material Library. You can drag-and-drop materials onto surfaces on the design window.
For detailed steps on applying materials, see “Applying Building Materials”.
Note: To apply materials, Shaded view should be turned on. For more information on views, see “Using Different Views”.
Applying Paint and Color
With 3D Custom Workshop, you can try out various color schemes with ease. Now you can choose between paint libraries and color families with just a few mouse clicks.
For detailed steps on applying paint and colors, see “Applying Paint and Color”.
Note: To apply paint and colors, Shaded view should be turned on. For more information on views, see “Using Different Views”.
Controlling Application of Color or Material

With 3D Custom Workshop you can control how colors and materials are applied to your design.
Note: To apply materials, paint, and colors, Shaded view should be turned on. For more information on views, see “Using Different Views”.
Single Pane
By default, the Single Plane function is selected, where
the color or material is applied only to the individual surface of an object.

To Use Single Plane Apply
- Click the Paint Colors or Materials tab and from the Apply drop-down menu, choose Single Plane.
- Drag the color or material you want onto the surface where you want it applied. The color or material is applied only to that surface.
- Continue to drag and drop onto each surface where you want the color or material.
Wrap Single Segment
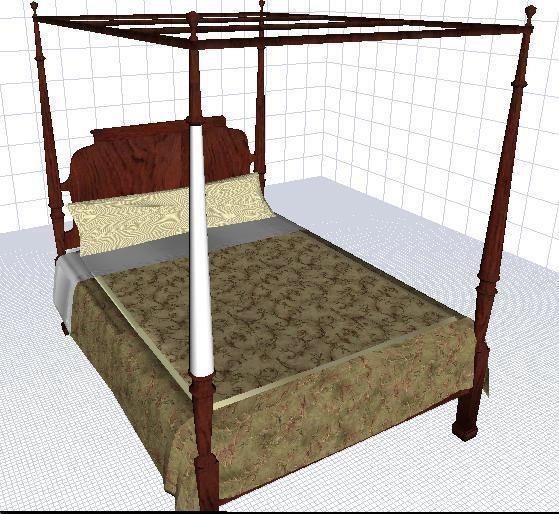
The Wrap Single Segment option allows you to apply a color or material to a single segment along part of an object, as objects are made up of multiple segments, in most cases. In the example below, a white paint color is applied to a segment of the bed post.
To Use Segment Apply
- Click the Paint Colors or Materials tab and from the Apply drop-down menu, choose Wrap Single Segment.
- Drag the color or material onto the object. The color or material you selected is applied only to the single segment.
Wrap All Segments
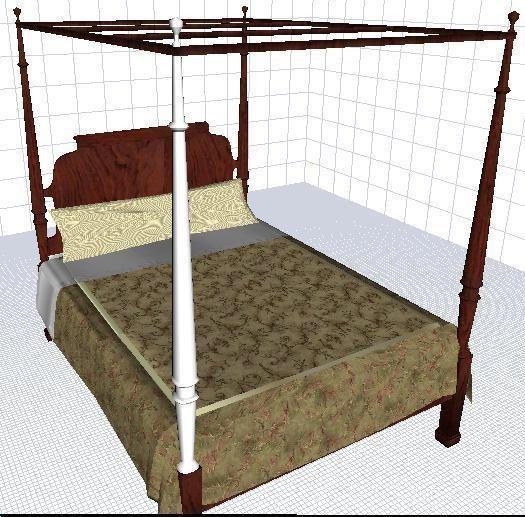
You can also choose to Wrap All Segments with a selected color to material. This option covers all of the segments that make up a specific piece of an object. In the example below, a white paint color is applied to all of the segments of the bed post.
To Use All Segment Apply
- Click the Paint Colors or Materials tab and from the Apply drop-down menu, choose Wrap All Segments.
- Drag the color or material onto the object. The color or material you selected is applied to all of the segments.
Grouped Apply
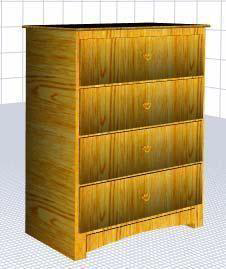
The Grouped Apply method applies the color or material to all of the object’s segments at once. In the example below, a wood material is applied to all of the surfaces of the dresser.
To Use Grouped Apply
- Click the Paint Colors or Materials tab and from the Apply drop-down menu, choose Entire Group.
- Drag the color or material onto the object. The color or material you selected is applied to the entire object.
Note: To control how shadows are rendered across an object with many facets, use Planar Mapping (Options menu > Planar Mapping); Surface Mapping will apply the shadow to each facet individually.
Matching Apply
Matching Apply replaces all like colors or materials with the new one. In the example below, a wood material is applied to one of the drawers, and all of the surfaces with the same material are updated.

To Use Matching Apply
- Click the Paint Colors or Materials tab and from the Apply drop-down menu, choose Matching.
- Drag the color or material onto the object. The color or material you selected is applied to all places matching the material you are replacing.
Using AutoClick Placement
AutoClick Placement allows you to tag the surfaces where you want a color or material applied and then apply it to all of the tagged surfaces at once. This offers flexibility in choosing only certain surfaces on one object or different surfaces on multiple objects in your design.
Note: To apply materials, paint, and colors, Shaded view should be turned on. For more information on views, see “Using Different Views”.
To apply a series of the same color or material
- Click the Paint Colors or Materials tab and choose the category you want. Options appear in the Preview Bar.
- From the Apply drop-down menu, choose AutoClick Placement.
- Click the color or material you want to apply and then click each surface where you want the color or material applied.
- Click the right mouse button to end. The color or material you selected is applied to each surface.
Using the Decorator Palette

Punch! Decorator Palette allows you to construct lists of commonly-used colors and materials so they can be easily used throughout your design. Each palette is divided into as many as 15 groups, allowing you to assign each group to a room or other aspect of your design.
After you’ve created your palette in the main program, you can access it while working in 3D Custom Workshop.
For more information, see “Using the Decorator Palette”.
Searching for Colors or Materials
If you see a color or material you want to match or have forgotten which library the color or material you want is stored in, you can use the Select Material/Color Tool to automatically find the library in which the color or material appears.
To find a material or color
- Click the Select Material/Color Tool. Your cursor changes to an eye-dropper as you move it over the design window.
- Click the material or color you want to search for. The material, or color, is displayed on the Preview Bar.