How to Create a Custom Lesson
Mavis Beacon Teaches Typing provides a selection of tools to help you create your own lessons. Follow the instructions below to create a new lesson with the Custom Lesson Designer.
Click New to begin.
Enter a name for your lesson in the Create Lesson Title Here dialog box where it says “Type Here.” Then click OK to accept or Cancel to start over.
![]()
Now, select the text for your lesson by clicking the Change button to left of the Lesson Text preview box. The Lesson Text dialog box displays.![]()
To import your own text, make sure that it has been saved as a text file (or in ASCII file format) to the directory or folder of your choice (for example, samptext.txt). Then click the button next to the Import Your Own Text option.
NOTE: If you do not want to import your own text for the custom lesson, skip steps 4‐6 of this section.
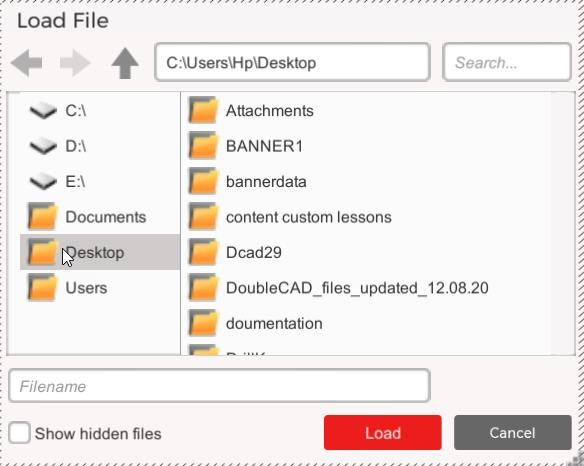
An Import a File dialog box displays allowing you to browse your computer for the file. Select the file and click Open.
- Once you have selected the text you want to use, click OK. You return to the Custom Lesson Designer screen where you can review the text you have selected in the Lesson Text preview box.
- You can also use text from a selection on the Create from Mavis Beacon Content list by clicking the button next to the title of your selection.
- Once you have selected the text you want to use, click OK. You return to the Custom Lesson Designer screen where you can review the text you have selected in the Lesson Text preview box.
4.You can change the Lesson Environment for your custom lesson by clicking the Change button to the right of the Lesson Text preview box. The Lesson Environment dialog box displays. The following options on the dialog box allow you to specify where in the program you want your custom lesson to appear: - Click the button next to Standard Lesson if you would like your lesson to appear on the My Lessons list when you select Custom Lesson in the Lesson Area. - Click the button next to Speed Test if you want your lesson to appear on the My Speed Tests list when you select Speed Test in the Lesson Area. - Click the button next to a game title in the Games section of the dialog box if you want your lesson to appear on the My Lessons list. When you select the custom lesson in the Lesson Area, your imported text appears in the game you have chosen.
![]()
5.Once you have chosen a Lesson Environment for your custom lesson, click OK. You return to the Custom Lesson Designer screen.
6.Next, you need to set the Lesson Limits for your custom lesson. You can move the sliders to adjust these settings:
7.The Time setting determines the amount of time you have to complete the lesson. You can increase the amount of time in one‐minute increments until you reach a maximum of 15 minutes. You can also set the time to Unlimited. The total amount of time you allow for the lesson appears in the Time Remaining clock on the Lesson Dashboard. When you start the lesson, the time counts down to zero. The lesson stops when the time runs out. If you leave the Time setting at zero, then the Time Remaining clock
counts up from zero, stopping when you complete the text selection or reach the 15‐ minute time limit.
8.The Errors setting determines the number of errors you can make before you fail the lesson. This number can range from 0 to 255.
9.The Words setting determines the number of words in the lesson. This number can range from 1 to 999.
The last area of customization in the Custom Lesson Designer is the Lesson Goals section. You can move the sliders to adjust these settings:
10.The WPM setting determines your target speed for the lesson. This number can range from 25 to 120.
11.The Accuracy setting determines your target accuracy for the lesson. This percentage can range from 50 to 100.
Once you have adjusted the Lesson Title, Lesson Limits, and Lesson Goals settings for your custom lesson, you have the following options:
Click the Start Lesson button on the lower‐right side of the screen to visit the Custom Lesson screen. You can preview your new custom lesson on this screen. Click Home on the Custom lesson screen and then select Custom Lesson Designer to return to the Custom Lesson Designer to make additional changes to your lesson.
- Click Cancel to abandon the custom lesson you just created, and then click Home to return to the Home screen.
- Click Save to save changes to your lesson. You must save lessons to access them later for editing or use in the Lesson Area.