PhotoView and PhotoView Editor
Punch! Home Design Software lets you import a digital photograph or a scanned image of your home and landscape around it. From cars to pets, windows to chimneys, doors to neighbors, you can customize your design to match your dreams. You can even place an imported image of your own backyard, so when you look out a window, your home.
With PhotoView Editor, you can apply different building materials onto your home’s picture. No redrawing walls, no adding windows and doors - just click and drag a new material onto your home!

Tips for Using PhotoView
Punch! Home Design Software’s PhotoView lets you take digital pictures and add them to your landscape design. Although this is a straightforward process, there are a few hints that will make the ultimate result much more satisfying.
-
Verify that the image is level and straight, when taking a digital picture or scanning a photograph. If the initial photograph is not straight, use your graphics software to rotate it in half-degree increments, until it is.
-
Photograph the feature when the sun is shining. This ensures more color saturation and detail of the image.
-
Double-check the dimensions when importing PhotoView images.
-
Take your time masking the image; the better the mask, the better the end result.
-
Images are placed in the center of the lot. When importing multiple images, move each image, as it is placed, to avoid stacking them on top of each other.
-
Images should touch the bottom of the image area. If it is centered in the area, it will float above ground level.
Importing PhotoView Images
Whether you want to import an image of your home’s facade to landscape around or you want to add a custom door or window, Punch! PhotoView makes it easy. You can import any image you want, even your pet or your neighbor.
To import PhotoView images
-
Click Design menu > Launch PowerTool. The PowerTool Launcher is displayed.
-
Click to select PhotoView and click Launch. The Open dialog box is displayed.
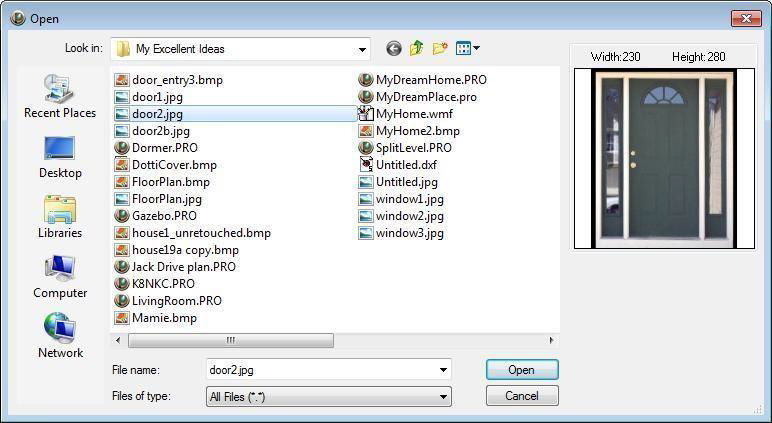
3. In the Look In box, type the name of the directory where your file is located, or search for the file by browsing folders or drives.
Note: As you scroll through the available images, when one is highlighted, it will be displayed in the preview box.
  4. When you find the file you want, click to select it.

  5. Click Open. The Properties dialog box is displayed.

6. Type width and height, in inches, or feet and inches, separated by a hyphen, then click
OK. Note: PhotoView Images appear as lines in the 2D window.
PhotoView Properties
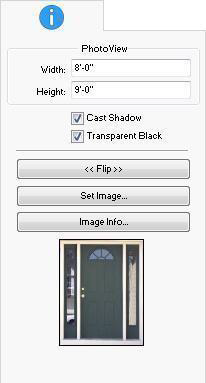
Once you have imported your PhotoView image, you have the option of further customizing its appearance. This can be done at any time during the design process. You can resize, change elevation, rotate, flip it, and perform other editing tasks. To edit a PhotoView image, click to select it in the design window and the PhotoView Properties are displayed.
Note: Always press the ENTER to accept new values in a text box.
1. Size defines the Width and Height, in inches or feet and inches, for the image. You can also resize an image manually by dragging an end point until the image is the size you want.
Note: Dragging an end point only changes the width of the image; to keep proportions accurate, update the Height value manually.
-
Cast Shadows checkbox controls if the imported image generates a shadow or not. When selected, the image casts a shadow; when deselected no shadow us cast.
-
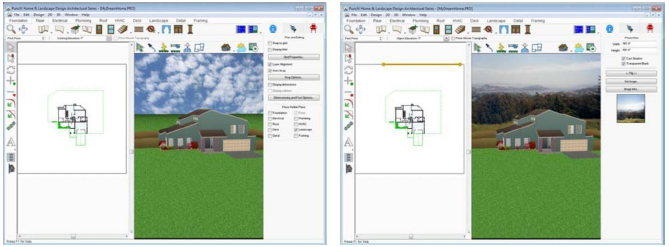
Transparent Black checkbox controls if black masking that has been added to an image is ignored to create a transparent area or if the black is displayed as part of the image.
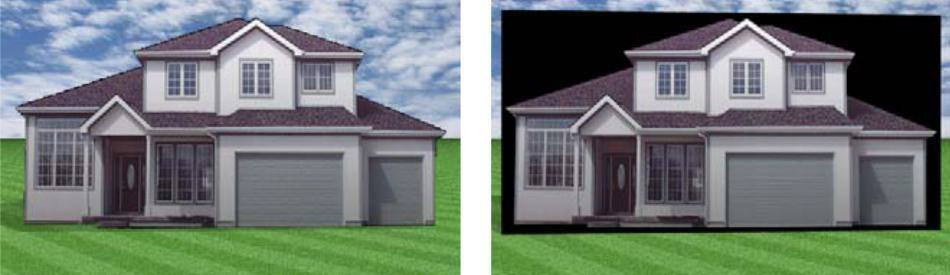
Transparent Black Enabled Transparent Black Disabled
-
Flip button flips the image horizontally.
-
Set Image button allows you to set a different image in your drawing. You can search for a new image and add it to the design, replacing the existing image (the dimensions remain the same).
-
Image Info button open the PhotoView Info dialog box, which shows the path where the file is located on your hard drive.
Tip: You may find it useful to store PhotoView images in the Content folder (C:Users
Landscaping Using PhotoView Images
One way to get started landscaping your yard is to import a PhotoView image of your home. You can then embellish your design with landscaping and other elements.
Note: It’s very important to input the correct dimensions of your home. For more information, see “To import PhotoView images”.
To landscape using PhotoView images
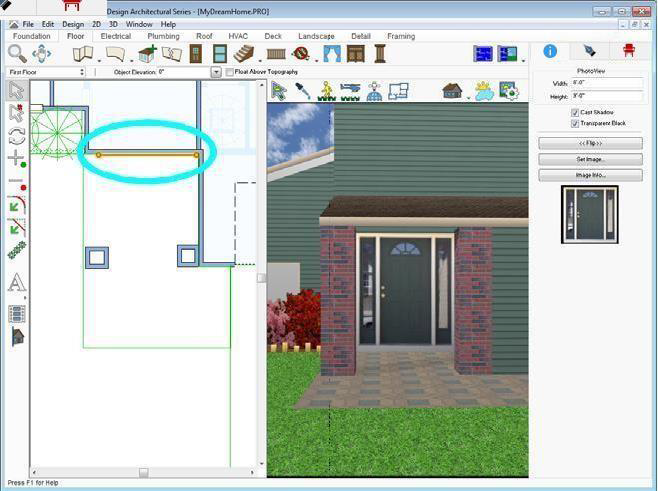
1. Import the image of your home, as explained previously, and open a 3D view window.
Note: It’s very important to input the correct dimensions of your home. For more information, see “To import PhotoView images”.
- Add landscaping (see “Landscape Plan Tab”) and plants (see “Plants Libraries”).
Note: PhotoView images appear in the 2D design window as lines, similar to interior walls.
Right in Your Own Backyard
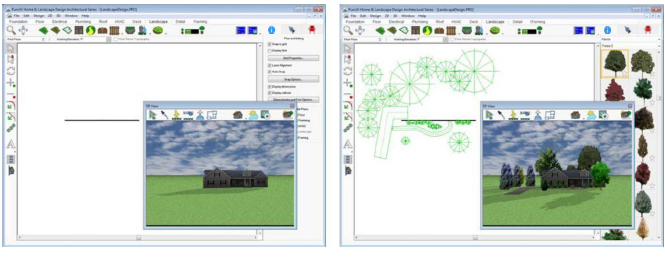
In Punch! Home Design Software you can even look out the window of your new home design and see your own backyard. By taking a digital picture of your backyard, you can position it so when you view your design in 3D View, you’re home.
Note: In the example above, the PhotoView image is the line at the top of the design window.
To view your own backyard
     1. Create your home design, using tools and techniques outlined in previous chapters and open a 3D view window.

     2. Import the image of your own backyard using PhotoView and adjust the position and size of the image as needed.
PhotoView Editor
You can now take a digital picture of your house and apply materials and colors directly to it with PhotoView Editor, then import it into Punch! Home Design Software.
Launching PhotoView Editor
     1. Click Design menu > Launch PowerTool. The PowerTool Launcher is displayed.

     2. Click to select PhotoView Editor and click the Launch button. The Open dialog box is displayed.

     3. In the Look In box, type the name of the directory where your file is located. Or search for the file by browsing folders or drives.

     4. When you see the name of the file you want to open, click to select it and then click OK.
To open a PhotoView image in PhotoView Editor
  1. Click to select the PhotoView image on the design window that you want to open in the PhotoView Editor

  2. Click Design menu > Launch PowerTool. The PowerTool Launcher is displayed.

  3. Click to select PhotoView Editor and click the Launch button. The image opens in the PhotoView Editor.
Editing Your PhotoView Image
With Punch! PhotoView Editor, you can draw shapes to color, fill, replicate, or add materials to your photograph. The four drawing styles available in PhotoView Editor are:
 Color Tools on this tab will create shapes that add a tint to your photograph.
 Fill Tools on this tab will completely replace the original color with a color of your choice.
 Replicate Tools on this tab copy what is on the original photograph, so it can be placed elsewhere.
 Material Tools on this tab completely replace the original material with a material of your choice.
Editing Shapes
All shapes drawn in PhotoView Editor can be edited in a variety of ways. They can be moved specified amounts, rotated, layered, edited, and even converted to other types of drawing shapes. Object-Level Editing is active by default. Object-Level Editing, along with Point-Level Editing, controls how your edits impact your object. If you are in object selection mode, changes affect the object as a whole. If you are working in point selection mode, each edge of the object is treated separately, as you edit.
To control layering
  1. Click the Selection Tool and then right-click a shape to select it.

  2. Click Bring to Front on the pop-up menu that is displayed to place the shape on the top of the other shapes.
Click Send to Back on the pop-up menu that is displayed to place the shape behind the other shapes.
To convert to another drawing style
  1. Click the Selection Tool and then right-click a shape to select it.

  2. Click Convert To on the pop-up menu that is displayed and then click to select the type of feature you want.
Editing Material Perspective
In addition to rotating, moving, and point-level editing, material shapes can be edited to conform to the perspective in the photograph. Click a shape to select it. This will activate Perspective Editing Mode. In this mode, there will be different colored controls that manipulate different things.
To adjust material perspective
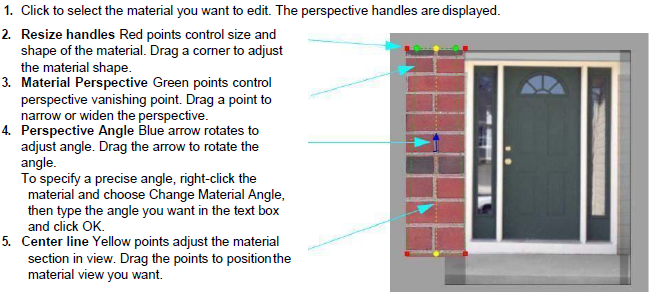
To specify a precise angle, right-click the material and choose Change Material Angle, then type the angle you want in the text box and click OK.
- Center line Yellow points adjust the material section in view. Drag the points to position the material view you want.
To flip material orientation
1. Right-click the material, then click Flip Material Orientation on the context menu that is displayed. The material orientation is flipped in a clockwise direction.
To restore the material, right-click the material then clicks Restore Material Orientation to reset the orientation back to the original direction.
To set the scale
1. Right-click the material, then click Change Material Scale on the context menu that is displayed. Type the new percentage(s) in the text box, then click OK.
To reset perspective changes
1. Right-click the material, then click Reset Material Attributes on the context menu that is displayed.
File Management
With PhotoView Editor you can save your personalized image as a new file or you can overwrite the existing file.
Saving an image
  1. Click File menu > Save Image as BMP. The Save Image dialog box is displayed.

  2. Type a file name in the File Name text box and click OK. This saves an image of your edited file. Overlays you’ve added are saved as part of the image.
Opening an overlay mask
  1. Click File menu > Open Overlay Mask. The Open Overlay Mask dialog box is displayed.

  2. In the File Name text box, type the name of the file you want to open, or search other folders or drives.

  3. When you see the name of the file you want to open, click to select it.

  4. Click OK. This opens an overlay design you previously saved.
Saving an overlay mask
  1. Click File menu > Save Overlay Mask. The Save Overlay Mask dialog box is displayed.

  2. Type a file name in the File Name text box and click OK. This saves the overlay design you’ve added to the image. You can later open this overlay and edit it further, if needed.
Opening a custom color list
  1. Click File menu > Open Custom Color List. The Open Color List dialog box is displayed.

  2. In the File Name box, type the name of the file you want to open or search other folders or drives.

  3. When you see the name of the file you want to open, click to select it.

  4. Click OK. This opens a colors palette you previously saved.
Saving a custom color list
Note: For information on creating custom colors, see “To define a custom color”.
  1. Click File menu > Save Custom Color List. The Save Color List dialog box is displayed.

  2. Type a file name in the File Name text box and click OK. Changes to the Colors palette are saved.