Estimator
Punch! Home Design Software keeps track of building materials, as you design your home. Estimator continually and automatically tallies your expenses and building materials. This information is presented in an editable, printable, exportable spreadsheet format. Estimator also utilizes the Plan Tabs from Punch! Home Design Software, so you can easily find the materials for a specific part of your design.
As you input the material costs for your area, Estimator calculates the subtotals of each size door and window, each plant type, including sod, roofing materials, and roof trusses, and computes the grand total for the entire project.
You can even create custom pricelists, so you use appropriate vendors or wholesalers for specific parts of the job. This may be especially useful if you plan to renovate just one or two rooms. Punch! Estimator calculates each room separately, too.
Launching Estimator
Punch! Home Design Software includes an extremely versatile PowerTool called Estimator. Estimator inventories almost every feature of your design. Prices may be higher during the peak building season and will depend on the part of the world where you are building your new home. You can obtain specific costs from your local supplier or contractor.
Launching Estimator
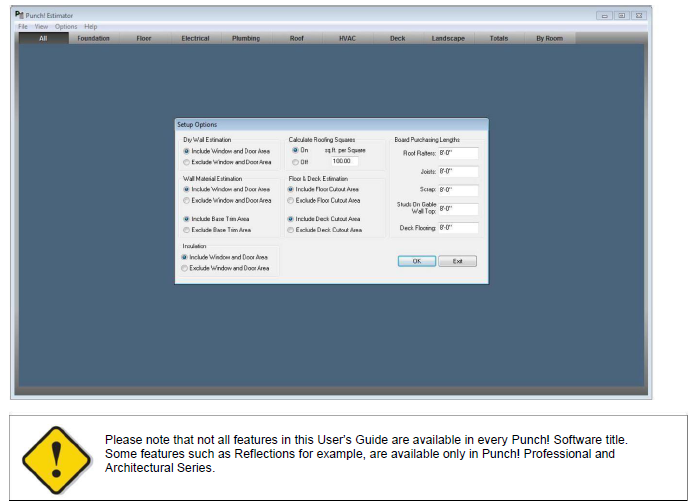
- Click Design menu > Launch PowerTool, then choose Estimator and click Launch. The Setup Options window is displayed.
- Edit the options for your estimate as needed and click OK to open the plan estimates.
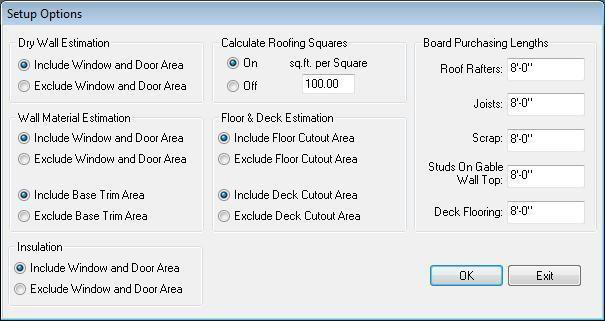
Dry Wall Estimation By default, Estimator will estimate dry wall usage, without regard to where doors or windows are placed. Choose Exclude Window and Door Area if you want to subtract those areas from the calculation.
Wall Material Estimation By default, Estimator will make estimations, without regard to where doors or windows are placed or whether or not the walls have base trim. Choose Exclude Window and Door Area and/or Exclude Base Trim Area if you want to subtract those areas from the calculation.
Insulation By default, Estimator estimates insulation needed, without regard to where doors or windows are placed. Choose Exclude Window and Door Area if you want to subtract those areas from the calculation.
Calculate Roofing Squares By default, Estimator will estimate the number of roofing squares needed for your design. Choose Off if you do not need this calculation.
Floor & Deck Estimation By default, Estimator makes floor and deck estimates without regard to where cutout areas are placed. Choose Exclude Floor Cutout Area or Exclude Deck Cutout Area if you want to subtract those areas from the calculation.
Customizing the Spreadsheet
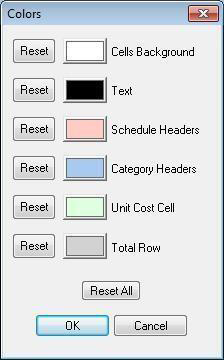
You may find it easier to use or read the data if you change the colors of specific areas of your spreadsheet. Punch! Home Design Software makes this easy. You can assign any color you want to certain parts of the spreadsheet.
To customize colors
-
Click Options menu > Set Colors. The Colors dialog box is displayed showing the customizable sections of the estimate.
-
Click the color block next to the feature you want to customize. The Color dialog box is displayed.
-
Click one of the Basic or Custom colors or click on the color spectrum block to select a color.
-
(optional) Adjust the current Red, Green, and Blue values to create a custom color.
-
(optional) Click an area on the color spectrum window to select a color, then adjust the RGB values, if necessary.
-
Click OK. The color you defined is displayed on the color block on the Colors dialog box.
-
Click OK. The color is applied to the spreadsheet.
To reset a color back to the default
-
Click Options menu > Set Colors. The Colors dialog box is displayed.
-
Click the Reset button next to the feature you want to reset to the default color. Then click
OK. (optional) Click the Reset All button to reset all colors then click OK.
Selecting a Plan Tab
Estimator will automatically display features and materials used on all plan tabs of your design. You can choose to estimate specific areas of your design, for instance just the HVAC materials or just the materials for your deck.

To select a plan tab
- Click the plan tab you want to use. The plan tab is selected and the materials list for that tab appears.
(alternatively) Click View menu > Estimates then click the individual plan you want.
Calculating Construction Costs
Estimator automatically calculates the total square footage for each floor of your design. The Construction Cost Per Square Foot is dependent upon variables specific to your area. You can obtain specific costs from your local supplier or contractor.
To calculate construction costs
-
Click the Unit Cost cell (green cell) next to Construction Square Foot Cost.
-
Type the estimated cost.
-
Press ENTER. Punch! Home Design Software automatically calculates the total and places it in the grey-shaded cell across from Total Cost.
Completing the Various Schedules
Estimator catalogs the features of your design that appear on each Plan Tab. From cubic yards of concrete, for a slab foundation, to light switches, everything is displayed on individual lines and calculations are based upon prices that you obtain from a building supply company near you.
To complete Estimator schedules
-
Click the green-shaded cell for the Unit Cost of each material or feature of your design.
-
Type the estimated cost.
-
Press ENTER. Punch! Home Design Software automatically calculates the total and displays it in the Total Cost column, then keeps a running Grand Total of each schedule.
Note: Use the arrow keys, on your keyboard, to move around your spreadsheet.
Creating a Master Pricelist
Estimator saves the prices you enter in a master pricelist file to make it easy to create a new estimate, after making alterations to your design. In addition, you can create individual pricelists for each building supply company, vendor, or wholesaler that you make purchases from.
To store a master pricelist
-
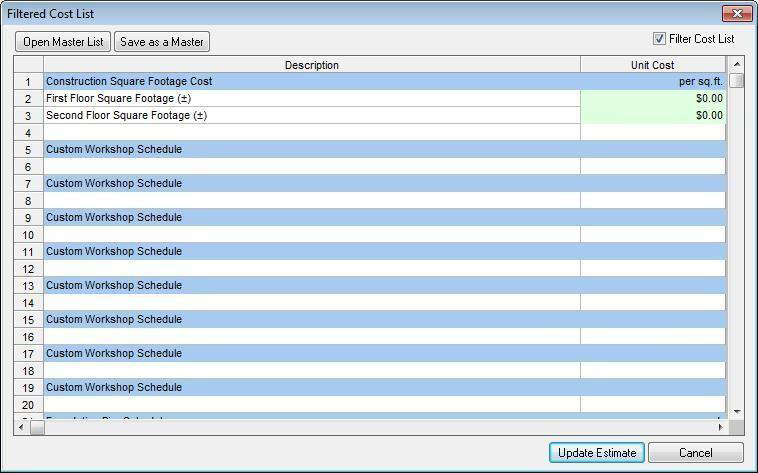
Click View menu > Plan Cost List. The Filtered Cost List menu is displayed.
-
Type the costs from the source where you plan to purchase materials.
-
Click Save as a Master when you have finished updating your prices. The Save As dialog box is displayed.
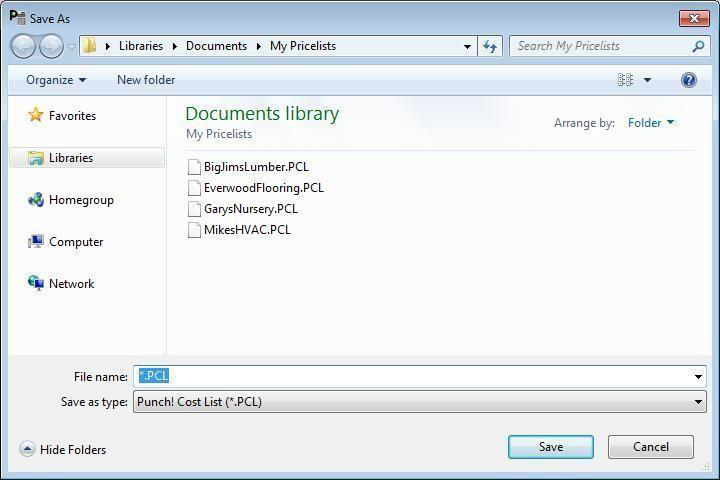
- Type a file name in the File Name text box and click Save. The file extension is added automatically. (optional) If you want to save the drawing to a different drive or folder, click a different drive
and folder or type the complete path in the File Name text box. Click Save.
To open a master pricelist
-
Click View menu > Plan Cost List. The Filtered Cost List menu is displayed.
-
Click Open Master List. The Open dialog box is displayed.
-
Type a file name in the File Name text box or click to select the Master List you want to use. Click Open.
Exporting a Pricelist
You can export the information contained in an Estimator spreadsheet so you can use the information in other programs, such as Microsoft Excel or Quickbooks. You can even display your pricelist on the web!
To export a pricelist
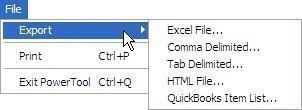
-
Click File menu > Export then click either Excel File, Comma Delimited, Tab Delimited, QuickBooks Item List, or HTML. The Save As dialog box is displayed.
-
Type a file name in the File Name text box; the extension is automatically added. Click Save.
Note: All necessary graphics are copied to the directory where you save the HTML file. You will need to upload all files
to your web server to make them available to be viewed by others.
Printing a Pricelist
You can print pricelists any way you need them. There are many ways to customize your estimations.
To print a pricelist
- Click File menu > Print. The Print Preview Setup dialog box is displayed.
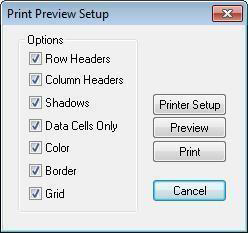
- Click to check the options you want to have printed and uncheck any options you don’t want to print. (optional) Click Printer Setup to specify which printer you want to use. For more information
on printer setup,
(optional) Click Preview to see what the page will look like before you actually print it.
- Click Print when you have finished setting the options.