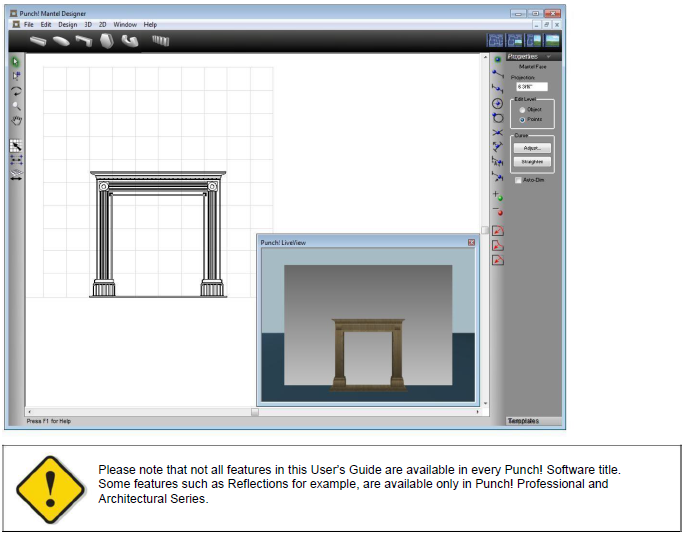
Mantel Designer
The Punch! Mantel Designer gives you the freedom to create extravagant, customized mantel designs. Using shapes or pre-designed templates, you can add a uniqueness to your fireplace, one that defines your personality and creates the look and feel only you could create.
Mantel Designer
Punch! Mantel Designer allows you to create unique mantels to customize the look of your fireplace. You can use 2D shapes to draw the mantel of your dreams or use pre-drawn templates to customize your fireplace.
To launch the Punch! Mantel Designer
-
Click Design menu > Launch PowerTool. The PowerTool Launcher is displayed.
-
Click to select Mantel Designer and click the Launch button. The Mantel Designer is launched and the Welcome window is displayed.
Drawing Mantel Shapes
Using tools provided in Mantel Designer, you can create a variety of mantel shapes. To begin, launch the Mantel Designer.

Rectangular Mantel Face Tool

Creates a rectangular or square mantel face. These are created using the same drawing method as rectangles and squares. For more information, see “Drawing Rectangles and Squares”. You can edit its properties on the Properties tab before or after you’ve drawn the shape.
Circle/Oval Mantel Face Tool

Creates a circular or oval-shaped mantel face. These are created using the same drawing method as circles and ovals. For more information, see “Drawing Circles and Ovals”. You can edit its properties on the Properties tab before or after you’ve drawn the shape.
Polygon Mantel Face Tool

Creates a user-defined mantel face made of polylines. These are created using the same drawing method as polygons. For more information, see “Drawing Polygons”. You can edit its properties on the Properties tab before or after you’ve drawn the shape.
Multigon Mantel Face Tool

Creates a multigon-shaped mantel face. These are created using the same drawing method as multigons. For more information, see “Drawing Multigons”. You can edit its properties on the Properties tab before or after you’ve drawn the shape.
Curved Mantel Face Tool

Creates a user-defined mantel face made of curves. These are created using the same drawing method as curves. For more information, see “Drawing Curves”. You can edit its properties on the Properties tab before or after you’ve drawn the shape.
Dental Mantel Face Tool

Creates a line-shaped dental face. These are created using the same drawing method as lines. For more information, see “Drawing Lines”. You can edit its properties on the Properties tab before or after you’ve drawn the shape.
Editing Your Mantel Design
Mantel Designer offers multiple ways to customize your mantel. You can control the shape and size, as well as control your mantel’s appearance by shaping element edges and projecting elements to create a look all your own.
After you’ve created a mantel shape, click the shape to select it. Its properties are displayed on the Properties Bar.
Note: Always press ENTER to accept new values in a text box.
-
Projection defines the distance the shape projects from the surface.
-
Edit Level Select Object to resize the whole object or Points to edit individual points on the shape. For more information, see “Editing Detail Shapes”.
-
Curve options control curvature. For more information, see “Changing Curve Tension”.
-
Auto-Dimension checkbox controls the displays of dimensions in 2D. When selected, dimensions are displayed.
Note: Dimensions are not available for Oval/Circle or Curved mantel shapes.
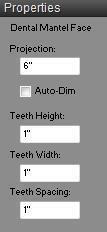
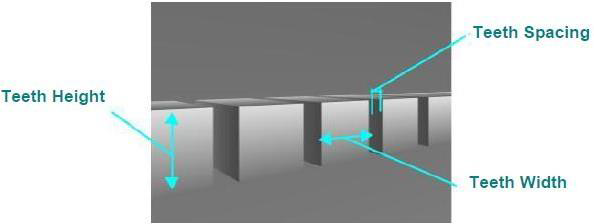
Dental Mantel Face Properties
Dental mantel face is defined by its projection as well as the size of the teeth along the shape.
Note: Always press ENTER to accept new values in a text box.
- Projection defines the distance the shape projects from the surface.
- Auto-Dimension checkbox controls the displays of dimensions in 2D. When selected, dimensions are displayed.
- Teeth Height defines the distance from the bottom of the dental face line to the top.
- Teeth Width defines the distance from one side of a block in the line to the other side.
- Teeth Spacing defines the distance between each block in the dental face line.
Editing Your Mantel Design
Rather than draw each geometric feature of your mantel separately, use Mantel Designer’s editing tools to reshape, reposition, re-orient, or even join existing mantel elements. You can manipulate shapes to match your custom design by inserting or removing points and rounding or chamfering corners. Join tools allow you to join lines, arcs, and polylines into a single entity for editing purposes.
For more information on flipping and mirroring, see “Flipping & Mirroring Elements”. The following options are available for editing your door design:
 Selection Tool (For more information, see “Moving a Selection” and “Reshaping and Resizing 2D Objects”).
 Rotate Tool (For more information, see “Rotating a Selection”)
 Resize Segment Tool (For more information, see “Changing Segment Length”)
 Add Point Tool (For more information, see “Editing Detail Shapes”)
 Remove Point Tool (For more information, see “Editing Detail Shapes”)
 Fillet Tool (For more information, see “Editing Detail Shapes”)
 Inverted Fillet Tool (For more information, see “Editing Detail Shapes”)
 Chamfer Tool (For more information, see “Editing Detail Shapes”)
Flipping & Mirroring Elements
The Flip function takes the original component and reverses it either horizontally or vertically. Mirror works similarly to the Flip function. The difference is that mirror leaves the original and makes a duplicate. Mirror creates two identical components facing one another.
For more information, see “Flip and Mirror”.
Using Snaps to Draw Mantel Elements
Punch! Home Design Software includes the power of snaps. With snaps, you can define exactly what distance mantel elements are placed from other mantel elements. You can TAB through the Snaps Toolbar. Each time you press TAB, the next Snap Tool is activated, SHIFT+TAB reverses the process.
Note: Each Snap Tool defaults back to “No Snap” after it is used; double-clicking the Snap Tool will lock it in active mode.
For more information on using the snap tools, see “Using Snaps to Draw Components”.
Tracing an Image
If you already have an image that shows the mantel design you want—for instance a scanned mantel drawing— Mantel Designer lets you trace mantel designs directly over that image. Simply import the image, position it in the drawing, then use one of the mantel faces tools to trace the image.
For more information, see “Import a Floor Plan Image”.
Controlling Your 2D View
While creating your mantel design, you’ll use a variety of tools and views, so it will be helpful to be able to adjust your 2D view, quickly, to accommodate your needs. You can pan, or move, across your entire design using the Pan Tool, zoom in and out to focus on specific areas, as well as quickly fit your entire design within the 2D window.
For more information, see “Viewing the 2D Plan”.
LiveView Window Options
LiveView offers three different 3D views for you to see your design as you’re creating. The LiveView window can be repositioned and resized at any time during the design process. The LiveView window sizes are accessible through buttons in Mantel Designer, and by right-clicking on the 2D workspace.
For more information, see “Working with 3D Views”.
Navigating in 3D
You can navigate through your 3D view using a Walk-Through and Fly-Around feature. You can adjust your viewing elevation, and even anchor your position using the Controlled navigation tools.
As you’re navigating, you can adjust the speed at which you’re moving and adjust the size of the camera angle. For more information, see “Moving Around in 3D”.
Adjusting 3D Lighting
You can control the lighting settings of your 3D view in Mantel Designer.

To adjust lighting intensity in a 3D view
-
Click 3D menu > 3D Lighting. The 3D Lighting dialog box is displayed.
-
Adjust the sliders to control Intensity and Brightness and then click OK.
Using Templates
Punch! Mantel Designer provides pre-made mantel designs for you to quickly place in your drawing. You can also create and manage your own templates, which is extremely useful when working with multiple mantels throughout multiple designs. The Template Organizer allows you to manage all of your templates; you can move them between categories, rename templates and categories, and delete templates and categories.
To use templates
-
Click the Templates tab. The mantel templates are displayed.
-
Drag and drop a template onto the workspace.
Note: The position of your cursor, when you drag and drop a template, determines the center of the design.
To organize templates
-
From the Templates drop-down menu, click Template Organizer.
-
On the left side of the Organizer, select a category from the drop-down menu.
-
On the right side of the organizer, select a category from the drop-down menu.
-
Click on the name of the template you want to move.
-
Click the navigation arrows to move templates from one category to another.
To change template info 
- Select the mantel template you want to change and click the Info button, under Template. The Template Info dialog box is displayed.
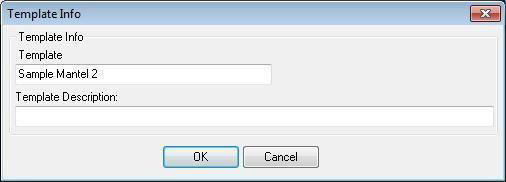
- Type the name you want in the Template text box.
- Type a description in the Template Description text box.
- Click OK.
To delete a template
-
Click the template you want to delete to select it.
-
Click the Delete button, under Template. A confirmation box is displayed.
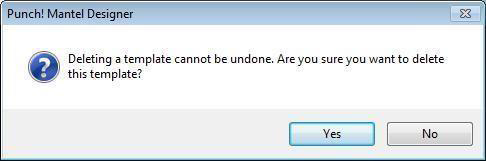
- Click Yes to permanently delete the template from the library.
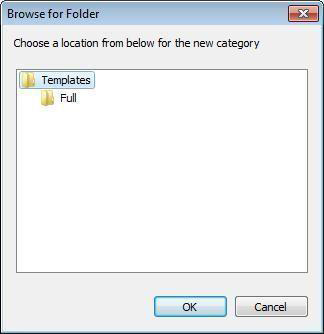
To create a new mantel category
- Click the New button under Category. The Browse for Folder dialog box is displayed.
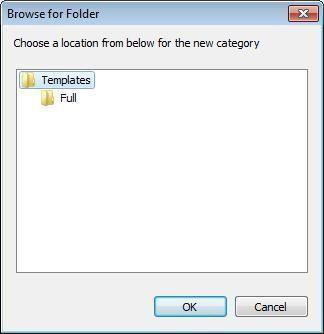
- Select a folder for the location of your new category and click OK. The Category Name dialog box is displayed.

- Type the name of your new category in the Category Name text box and click OK. Your new category is displayed on the right side of the Organizer.
To delete a category
- Click the Delete button under Category. The Browse for Folder dialog box is displayed.

- Select the category you want to delete and click OK. The delete confirmation box is displayed.
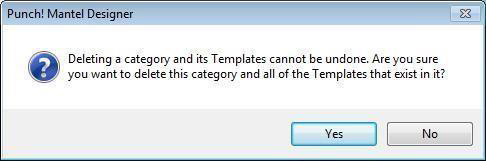
- Click Yes to permanently delete the category and its templates from the Organizer.
To rename a category
- Click the Rename button under category. The Browse for Folder dialog box is displayed.
- Select the category you want to rename and click OK. The Category Name dialog box is displayed.
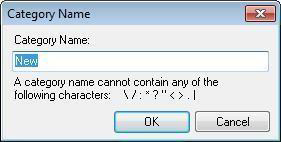
- Type the new name in the Category Name text box and click OK. The new category name is displayed in the Organizer.
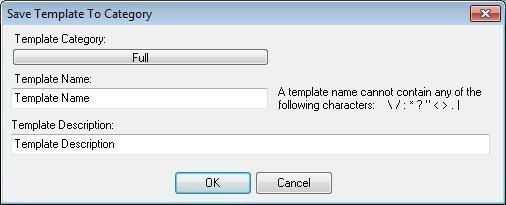
To create a mantel template
-
Create a mantel design you want to save as a template and click the Templates Tab. Templates are displayed on the Properties Bar.
-
Click the Template Library drop-down menu and select Create Template. The Save Template To Category dialog box is displayed.
-
Click the Template Category drop-down menu to select the category where you want to save your mantel template.
-
Type the name of your mantel in the Template Name text box.
-
Type a description of your mantel in the Template Description text box.
-
Once you’ve finished entering the information about your new mantel, click OK. Your design is displayed on the Templates Properties Bar.
Tip: Use the Templates drop-down menu to navigate through your categories quickly.
Exporting to 3D Custom Workshop
By exporting a mantel created using Mantel Designer to 3D Custom Workshop, the smallest details can be added or altered. For more information, see “3D Custom Workshop”.
To export a mantel to 3D Custom Workshop
-
Click File menu > Export to Custom Workshop. The Save As dialog box is displayed.
-
In the File Name text box, type a name. Mantel Designer automatically adds the POB extension. Click OK.
Note: You may then open the file in 3D Custom Workshop.