Markup
Markup tools are used to add comments or notes to a drawing. Markup tools are often used during the design review process. Shark provides a variety of markup tools including pens, markers, clouds, and callouts. In addition to tools for marking up a drawing, tools exist for making a table of changes and status. The Markup tool palette is accessed from the Window menu. From left to right the Markup tool palette provides the following functions. Pencil
Marker
RevisionCloud
Balloons
Measure
Markup

Markup Settings
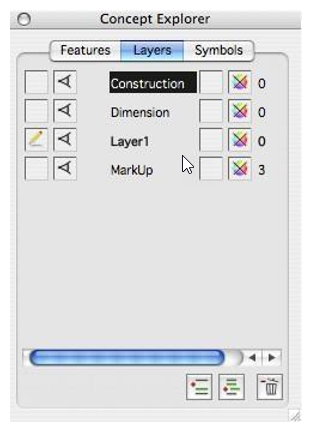
Markup annotations are assigned to the Markup layer.
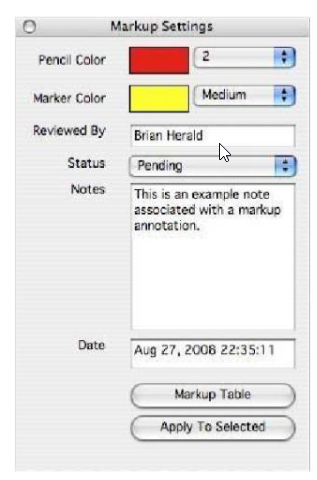
Markups also have pen attributes located in the Markup Settings dialog box. These attributes include pen and fill color and pen and marker thickness. The Markup Settings dialog box also includes the name of the reviewer, status, notes, and a date. Selecting an existing markup annotation will update the Markup Settings dialog to the selected entity. Use the Apply to Selected to change an existing markup attribute.
Pencil
The Pencil is used to draw a freehand line about a point of interest. The Pencil tool uses the Pencil Color and Pencil thickness attributes located in the Markup Settings dialog box for pen attributes. Reviewer, status, notes, and date attributes are attached to the resulting annotation.
Press the Option/Ctrl button to automatically close the pencil markup.
Using the Pencil tool
Click the Pencil tool.
On the workspace, click, and with your mouse button down, drag to define the pencil markup. The markup appears as dotted lines, as you are dragging, but will become a solid line when you finish. Release to finish.
Marker
The Marker tool creates two types of marker attributes. The first type is a rectangular marker defined by opposite corner diagonals. The second type is a line marker defined by a start and endpoint. The Marker fill color and the Line Marker thickness is set in the Marker Settings dialog box.
Using the Rectangular Marker tool
Click the Marker tool.
On the Prompt Window, drag through the sub-•toolset and choose the Rectangular Marker tool.
Click to set the start point.
Drag to extend the rectangle to the size you want.
Click to finish and place the rectangle.
Using the Line Marker tool
Click the Marker tool.
On the Prompt Window, drag through the sub-•toolset and choose the Line Marker tool.
Click to set the start point.
Drag to extend the line to the length you want.
Click to finish and place the rectangle.
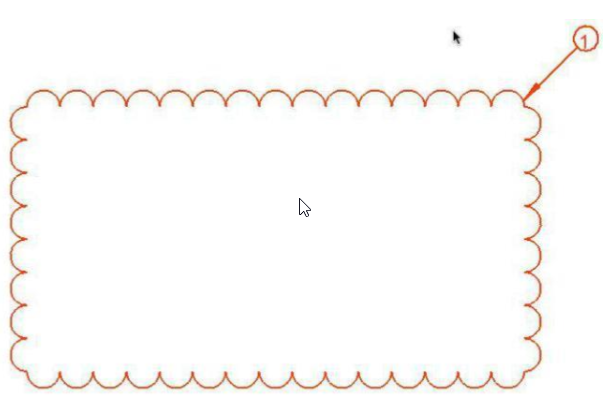
Revision Cloud
A Revision Cloud is a standard annotation in engineering, architecture, and construction for depicting a design or drafting change. Three types of revision clouds are supported which include:
Cloud Rectangle
Cloud Ellipse
Cloud Freehand

Using the Cloud Rectangle tool
Click the Revision Cloud tool.
On the Prompt Window, drag through the sub-•toolset and choose the Cloud Rectangle tool.
Click to set the start point.
Drag to extend the cloud to the size you want.
Click to finish and place the cloud.
Using the Cloud Ellipse tool
Click the Revision Cloud tool.
On the Prompt Window, drag through the sub-•toolset and choose the Cloud Ellipse tool.
Click to set the start point.
Drag to extend the cloud to the size you want.
Click to finish and place the cloud.
Using the Cloud Freeform tool
Click the Revision Cloud tool.
On the Prompt Window, drag through the sub-•toolset and choose the Cloud Freeform tool.
Click and, with your mouse button down, drag to define the shape of the cloud.The markup appears as dotted lines as you are dragging, but will become a solid line when you finish. Release to finish and place the cloud.
Balloon
The Balloon tool creates callout dimensions with labels and attaches to markup entities. The Balloon identifiers are useful for associating markup changes in a markup table.

Using the Balloon tools
Click the Balloon tool.
On the Prompt Window, drag through the sub-•toolset and choose the Balloon tool you want.
On the workspace, click to where you want the balloon to point.
Drag to where you want the notation and click. You can edit the balloon’s content on the Prompt Window.
Measure
The Measure tool creates a parallel dimension between two points in a drawing.
Using the Measure tool
Click the Measure tool.
On the workspace, click to set the dimension start point.
Drag, to extend to the length you want, and click to place the dimension.
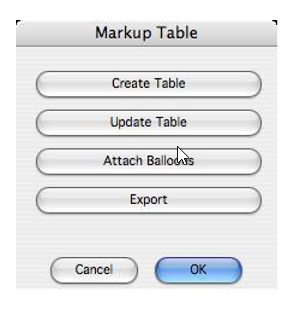
Markup Table
The Markup Tables provide a means to identify the markups and status for a reviewed document in a table format. The Markup Table dialog displays four buttons providing the following features.
Create Table
Creates a table of markup annotations listed by Item number.
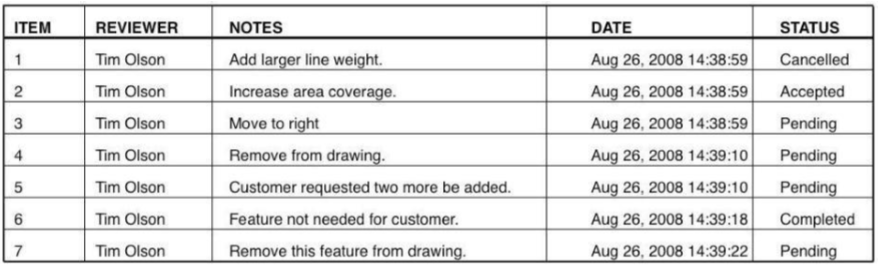
Update Table
Updates an existing table for markup changes since the last time the table was created.
Attach Balloons
Attaches balloon annotations to markup entities.
Export
Exports a table of markup annotations as a comma delimited text file suitable for reading into Excel or other spreadsheet programs.
Hide All Tools
A Hide All Tools option quickly hides all dialogs and tool palettes from the application. Hitting again will restore the dialogs and tools. It works especially well with photo rendering in the follow example:
Select the Hide All Tools option.
Render using your favorite Render Command.
View entire screen.
Select the Hide All Tools option to get back to work.
Minimize
Minimize the current design window.
Rotate Forward
When multiple design windows are active, Rotate Forward will bring forward the window created prior to the currently active window. So if the current window was the second window opened, Rotate Forward will make the first design window the active window. If the active window was the first window created, Rotate Forward will activate the most current window created.
Rotate Backward
When multiple design windows are active, Rotate Backward will bring forward the window created after the currently active window. So if the current window was the second window opened, Rotate Backward will make the third design window the active window. If the active window is the most current window, Rotate Backward will activate the first window created.
Bring All To Front
This option maximizes all the windows that have been minimized.
Tile Vertically
Rearranges and sizes all open drawing windows as columns. PC Only.
Tile Horizontally
Rearranges and sizes all open drawing windows as rows in a single column. PC Only.