View
The View menu contains commands for changing and creating view orientations, zooming, and assigning OpenGL settings.
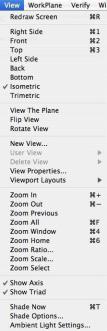
Redraw Screen
Refreshes the drawing window.

Right Side
The Right Side option will change the view orientation to view the y, z plane looking down the x axis. The view normal for this orientation is x = 1, y = 0, z = 0.

Front
The Front option will change the view orientation to view the x, z plane looking down the y axis.
The view normal for this orientation is x = 0, y = -1, z = 0.

Top
The Top option will change the view orientation to view the x, y plane looking down the z axis.
The view normal for this orientation is x = 1, y = 0, z = 0.

Left Side
The Left Side option will change the view orientation to view the y, z plane looking down the x axis. The view normal for this orientation is x = -1, y = 0, z = 0.

Back
The Back option will change the view orientation to view the x, z plane looking down the y axis.
The view normal for this orientation is x = 0, y = 1, z = 0.

Bottom
The Bottom option will change the view orientation to view the x, y plane looking down the z axis.
The view normal for this orientation is x = 0, y = 0, z = -1.

Isometric
The Isometric option will change the view orientation to view the x, y plane looking down the z axis. The view normal for this orientation is x = .577, y = -.577, z = .577.

Trimetric
The Trimetric option will change the view orientation to view the x, y plane looking down the z axis. The view normal for this orientation is x = .76, y = -.512, z = .39.
Navigator
The Navigator is a viewing tool independent of your drawing. The Navigator has two viewing modes: Sphere Mode and Step Mode. To toggle between the two modes, click the Step Mode or Sphere Mode button in the top right corner of the dialog.
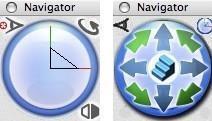
Sphere Mode Step Mode
Navigator Modes
Views
The Navigator dialog’s Views drop-down is available while in Sphere Mode, from the bottom right corner. It allows you to quickly choose one of the 8 saved views or choose DynView to drag the Navigator and set your view.
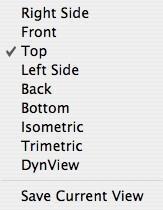
Views drop-down
DynView
To activate DynView, use the Navigator to change your orientation. DynView also appears on the View drop-down. Each mode has rotation options which control the type of rotation
and the origin of rotation.
Using the DynView setting you can manually control your view, either by dragging the Navigator in Sphere Mode or by clicking stepper controls to change your orientation in Step Mode.
To auto-rotate, click the Steps in the center of the Navigator while in Step Mode, then choose a direction. Your view automatically rotates in that direction until you click the Steps again.
Sphere Mode Rotation Options
In the top left corner of the Navigator dialog, click the Rotation Options button.
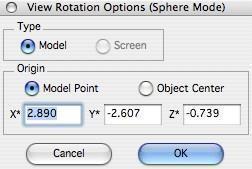
In Sphere Mode, Model is the only rotation type available. You can select your rotation’s point of origin by selecting either Model Point or Object Center. Using Model Point, you select a location on the design window or enter coordinate values in the text fields. Using Object Center, you select the object you want to use as your origin of rotation.
Step Mode Rotation Options
In the top left corner of the ViewBall dialog, click the Rotation Options button.
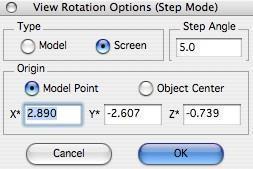
In Step Mode, you can select the rotation type, either Model or Screen. Model axis use the red/green/blue x, y, and z axis. Screen rotations are horizontal and vertical, relative to the monitor.
With Step Angle, you can define the increment that the object will rotate when you press the arrow keys.
Using Model Point, you select a location on the design window or enter coordinate values in the text fields. Using Object Center, you select the object you want to use as your origin of rotation.
Save View
You can save views using the Navigator. From the Views drop-down, choose Save Current View. View The Plane
This option will change the view to that associated with the current work plane. The eye point is taken 500 units out along the work plane normal. The reference point is taken as the work plane origin.
Flip View
The Flip View command will change the current view by flipping the eyepoint to the other side of the view plane. Internally, the view normal changes the sign of its direction. For example, flipping the top view will yield the bottom view and flipping the front view will yield the back view.
Rotate View
The Rotate View command rotates the eye point 180 degrees about the up vector.
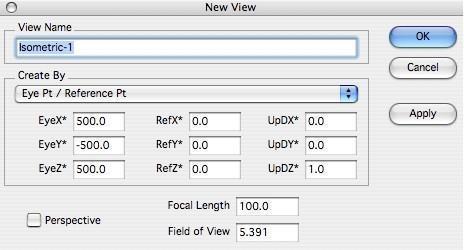
New View
The New View option provides a means to create custom user defined views. Options are described below:
ViewName
Create By
Perspective Field of View
Focal Length
Assigns a user specified name to the particular view. This name appears in the drop- downs that identify the view.
A pull down menu that determines the method for specifying the eye point, reference point, and up vector. Methods exist for specifying these values as:
Eye Pt Reference Pt
Azimuth/Elevation
Rotation relative to current view
Sets a flag indicating whether this view has Perspective enabled.
The Field of View entry is a value that represents the angular value associated with the eye point, reference point, and viewable area. Small fields of view imply you are far away from an object.
The Focal Length is the distance between the eye point and reference point.
This value is only used in perspective mode.
User Views
The User Views Menu option provides a means to access user-defined views. When selected, a submenu will appear with all the user-defined views. Simply pick one and the current view is changed to the selected view.
Delete View
The Delete View command is used to delete user defined views. Select the view to delete from the submenu and the view will be permanently purged from the file.
Tip: There is no undo for this operation.
View Properties
The View Properties dialog box will display all relevant information associated with the current view. In the case of user defined views you can use this dialog to modify values. The dialog displayed is the same used in creating new views.